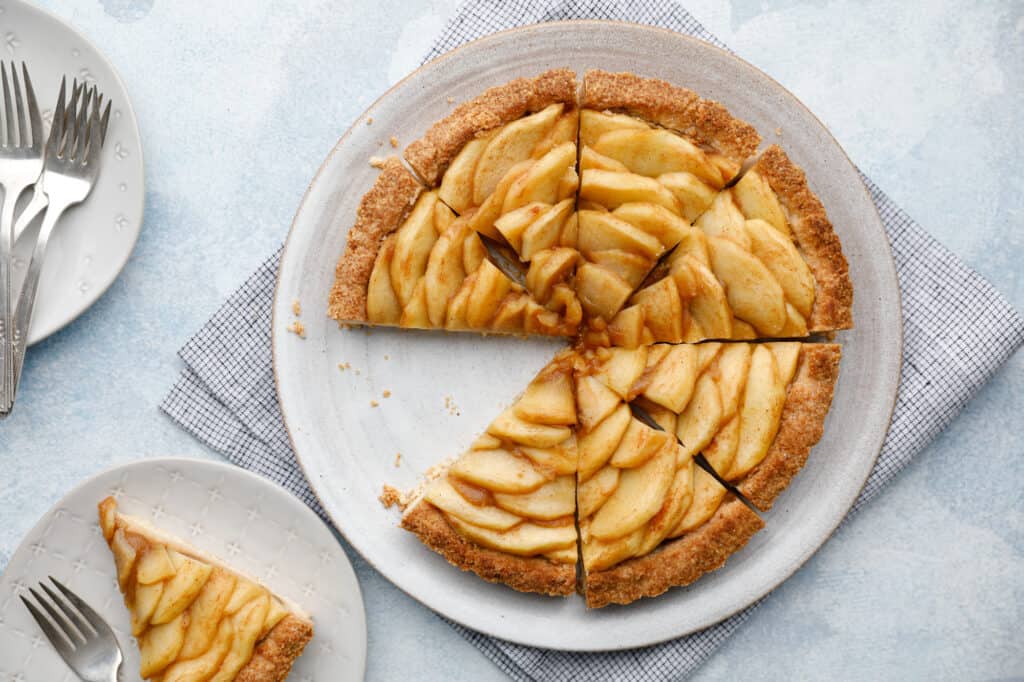
A dessert that everyone can enjoy! Vegan, gluten-free, and keto friendly, this celebratory vegan apple tart dessert with an almond flour crust makes menu planning easy for your next dinner party. And that fancy apple pattern on top is super easy to do. Let me show you!
I was scratching my head while planning the menu for Friendsgiving. My one friend has Celiac, another is keto, and another is vegan. Instead of making three different desserts, I wanted to make one thing everyone could enjoy.
I tested this recipe twelve times to get the perfect texture on the crust and a proper balance of filling and apples. Everyone was so surprised that we could ALL enjoy a slice with having all sorts of dietary restrictions.
What's In It?
There are three components to this apple tart:
- Homemade apple butter
- A gluten free crust
- Spiced, cooked, sliced, apples
And you'll need the following specialty tools to execute this recipe per my instructions:
- 9'' tart pan with a remove-able bottom
- A blender - I'm personally a Vitamix devotee
- A food processor *not required, but highly suggested for the proper crust consistency
The Ingredients and a Warning about Substitutions
Any time you're dealing with baking, it's very important to stick to the recipe. It's very much a science, especially when we're talking about gluten free baking. Gluten free flours like almond flour, coconut flour, tapioca flour, rice flour, etc. they all react differently, perform differently, absorb moisture differently, and thus, cannot be readily swapped.
That said, I created this recipe with the vegan keto diet in mind, so the crust is primarily almond flour with a little bit of coconut flour to help absorb the fats and liquids. I also tested it swapping the almond flour for hazelnut flour because of a friend with an almond allergy. Hazelnut flour performed well in a 1 to 1 swap for the almond flour.
If you're making this tart for someone with a general nut allergy, I would recommend looking for a nut-free gluten-free tart crust and making that instead.
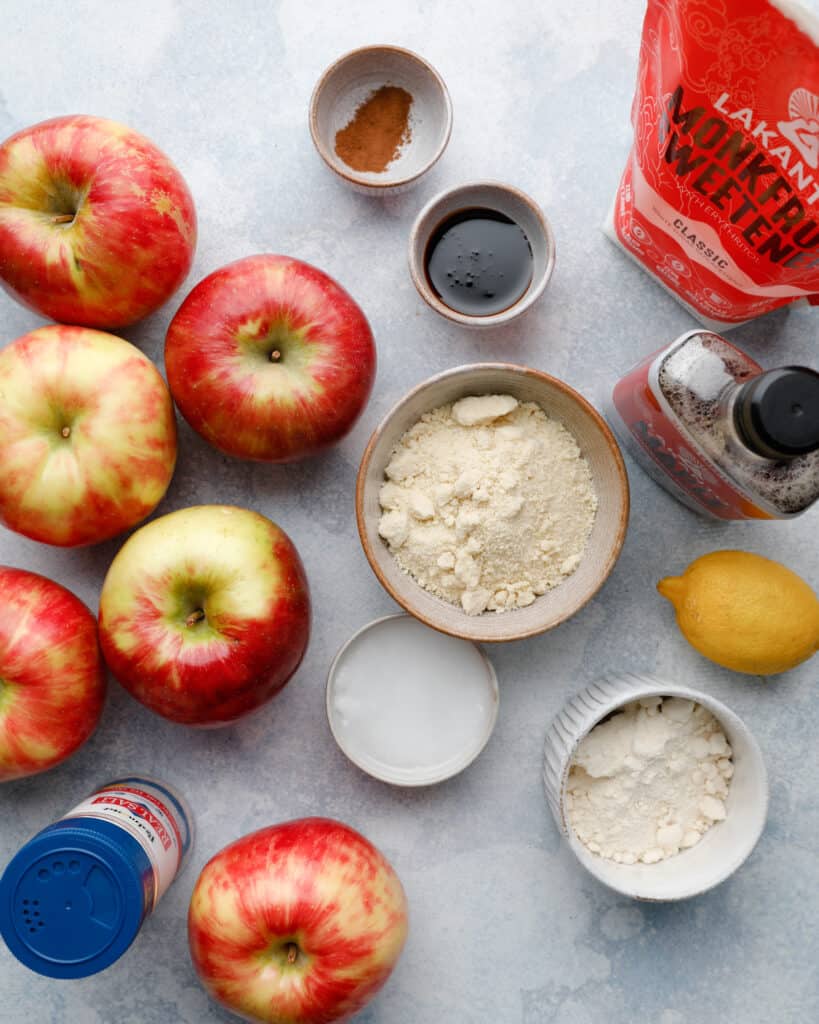
As for the Monkfruit sweeteners I use in this recipe, feel free to swap those 1 to 1 with your preferred sweeteners. Instead of the monkfruit maple syrup, you can use regular maple syrup. Instead of the granulated monkfruit you can use your favorite type of granulated sugar.
The apples I use in this recipe are medium sized honey crisp apples. I find them perfect flavor-wise in this recipe because of their sweetness with just a little bit of tartness. If you want to swap out the apples, bear in mind the size in terms of the quantity of apples. The honey crisp I have used are medium in size (not softball sized like you sometimes see). So, if you go with smaller apples or larger apples, be mindful to adjust the quantity of apples accordingly.
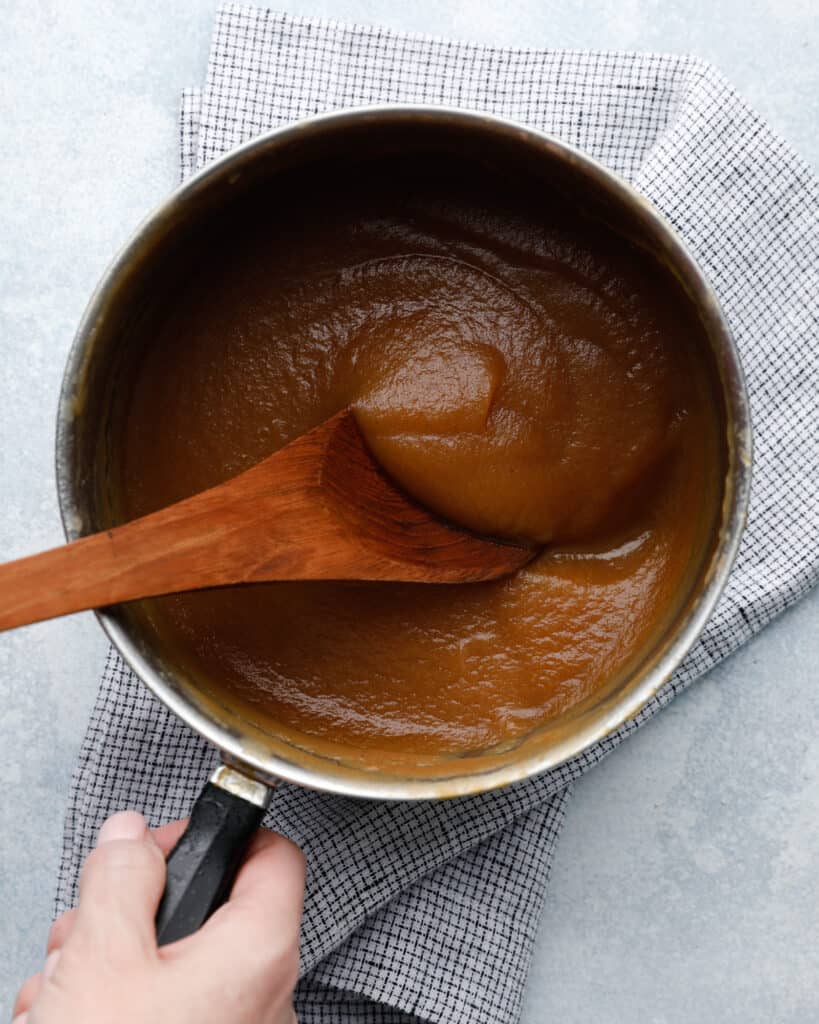
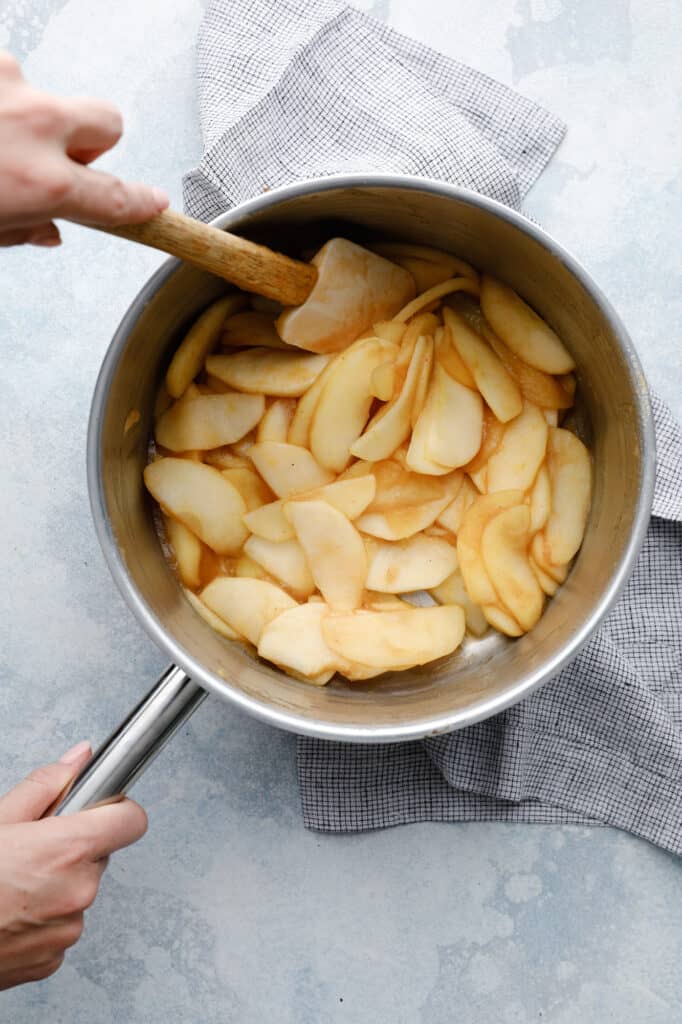
Making Homemade Apple Butter
It's surprisingly easy to make apple butter at home. I had personally imagined it to be complicated before I attempted it the first time. But, truth is it only requires a few ingredients and a little bit of time. I spell out all of the nitty gritty details in the recipe card below for how to make it.
One important note is to make sure you cook down the apple butter long enough so that it gets to the "buttery" stage. You can see the caramel brown color and texture it takes on once it has reduced well and the water is cooked out. We want apple butter for this recipe, not apple sauce.
You may be pressed for time and want to simplify matters. If that's the case, you can buy pre-made apple butter. You will need approximately 8 oz of apple butter for this recipe.
My only word of caution is to read labels. The advantage of making apple butter at home is that you know what went into it and can regulate the amount of sugar going into it.
The Sliced Apples
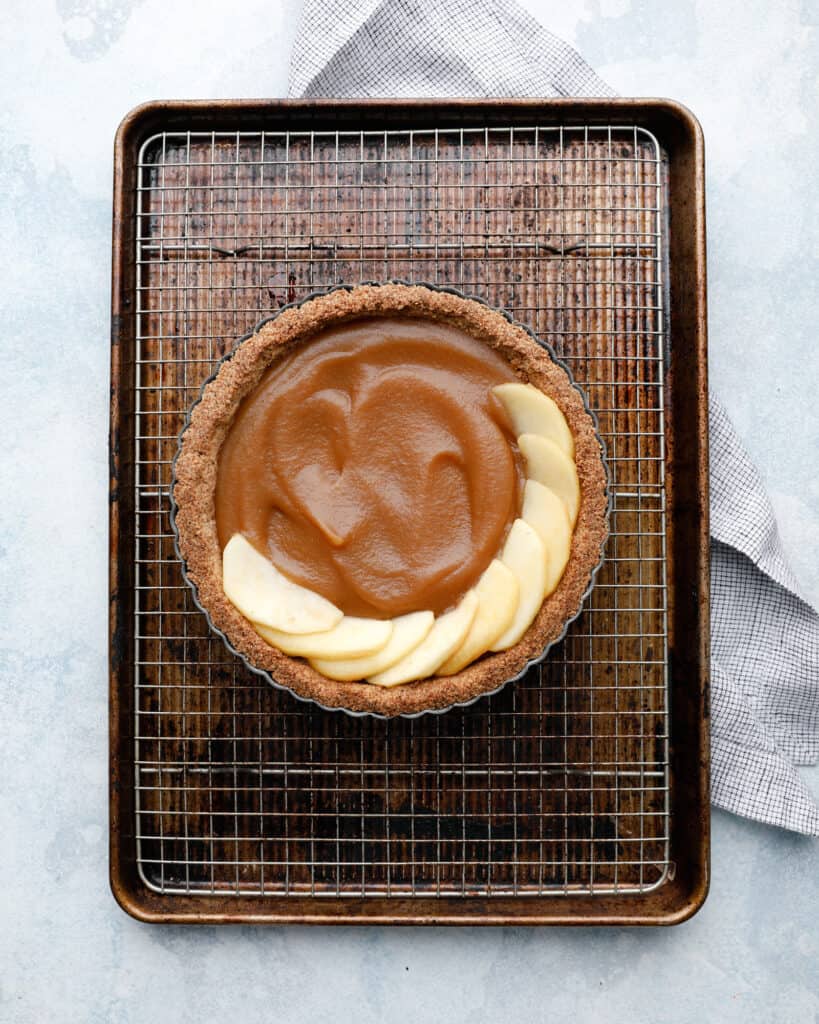
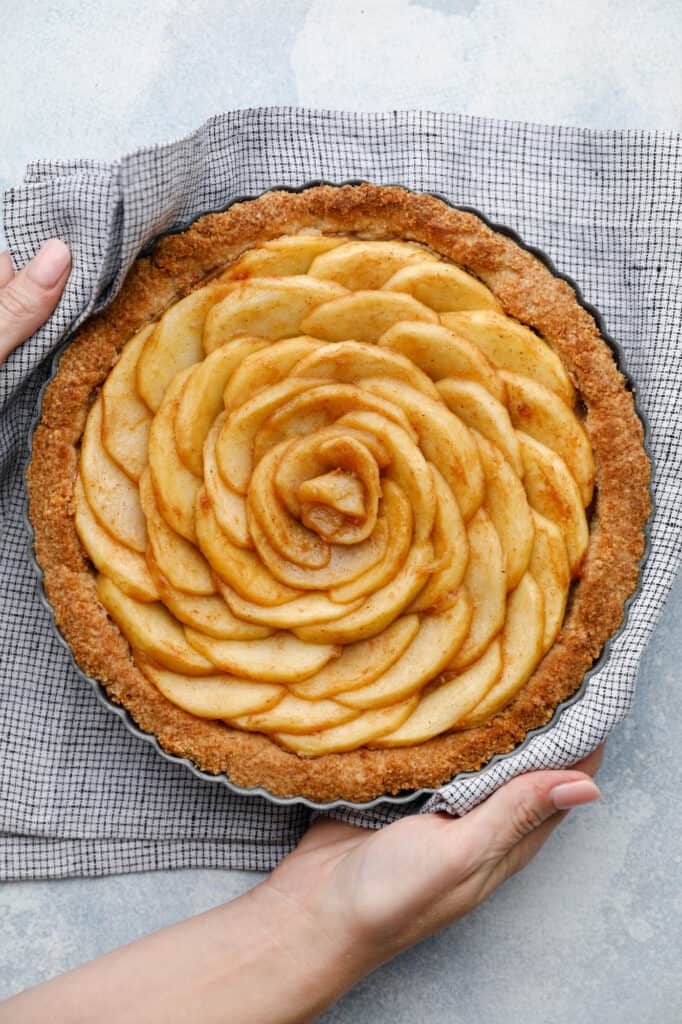
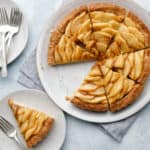
This recipe is a stunner because of the floral looking pattern you can create on top of the tart with your sliced apples.
To achieve this fancy look, I make sure to slice the apples uniformly at ⅛ inch thickness. This is the right thickness so that once they're cooked for about 10 minutes in a saucepan on the stove that they'll be soft and pliable for easy placement on the tart. I do like to keep just a little bit of firmness to the apples, though, so that they end up "al dente" and have that little bit of crisp snap to them. Certainly, you can cook them to the softness you desire.
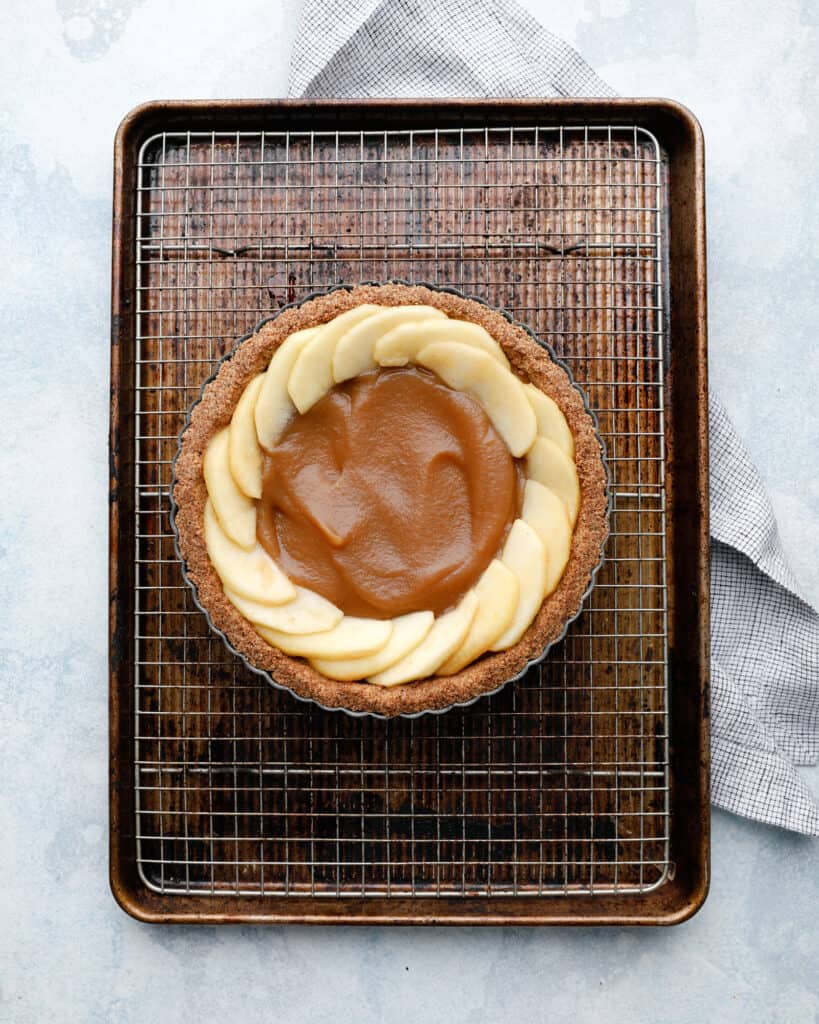
As far as the fancy arrangement of slices, it's deceptively simple as long as your slices are relatively uniform. Start with the outside edge and place a slice, then shingle another slice right next to it, laying about half of the slice over the prior.
Continue this method until you get around the edge of the tart, then start a new row moving a bit more toward the center of the tart.
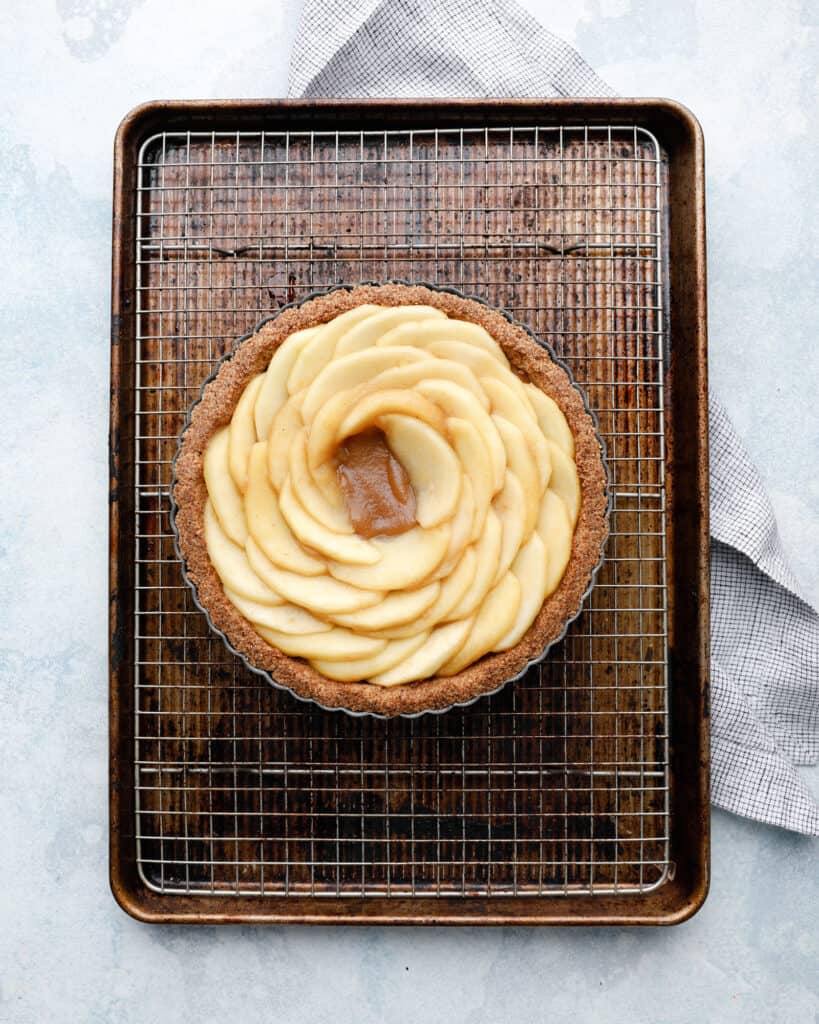
Eventually, you'll reach the center. I like to fill the center with a more tightly wound slice so it looks like the center of a rose.

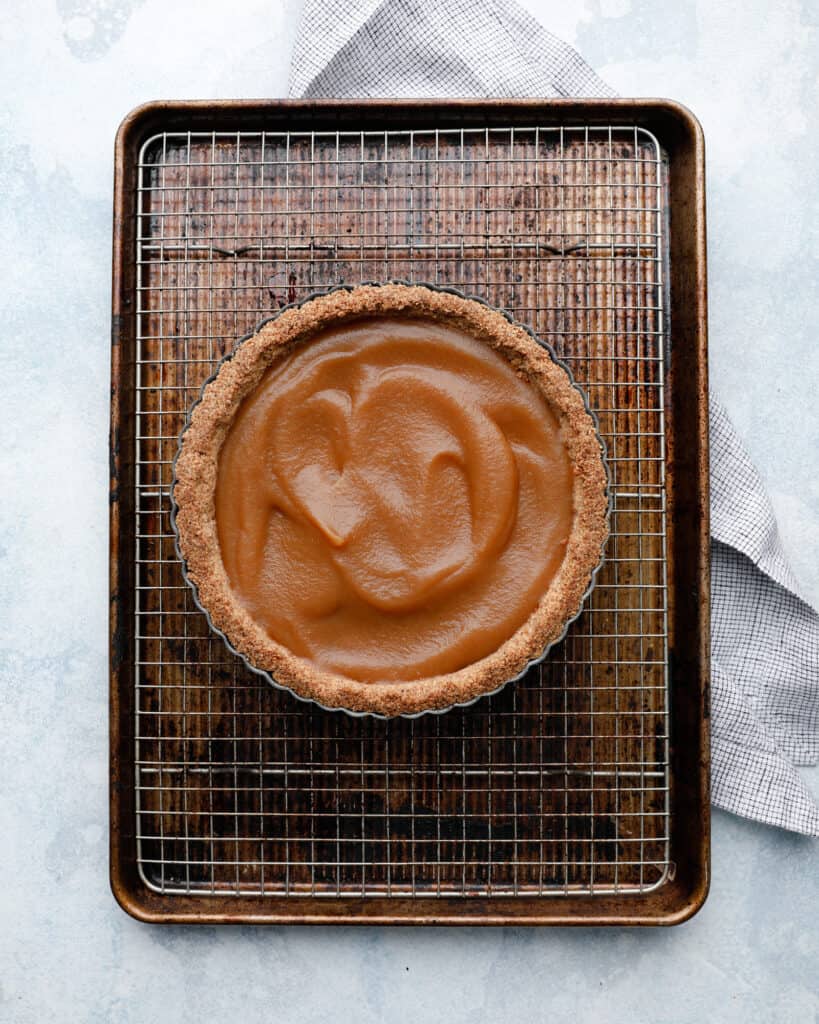
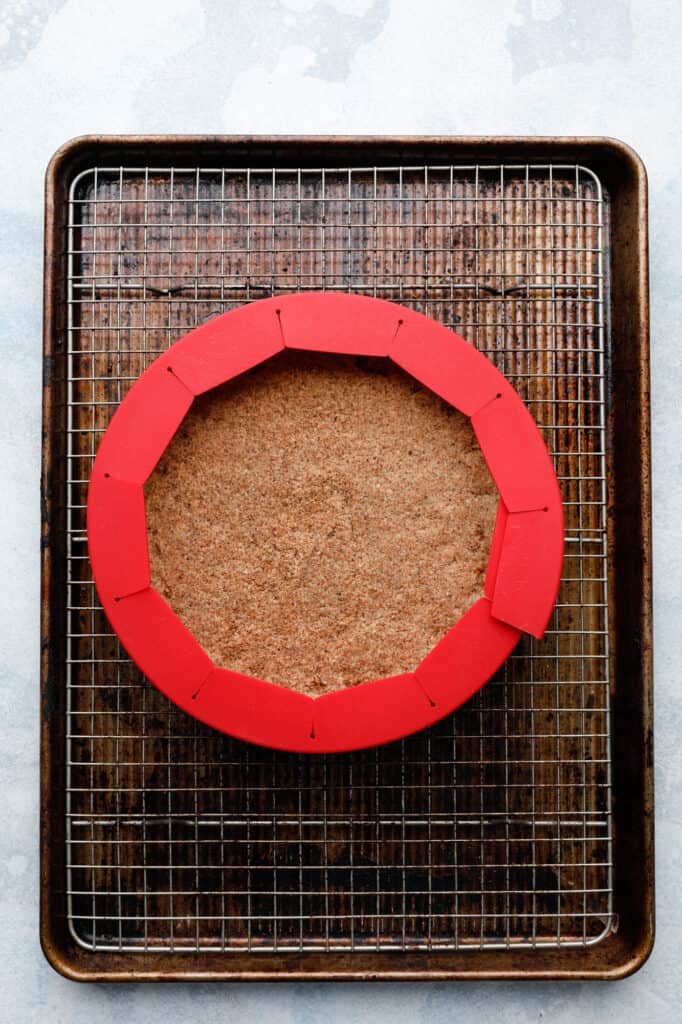
Protect Your Crust
I'm not a huge fan of kitchen gadgets, but one gadget that I do love and always use when preparing this recipe is a pie shield. I use when I'm baking the crust the first time before the filling is added. I use it again when the pie goes into the oven with the filling for the full final bake.
Pie shields come in various designs and forms with the ultimate goal of protecting your pie crust from getting too browned in the cooking process while allowing the center of the pie to cook through.
Lots of folks opt for just making a tent around the edges of the pie with foil. But, I find this adjustable silicone pie shield to be a lot easier to wield. Either way, if you don't protect your crust in this recipe, you might end up with singed crust.
I Have Leftover Sliced Apples!
Going back to the discussion about the size of your apples, you might end up with a little extra in terms of the cooked sliced apples. I've never found that to be a problem because they are a favorite of my kids. I serve them as a side dish, similar to how you would apple sauce. Both will keep in the fridge well for up to three days.
What it looks like when it's done...
Looking for other delicious desserts?
- Classic Gingerbread Cookies with Royal Icing
- Strawberry Icebox Cake with Graham Crackers
- Old Fashioned Fruit Cocktail Cake
- Dark Chocolate Bark with Fruit and Nuts
Vegan Apple Tart
- Prep Time: 30 min
- Cook Time: 90 min
- Total Time: 2 hours
- Yield: 8 servings
- Category: dessert
- Method: baking
- Cuisine: American
Description
A cozy apple tart made with homemade apple butter, layered honey crisp apples and a gluten-free crust. It's a decadent holiday treat while being 100% vegan and low glycemic with natural sweetness from apples.
Ingredients
- 6 medium sized honey crisp apples
- 1 Tbs dark or blackstrap molasses
- 2 Tbs of monkfruit maple syrup or regular maple syrup
- ½ cup water
- 2 ½ tsp cinnamon, divided
- ¼ tsp nutmeg
- ½ tsp salt, divided
- 3 cups almond flour
- ¾ cup coconut flour
- 3 Tbs granulated monkfruit sweetener (or other granulated sweetener)
- ⅓ cup coconut oil, melted and in liquid form at room temperature
- Juice of 1 lemon
Instructions
Start with the Apple Butter
- Peel 3 of the honey crisp apples and core them and then slice the into quarters.
- Place the apples into a medium saucepan over medium heat along with 1 Tbs molasses, 2 Tbs maple syrup, ½ cup water, 1 ½ teaspoon cinnamon, ¼ teaspoon nutmeg, and ¼ teaspoon salt.
- Stir the ingredients together so that the apples are coated in spices and cook over medium heat for 15 minutes, stirring occasionally until the apples are very soft. If you're good at multitasking, while these are cooking, you can start on the crust (instructions below). If you're not into multitasking, don't sweat it...our brains really aren't engineered for that nonsense anyway.
- Place the softened apples along with the liquid into a blender and blend until very smooth. Smooth is the name of the game here!
- Transfer the blended apples back into the saucepan and reduce the heat to low and allow the apple sauce to reduce (allow the water to cook out of it) until thickened and caramel in color.
- Set the apple butter to the side until you're read to fill your tart.
Prepare Your Tart Crust
- Preheat the oven to 325F.
- Combine 3 cups almond flour, ¾ cup coconut flour, 3 Tbs granulated monkfruit sweetener and remaining ¼ teaspoon salt into a food processor and pulse several times to break up any large pieces of the flour and to combine the dry ingredients.
- Turn on the food processor and pour in the ⅓ cup coconut oil slowly until it's fully incorporated. Turn off the processor once everything is combined and then test the dough to make sure it holds well. You should be able to form a small ball with the dough and it should hold and not crumble. If it's crumbly, add a Tbs of water to the dough and pulse in the food processor. Check the consistency and continue to add water by the Tbs full until the desired hold is achieved.
- Pour all of the dough from the food processor into a 9'' tart pan with a removable bottom and press it into the bottom and up along the sides to create a tart crust. I take my time at this step to ensure an even edge around the entire tart and press down into the bottom corners of the crust so that when the fillings are added they nestle nicely into the tart crust.
- Then, add a pie shield or something to protect the edges of your crust and place the un-filled crust in the oven on a baking sheet (which protects the bottom) in the center rack of the oven and bake for 20 minutes at 325F, rotating once halfway through the baking process. This is a partial bake so that when we bake the pie with the filling, it's fully baked through.
- Once the crust is baked, remove it from the oven and set it aside until you're ready to fill it.
Prepare the spiced, sliced apples
- Peel the remaining three apples and remove the cores. Then halve them and then slice the halves into ⅛ inch slices.
- Add the apple slices, 1 teaspoon remaining cinnamon, juice of 1 lemon and ¼ cup of the apple butter you made to a large saucepan over medium-high heat and cook, stirring occasionally, for 10 minutes until the apples are slightly softened and pliable.
- Remove the saucepan from the heat and allow the apples to cool so that you can handle them in order to place them in your tart.
Assemble and bake the tart
- If the oven isn't still on from the partial bake of the crust, preheat it to 325F.
- Spread the apple butter into the prepared tart crust.
- Layer the apple slices in the tart on top of the apple butter, starting with the outer edge along the crust, creating a shingled effect and continue to layer the apples until the entire tart is covered (see visual aids above in the blog post for reference).
- Place the tart with a pie shield around the crust in the middle rack of the oven and bake at 325F for 25 minutes, rotating halfway through the baking process for an even cook.
- Once baked, allow the tart to rest for at least 30 minutes to allow the moisture to become absorbed and for the crust to firm up to the proper texture.
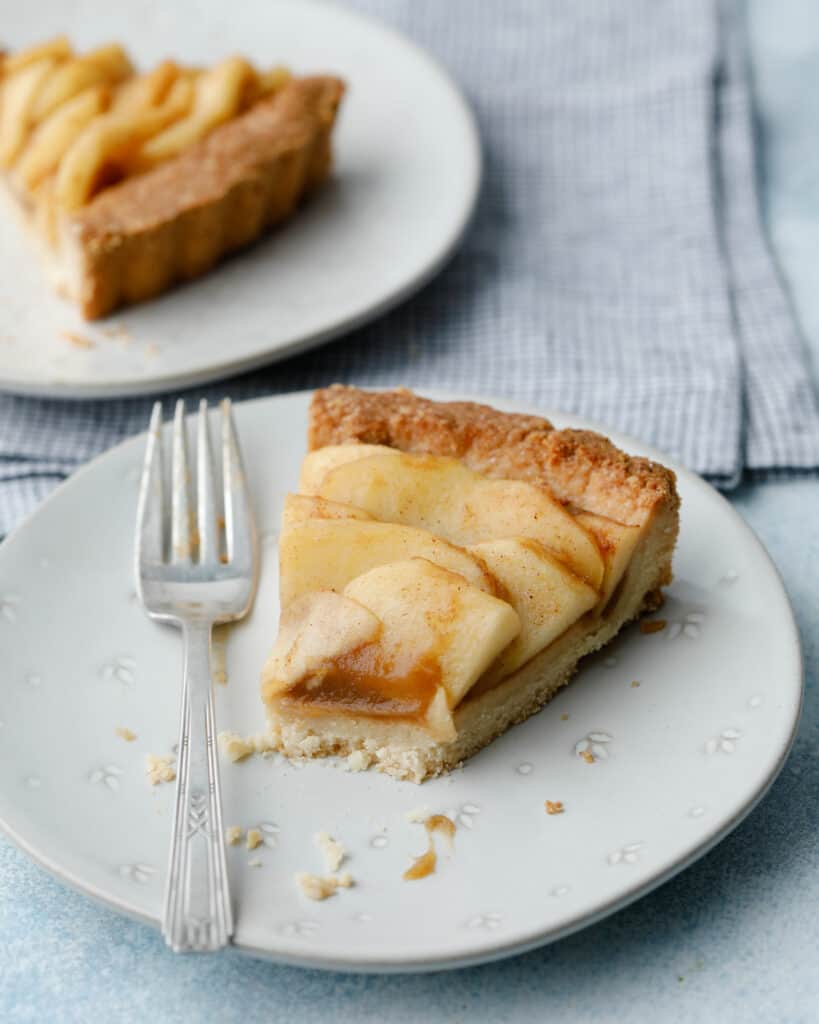
To Serve
- Since it's made in a tart pan with a remove-able bottom, it should slide nicely out by pressing up on in the center on the bottom of the pan and the side part of the pan can be removed. Then, run a knife around the bottom edge where the bottom part of the pan meets the tart to help loosen it so the bottom of the pan can be removed and the tart slid onto a pie plate or cake stand. Then use a serrated knife or very sharp paring knife to slice the tart into 8 or 12 slices and serve with a pie server.Serve topped with your favorite non-dairy whipped cream or ice cream!
- This tart keeps well covered in the refrigerator for up to three days.
Notes
For the coconut oil, you can use refined if you don't like the taste of coconut and use unrefined if you do like to taste coconut.
Be sure to read the body of this blog post before you attempt any substitutions, particularly when it comes to making substitutions for the almond flour and coconut flour.
Nutrition
- Serving Size: 1 slice
- Calories: 391
- Sugar: 14.1 g
- Sodium: 153.9 mg
- Fat: 15 g
- Carbohydrates: 27.6 g
- Fiber: 6.8 g
- Protein: 8.5 g
- Cholesterol: 0 mg

Louisa Maria Schmidt says
Hi Joanie, can u tell us what's the name of the recipe plugin?
It looks delicious.
Best from Germany
Joanie Simon says
Yep! WP Tasty: https://www.wptasty.com/tasty-recipes
Linda says
How did you get the tart so nicely from the pan it was baked in into the nice plate? slice it first? thanks
Joanie Simon says
Great question! I'll be sure to update the recipe with this info. Since it's made in a tart pan with a removeable bottom, it should slide nicely out by pressing up on in the center on the bottom of the pan and the side part of the pan can be removed. Then, I run a knife around the bottom edge where the bottom part of the pan meets the tart to help loosen it so the bottom of the pan can be removed and the tart slid onto a pie plate or cake stand. Then I use a serrated knife or very sharp paring knife to slice the tart into 8 or 12 slices and serve with a pie server.
vurtil opmer says
Hello.This article was extremely fascinating, especially because I was searching for thoughts on this subject last Monday.
Nora says
I'm so glad to see the word "Vegan" and I've never tried to make apple butter before. This looks so amazing and I'll definitely find a time to give it a try! Thank you for sharing.
BTW, the napkin looks so beautiful!
Joanie Simon says
Awesome! Let me know how it goes. I love making this dessert! <3
Dom John says
Made this recipe for the third time now! It’s excellent and everyone loves it.
Joanie Simon says
That is wonderful, Dom! Thanks for sharing your review <3
Nanna says
Can you use regular (gluten free) flour instead of coconut flour? And if so, how much?
Emily says
I was so excited to find a Vegan Apple Tart recipe - I wanted to make one for for Valentine's Day, so this was perfect. I have always wanted to try the rose pattern on the top too - baking goal achieved!
The tart filling was perfect and came out delicious. The topping, also came out delicious. I winged it a bit because I was pressed for time, so cut the lemon juice and added water, more cinnamon, a bit of molasses, and only added a tbsp of the apple butter, because I really didn't have 1/4 of a cup to spare. Maybe I reduced my apple butter too much or my Honey Crisp were on the small side.
The recipe for the crust was a little weird...and I ended up changing it quite a bit. I didn't understand how almost 4 cups of flour was supposed to bind together at at all with only 1/3 cup of coconut oil. I was also confused as to why I needed that much flour for a 9 inch tart pan. I happened to have vegan butter, so I added vegan butter to bind the flour. I also took out about 1 cup of the dry ingredients after I had mixed them all together, and added a bit more sweetener, cinnamon, and nutmeg for flavor as well. It wasn't as healthy, but it seemed more like an actual tart crust. I was wondering if maybe there was a typo in the measurements? Or the recipe had a missing ingredient?
Either way, this recipe helped me arrive at an amazing vegan apple tart that tasted as good as it looked! Thank you Joanie!
Joanie Simon says
Hi Emily. Thanks for letting me know! I'll definitely revisit this one. I know I tested it about a dozen times before publishing it so I wonder where the error is. Glad it turned out nonetheless with the tweaks!
Emily says
I printed the recipe, so maybe there's a glitch printing it out? Just a thought.
And thanks again - this was such a great recipe to go off of! I've already received requests to make this again!
Sam says
This looks so delicious! Can you use all coconut flour in the crust for a vegan and nut free version? I've been struggling to find the perfect dessert for my vegan dinner guests with nut allergies
Joanie Simon says
I've never tried it with all coconut flour, but coconut flour does absorb a lot of moisture, more than the nut flours do, so I imagine if you did go all coconut flour you'd need to adjust the liquid ratios as well.
Sam says
Thanks for the info! I'm so excited to try this 🙂
Nadine says
Thanks for this recipe. I am looking forward to making it. Its so difficult to find keto friendly as well as vegan recipes! My question is can I prepare the sliced apples for the top the day before, or will they go brown? I am a little short for time and was hoping to do the apple butter and sliced apples the day before the rest.
Thanks