
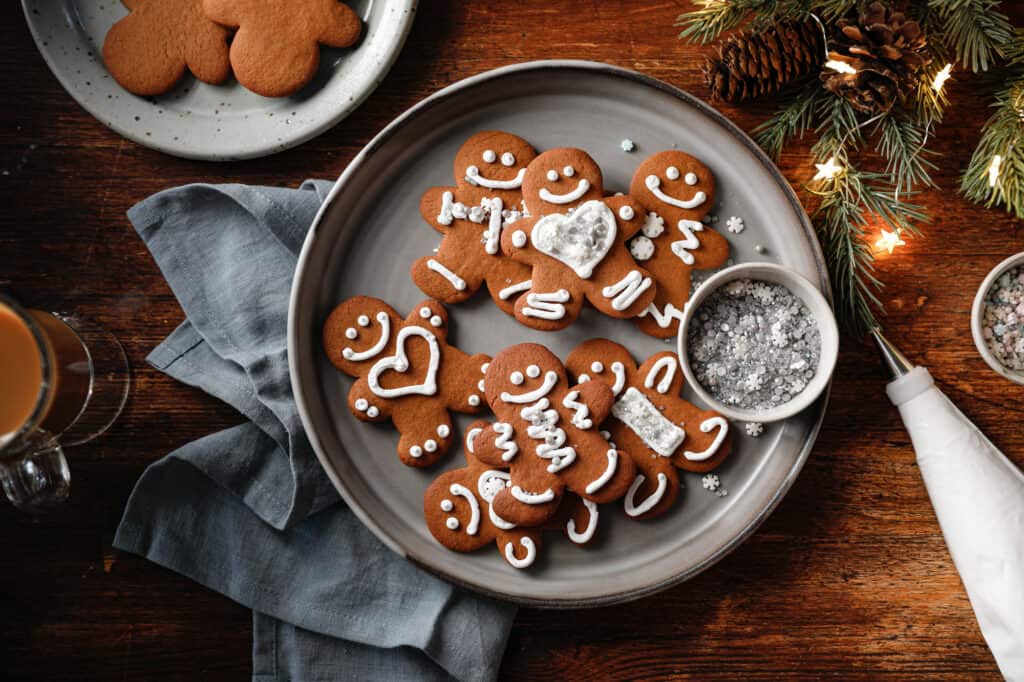
A classic recipe for gingerbread cookies made with molasses and brown sugar. They’re perfectly crisp on the outside and soft on the inside and decorated with royal icing.
The origin of my gingerbread recipe
Like most classic cookie recipes, this one is a hand-me-down. This is the same gingerbread recipe my Mom has made for years in preparation for our annual holiday cookie decorating extravaganza. Check out our 2016 cookie party to get a flavor for the way we celebrate cookies in our family.

The Steps
This is a straightforward recipe without a lot of complication. Follow the measurements and instructions and it should be smooth sailing for your holiday cookie party.
- Make the Dough
- Divide the Dough and Chill It
- Roll It
- Cut It
- Bake It
- Decorate It
Why Divide?
Why divide the dough in step 2? It’s easier to work with a smaller dough ball when rolling it out in step 3. This recipe makes a lot of cookies, so dividing the dough in two makes it easier to work with.
I remove the dough from the mixer and cut it in half. Next I roll up each half into a ball and flatten them into a thick disk. Then I wrap each disk in plastic wrap before putting them in the refrigerator.
Chill It
One important thing to note about this recipe is that you need to make the dough and then chill it sufficiently before heading to the rolling and cookie cutter stage. This is a recipe that requires you to do a little planning ahead.
Gingerbread needs to chill for at least an hour (or up to three days). During the chill, proteins in the flour start to form and bond, helping the dough to hold together and firm up. This will make rolling out your dough so much easier and help avoid a crumbly dough.

Baking the Gingerbread
I find most cookie cutter cookies to be a little temperamental when it comes to the baking stage. 325F is the perfect temp for these cookies. I double check the accuracy of my oven by placing an oven thermometer inside.
Part of where things get tricky in baking is based on how thick or thin you roll your dough and the consistency you’re going for in the final cookies. I roll mine to a little less than a quarter-inch thickness so that it’s a little crisp on the outside and soft on the inside.
But, to achieve that balance, you have to keep an eye on these little buggers and pull them just before they start to darken. I find 8 minutes to be perfect for my taste. If you want them crunchier, then roll them thinner or bake them a few minutes longer.
Keep an eye on that temp and don’t let them go too long or you’ll get singed edges. This is especially true on cookie shapes that are more delicate like stars and my favorite chili peppers.
The Icing
This icing recipe was snagged from my third-grade class. My Mom was helping on the day we decorated gingerbread houses at my school and discovered that this was the perfect gingerbread icing.
She was in love with this icing recipe because, like good royal icing, it dries hard. You can create all sorts of beautiful designs with your piping tips and it will hold its form.
The only thing to note is that the consistency of the icing is key. You want it thick enough to hold the form of the tip you’re using for piping. But, you also don’t want it too thick that it won’t come smoothly out of the piping bag. If you need a little more thickness, add a little more powdered sugar. If it’s too thick, add a teaspoon of water at a time until you get the proper consistency.

Piping Bags & Tips
As for piping bags, tips and couplers, I’ve always been into Wilton products. They’re easy to find and come in a wide assortment of shapes and sizes. I typically go with the 16” piping bags.
If you decide to add color to your icing, I recommend Wilton’s gel colors. They are vibrant and they won’t water down the consistency of your icing.
Print
Classic Gingerbread Cookies Recipe
- Prep Time: 40
- Cook Time: 30
- Total Time: 1 hour 10 minutes
- Yield: 36 cookies 1x
- Category: dessert
- Method: baking
- Cuisine: American
Description
A classic recipe for gingerbread cookies made with molasses and brown sugar. They’re perfectly crisp on the outside and soft on the inside and decorated with royal icing.
Ingredients
Gingerbread Cookies
- 1/2 cup butter, softened
- 1/2 cup shortening
- 3/4 cup packed dark brown sugar
- 1/2 cup granulated sugar
- 1 large egg
- 1 cup unsulfured molasses
- 5 cups all purpose flour
- 2 tsp ground ginger
- 2 tsp ground cinnamon
- 1 tsp ground nutmeg
- 1/4 tsp ground cloves
- 1 tsp baking soda
Icing
- 3 large egg whites
- 1/2 tsp cream of tartar
- 16 oz confectioners sugar (powdered sugar)
Instructions
Gingerbread Cookies
- In a large bowl, beat the 1/2 cup butter, 1/2 cup shortening, 3/4 cup packed brown sugar and 1/2 cup granulated sugar with a hand mixer or in a stand mixer and mix on medium speed until the mixture is fluffy.
- Add the 1 large egg to the butter and sugar mixture, beating until combined, approximately 30 seconds.
- Next add the 1 cup molasses and beat 30 more seconds until it’s smooth.
- In another large bowl, whisk together five cups of flour, 2 tsp ginger, 2 tsp cinnamon, 1 tsp ground nutmeg, 1/4 tsp ground cloves, and 1 tsp baking soda.
- Gradually add in the flour mixture to the butter mixture, beating until just combined. Try not to over-mix or you’ll end up with a tougher dough.
- Divide the dough in half, and shape each portion into a thick disk. Wrap the discs in plastic wrap and refrigerate for at least an hour up to 3 days.
- Preheat the oven to 325F and line baking sheets with parchment or silpat.
- On a lightly floured work surface, roll dough to 1/4 inch thickness using a rolling pin and cut using cookie cutters. Re roll the scraps together by gathering up the scraps, rolling them into a ball and then rolling out with a rolling pin and continuing to use the cookie cutters. Repeat that process until all of the dough is used up.
- Bake the cookies on the middle rack in the oven for 8 minutes or until lightly browned. Cool for 2 minutes then place on wire racks and cool completely before decorating
Icing
- Put all of the icing ingredients into a stand mixer bowl and mix on medium high (7 on a Kitchen Aid) with the whisk attachment for seven minutes. The consistency should be thick. If it’s too thick, add a teaspoon of water a time until it’s the proper consistency. If it’s too runny and doesn’t hold its form, add a tablespoon full of powdered sugar at a time until it’s the proper thickness.
- Fold down the sides of a piping bag halfway and then scoop the icing into your piping bag fitted with a piping tip and secured with a coupler. Once you filled the bag halfway, roll the sides of the bag up and then twist the bag at the top of the frosting to force the frosting down to the tip of the bag.
- Apply pressure at the twisted part of the bag, forcing the frosting to come out through the tip and have fun decorating your cookies.

Leave a Reply