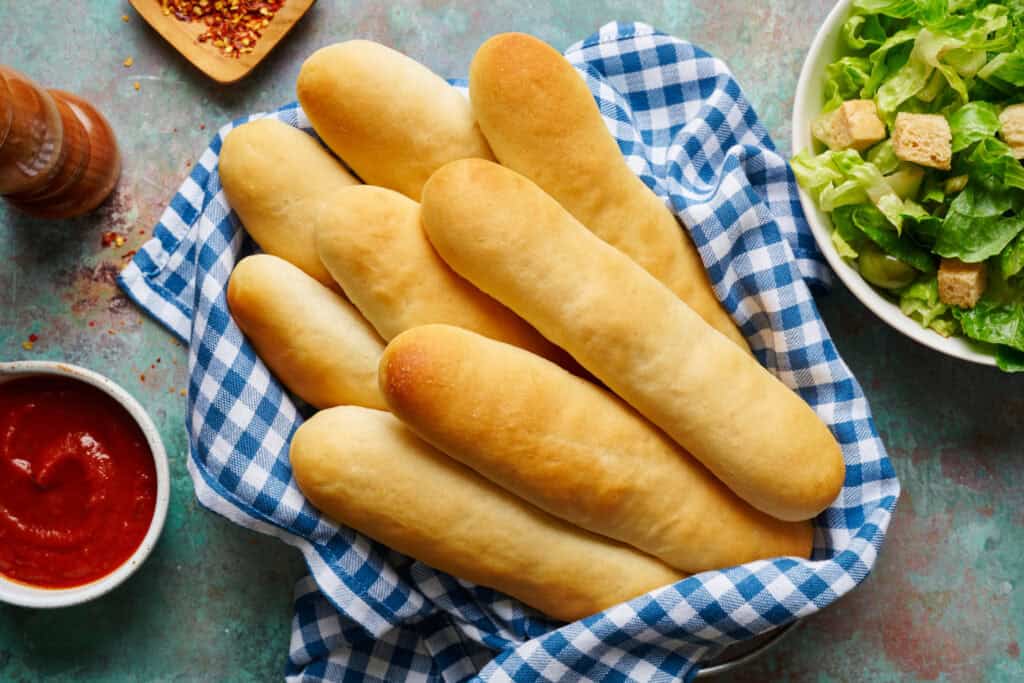
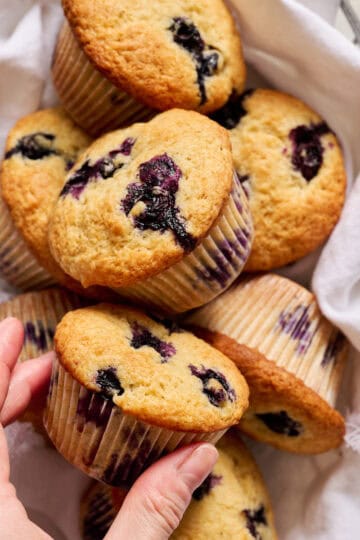
Upgrade your dinner with savory sourdough discard breadsticks! Soft, buttery, and begging to be served alongside your favorite soups, salads, and pastas.
Is there anything better than swiping the marinara off your plate with a homemade breadstick?
New to Sourdough?
Check out my Sourdough Starter for Beginner's Guide.
Otherwise, if you're already in the cult of sourdough, and looking for ways to use up your discard, you're going to love this recipe. It's one of the recipes that's guaranteed to lure my kids into the kitchen at dinner time.
But wait, isn't this a blood sugar friendly blog? Good news! Bread can absolutely be enjoyed as a part of a balanced meal. Check out my Guide to Eating Bread with Balance.
What You Need to Make Sourdough Discard Breadsticks
Sugar
Isn't this a savory recipe? Yep! Sure is! The little bit of sugar helps to encourage the yeast to rise. Sugar also adds a balance to the flavors, giving you all those Olive Garden breadstick vibes.
Sourdough Discard
My discard is from a sourdough starter fed at a 1:1:1 ratio. If that's not making sense, see the note above about getting started with sourdough. I purchased my starter from the fine folks at Basil & Bloom.
Oil
You'll see in the recipe below that I list using olive oil. However, if you don't have olive oil, you can use any neutral-flavored oil like avocado or vegetable oil.
Seasoning
Breadsticks love garlic. You'll love the kitchen smells when these are baking thanks to a bit of granulated garlic. Also, every baked good always needs salt. Salt is what unlocks your tastebuds to enjoy every bite of these breadsticks.
Flour
I use unbleached all-purpose flour for these breadsticks to make them light and fluffy. You can also make them with bread flour which creates a slightly chewier texture.
A Stand Mixer (optional)
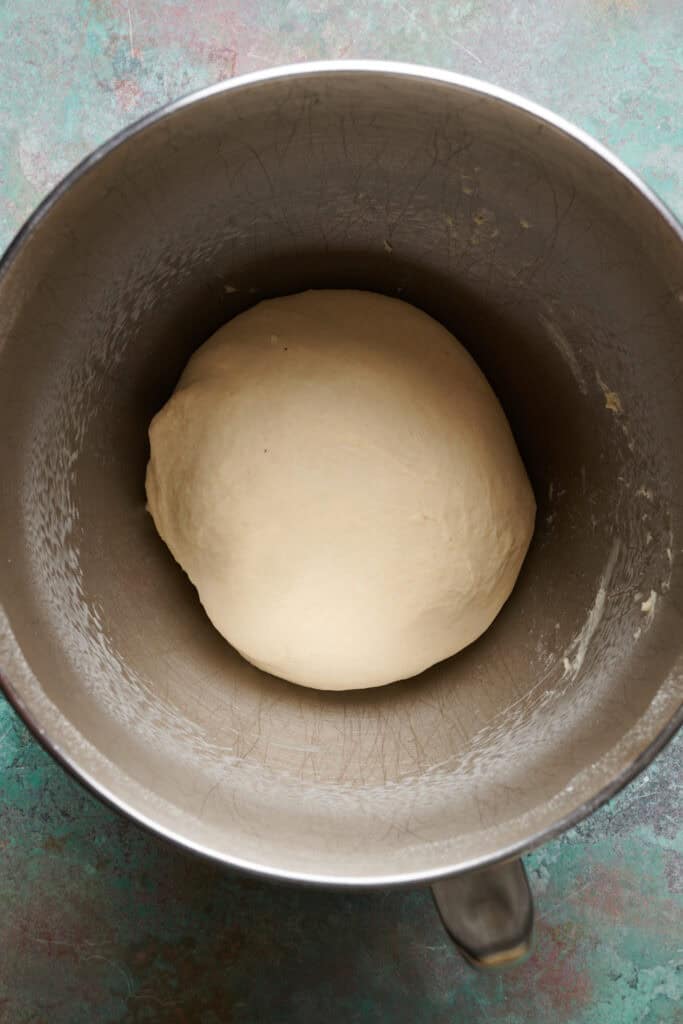
You absolutely can knead the dough for these breadsticks by hand. I know lots of folks who find this to be the best form of therapy. But, I am a fan of my stand mixer and I let it do the heavy lifting of kneading for 7 minutes until the dough is nice and elastic.
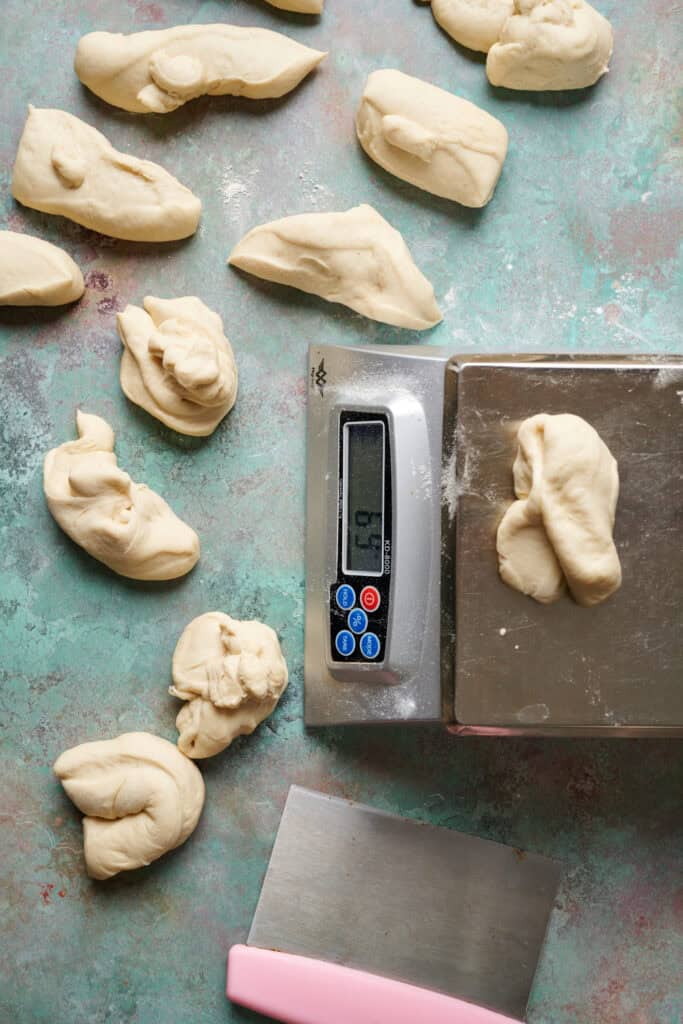
Kitchen Scale (optional)
I'm a nut for weighing ingredients when I'm baking. I used to say I wasn't a baker, mostly owing to the fact that I botched a fair number of cookie and bread recipes.
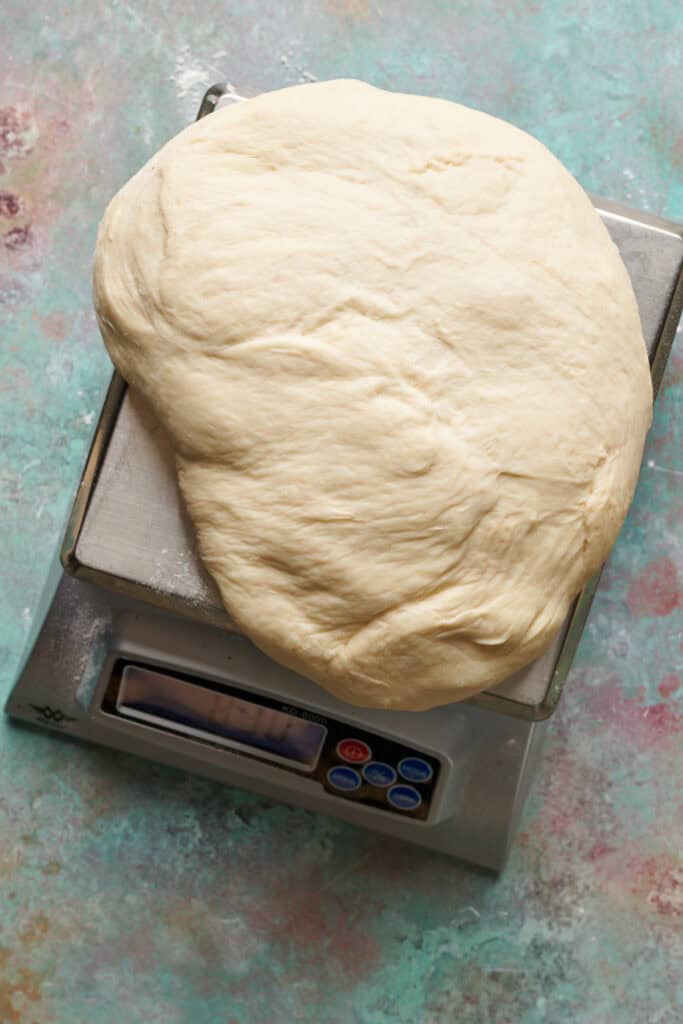
When I accepted that baking is a precision sport and started following recipes by weight measurements, my baking luck turned around. If you want your breadsticks to turn out like the ones you see in the pictures here, use a kitchen scale.
Shaping Breadsticks
The trickiest part of this recipe is shaping the breadsticks. I like a nice smooth exterior and rounded edges. Photos of the steps to follow are down below for visual reference.
I start by weighing the dough on a kitchen scale after its first rise and then divide that by 12 since this recipe makes 12 breadsticks. My full dough weighed approximately 828 grams. Yours should be somewhere near this.
So then 828 grams divided by 12 portions gives me 69 grams per breadstick. I then portion out the dough into twelve - 69 gram dough balls.
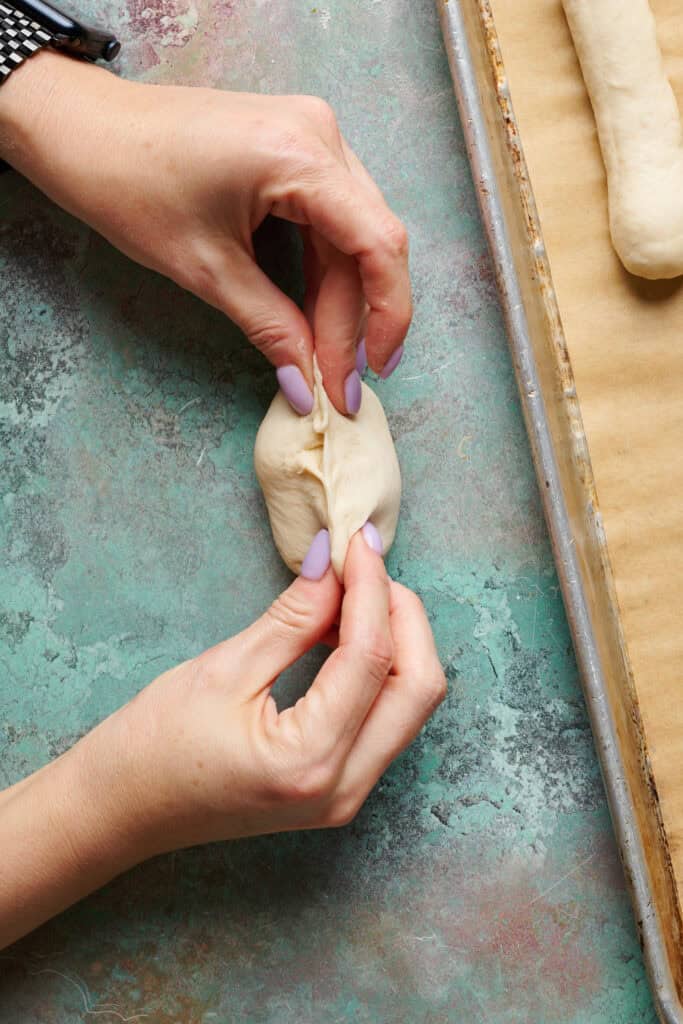
Next, I take a dough ball and pull up the ends and the sides to help make the underside smooth and taught and then pinch it together to keep that surface tension on the outside of the dough.
From there, I press the dough with my hands flattened and start to roll, pulling my hands away from each other so that it starts to lengthen the dough into a sort of rope.
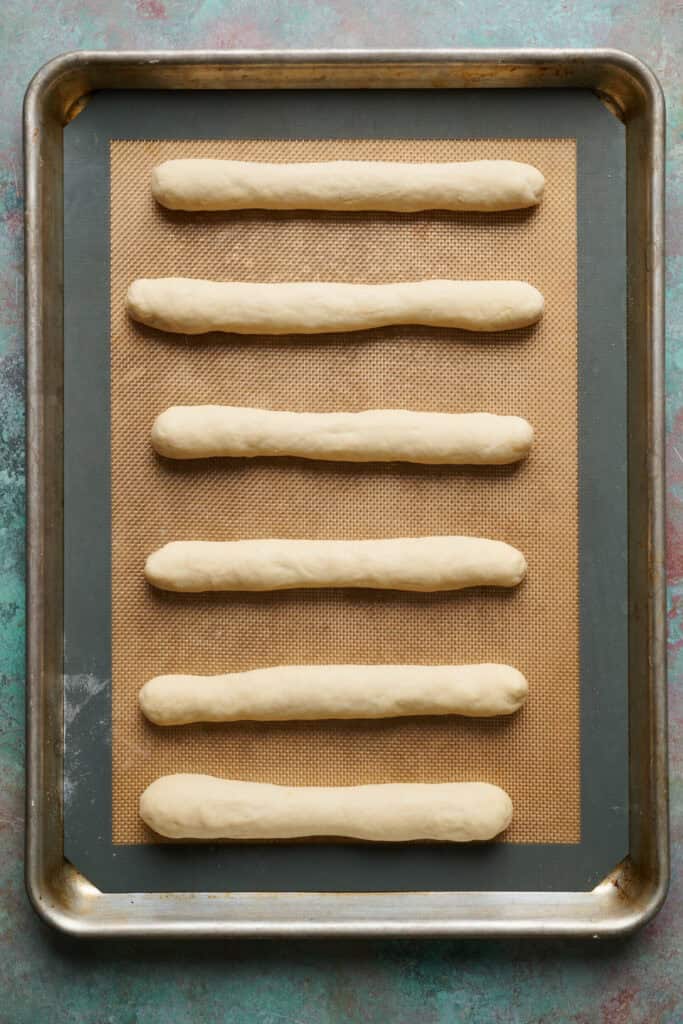
I aim to shape the dough 6 to 7 inches in length. Once you have it to your desired length, if there's a seam remaining on the bottom of the rope from where I did the initial pinching, I place that seam side down on a parchment or silicone mat lined baking sheet.
I make sure to leave space between my breadsticks so that they don't end up touching when they expand during the second rise and when they bake. I use two half-sheet baking pans to bake 12 breadsticks without them touching.
You'll see 6 breadsticks per sheet pan in the photos below.

Variations on This Recipe
Want to make hot dog buns or hoagie rolls? These are fantastic for making meatball subs with my Meatballs in Marinara Sauce recipe. Just divide the dough into 10 portions instead of 12, giving you larger rolls.
Butter on Breadsticks
Lots of folks recommend brushing melted butter on breadsticks after they're baked. I skip this step because I don't like greasy fingers.
Too, most of the time, I end up dipping my breadsticks in my soup or pasta sauce. Cleaning my plate like a pro.
But please feel free butter your breadsticks if you like! All you need to do is melt 2 tablespoons of butter, sprinkle in a ¼ teaspoon of garlic salt, and brush it onto your breadsticks after they come out of the oven.


Description
Upgrade your dinner with savory sourdough discard breadsticks! Soft, buttery, and begging to be served alongside your favorite soups, salads, and pasta dishes.
Ingredients
- 1 cup (240g) water warmed to 100 to 110F or 35 to 42C
- 2 ¼ tsp (7g) dry active yeast
- 2 Tbs (30g) granulated sugar
- ½ cup (100g) sourdough discard
- 2 Tbs (30g) olive oil
- 2 tsp (9g) fine salt
- ½ tsp (3g) granulated garlic
- 3 cups (425g) unbleached all-purpose flour
Instructions
- Combine the yeast and warm water in the bowl of a stand mixer and allow it to sit for 5 minutes until the yeast starts to form little foamy spots on the surface of the water (also referred to as blooming).
- Add the sugar, sourdough discard, olive oil, salt, granulated garlic, and flour to the bowl and start to mix using the dough hook attachment on a stand mixer on low speed.
- Once the dough starts to come together after about a minute on low, increase the speed to medium and knead the dough for 7 minutes. The dough will pull away from the sides and appear nice and smooth once it is done kneading.
- Lift the arm of the stand mixer and scrape off any dough that is still on the hook using a dough scraper and add it to the dough ball in the bowl.
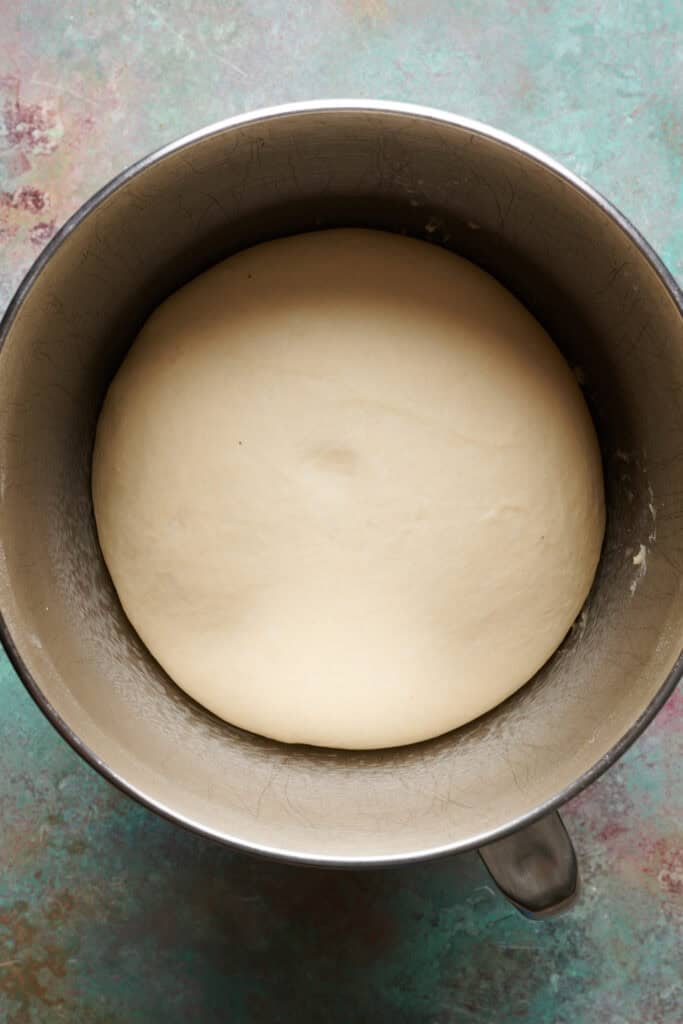
- Cover the bowl with the dough with a kitchen towel or cling wrap and allow it to rise for 30 to 60 minutes until doubled in size. If the room is warm it will rise faster. If it is cold it will rise slower.
- Once your dough has risen, sprinkle a few tablespoons of flour onto a clean work surface and dust your hands a bit then using a dough scraper, pull your risen dough out onto the floured work surface.
- Weigh the dough on a kitchen scale and divide the total weight by 12 since this recipe makes 12 breadsticks. Total weight should be approximately 820 - 830 grams.
- Portion out the dough into 12 equally sized dough balls, approximately 69 to 70 grams each.
- Next, take a dough ball and pull up the ends and the sides to help make the underside smooth and taught and then pinch the gathered sides together to keep the surface tension on the outside of the dough.
- Press the dough with your hands flattened and start to roll, pulling your hands away from each other so that it starts to lengthen the dough into a sort of rope.
- Shape the dough 6 to 7 inches in length. Once you have it to your desired length, if there's a seam remaining on the bottom of the rope from where you did the initial pinching, place that seam side down on a parchment or silicone mat lined baking sheet.
- Continue until you have shaped all 12 breadsticks, leaving enough space between each breadstick for them to expand when they rise and bake. 12 breadsticks will fill approximately two half-sheet pans.
- Cover the sheet pans of breadsticks with a large kitchen towel or cling wrap and preheat your oven to 400F.
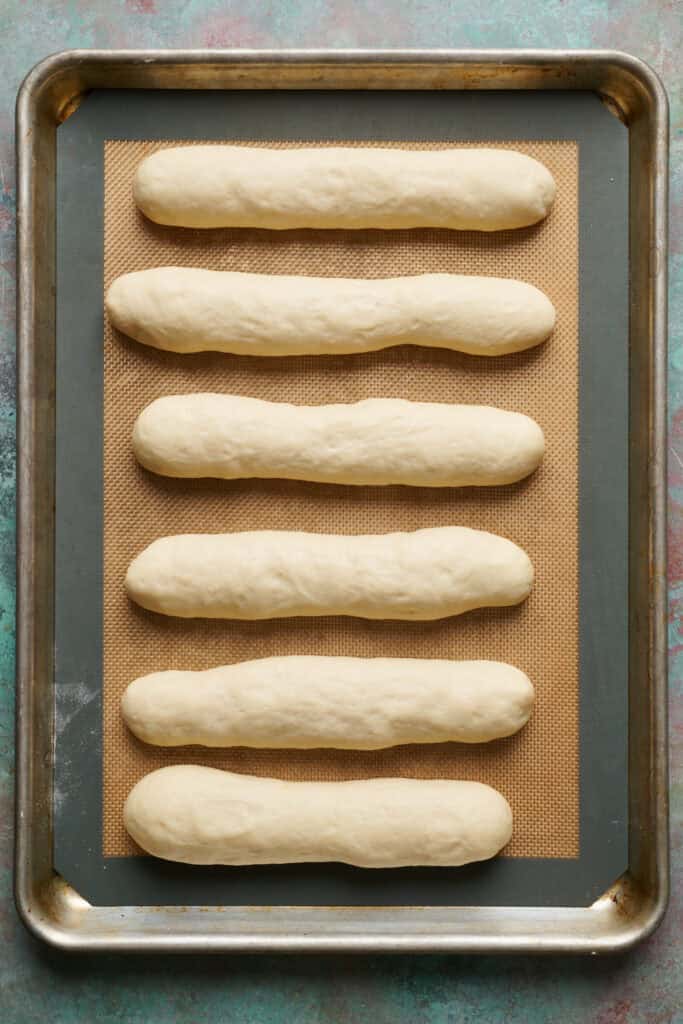
- Allow your breadsticks to rise for 30 to 60 minutes until puffed up and doubled in size.
- Once they are doubled in size, place them in the preheated 400F oven and bake for 12 to 14 minutes until nice and golden brown.
- Once they are baked, allow 5 minutes to cool slightly before enjoying. They will still be delicious and perfectly tender up to 3 days.
- Leftover breadsticks can be kept in an airtight container or resealable bag.
Nutrition
- Serving Size: 1 breadstick
- Calories: 154
- Sugar: 2.2 g
- Sodium: 388.7 mg
- Fat: 2.7 g
- Carbohydrates: 28.3 g
- Fiber: 1.1 g
- Protein: 3.8 g
- Cholesterol: 0 mg
Looking for More Sourdough Discard Recipes?
Discard Breadsticks FAQ
Sourdough discard should be thrown out if it develops mold, an off smell, or a pink or orange tint, as these are signs of spoilage. Excessive hooch or discard that's been sitting for over a month may also indicate it's time to start fresh. Always rely on your senses. When in doubt, throw it out!
Well, maybe not "anything" but it can go into a lot of things! Some personal favorites are pancakes, waffles, crackers, pizza dough, and quick breads. It adds a tangy flavor to them and prevents waste.
Yes! And I have from time to time when making this recipe. You can use sourdough discard straight from the fridge in most recipes. Cold discard will work just as well, though it might take slightly longer to mix into your dough or batter. If a recipe calls for room-temperature ingredients, you can let the discard sit out for 30-60 minutes to warm up, but it is not necessary.
Sourdough discard recipes often times require commercial yeast because discard typically doesn't have the strength or activity of an active starter. Since the discard hasn't been recently fed, it lacks the leavening power needed to make baked goods rise. Adding yeast helps provide the necessary lift for breads while the discard contributes flavor.


Rachel says
These were delicious and very low effort! Now I need to work on making the breadsticks look a little more even…
Joanie Simon says
So glad you enjoyed it! For sure it took me a few rounds to really get down the shaping on these.
Katie says
I can’t wait to try these! Am I able to make these ahead of time?
Joanie Simon says
Awesome! Let me know how you like them. They are best enjoyed the same day, but they're still good the next day.
Joan says
These were delicious - a soft, fluffy bread with a subtle garlic flavor. I like that they were quick and easy to make and used sourdough discard. I’ll definitely make them again. I also want to try the English muffins.
Joanie Simon says
Awesome! Glad they were a hit!
Mary says
These came out so good! Great and delicious way to use up sourdough discard. Served them with tomato orzo soup. Thank you for sharing your recipe!
Joanie Simon says
Hooray! So glad to hear it!! That sounds divine with that soup!
Cami Terkla says
Such an easy and delicious recipe! Love that it can be done in just a few hours.
Joanie Simon says
Yahoo! So glad to hear it!