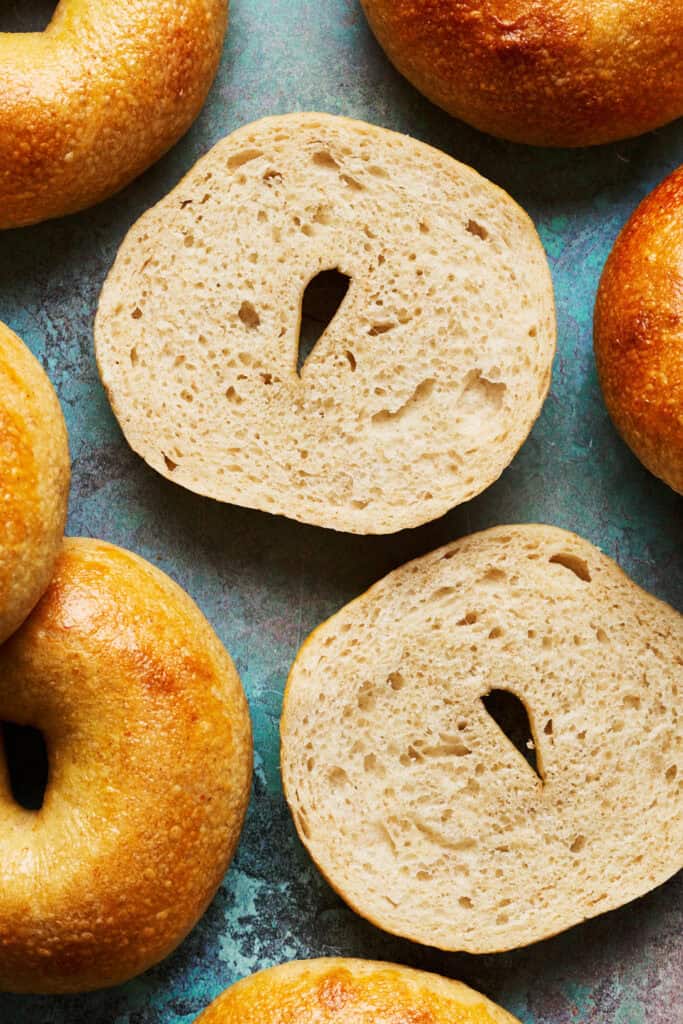
These homemade sourdough discard bagels are the perfect balance of chewy and soft. The recipe was specially developed through months of testing to ensure that they are still tasty for several days after they're made, too!

A Quest for Soft Bagels (that stay soft!)
The challenge I ran into in my bagel journey, was that the very best bagels out there are most enjoyable when they're fresh out of the oven, but chewy like shoe-leather not too long after.
I needed a bagel that tasted great fresh, but also was still enjoyable a few days later. And I'm happy to report after months of testing, I landed on a nice soft and chewy bagel. The trick was finding the right ratio of water to flour.
What is Sourdough Discard?
You get sourdough discard when you feed a sourdough starter. You typically need to discard a portion of it before feeding it with fresh flour and water to keep it active and healthy.
Obviously no one likes to waste food, so you can add the discard into various baked goods, such as pancakes, waffles, crackers, and bread recipes, to impart that distinct sourdough flavor and health benefits of sourdough.
However, discard is NOT active starter, so it won't cause breads to rise. Thus why in this recipe and a lot of sourdough discard bread recipes, you'll see use of active dry yeast.
Brand new to sourdough? Check out my Sourdough Starter for Beginner's Guide.
How to Make Sourdough Discard Bagels
Thanks to conventional yeast, these bagels come together in under 3 hours including proofing time.
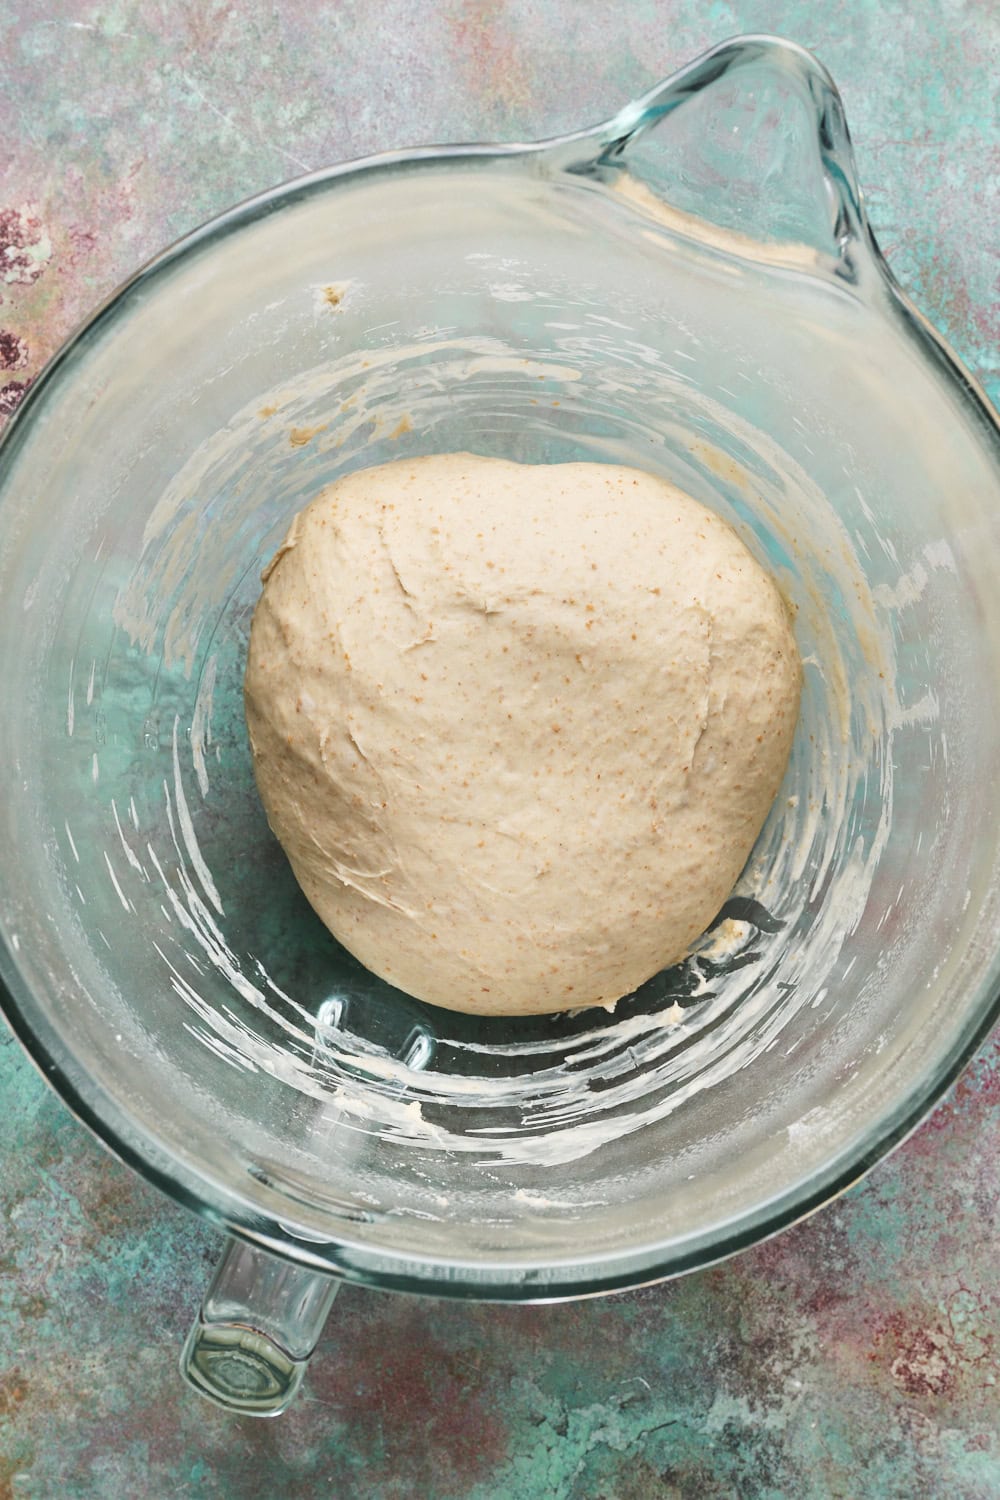
- Step 1: Bloom the yeast then add all the bagel ingredients to the bowl of a stand mixer and mix until a shaggy dough ball forms. Let the shaggy dough rest 10 minutes. The dough will seem dry, but trust the process. Resting will allow it to become more workable. After 10 minutes, knead for 8 minutes until you dough is smooth.
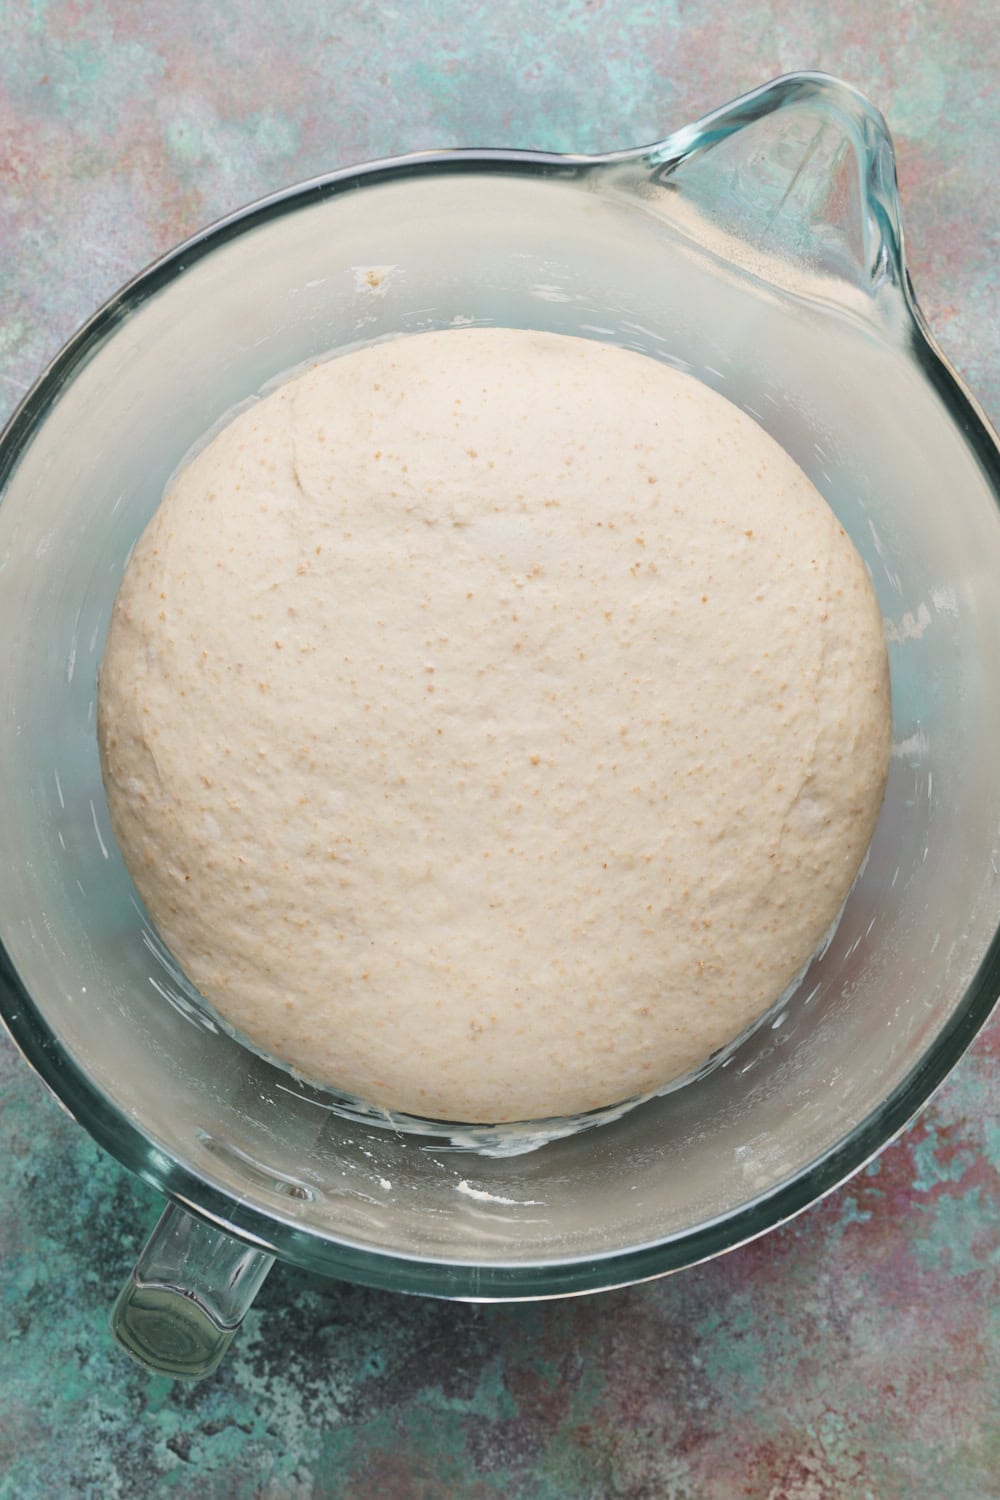
- Step 2: Cover the bowl and let the dough rise at room temperature for 60 to 90 minutes or until the dough has risen to double in size.
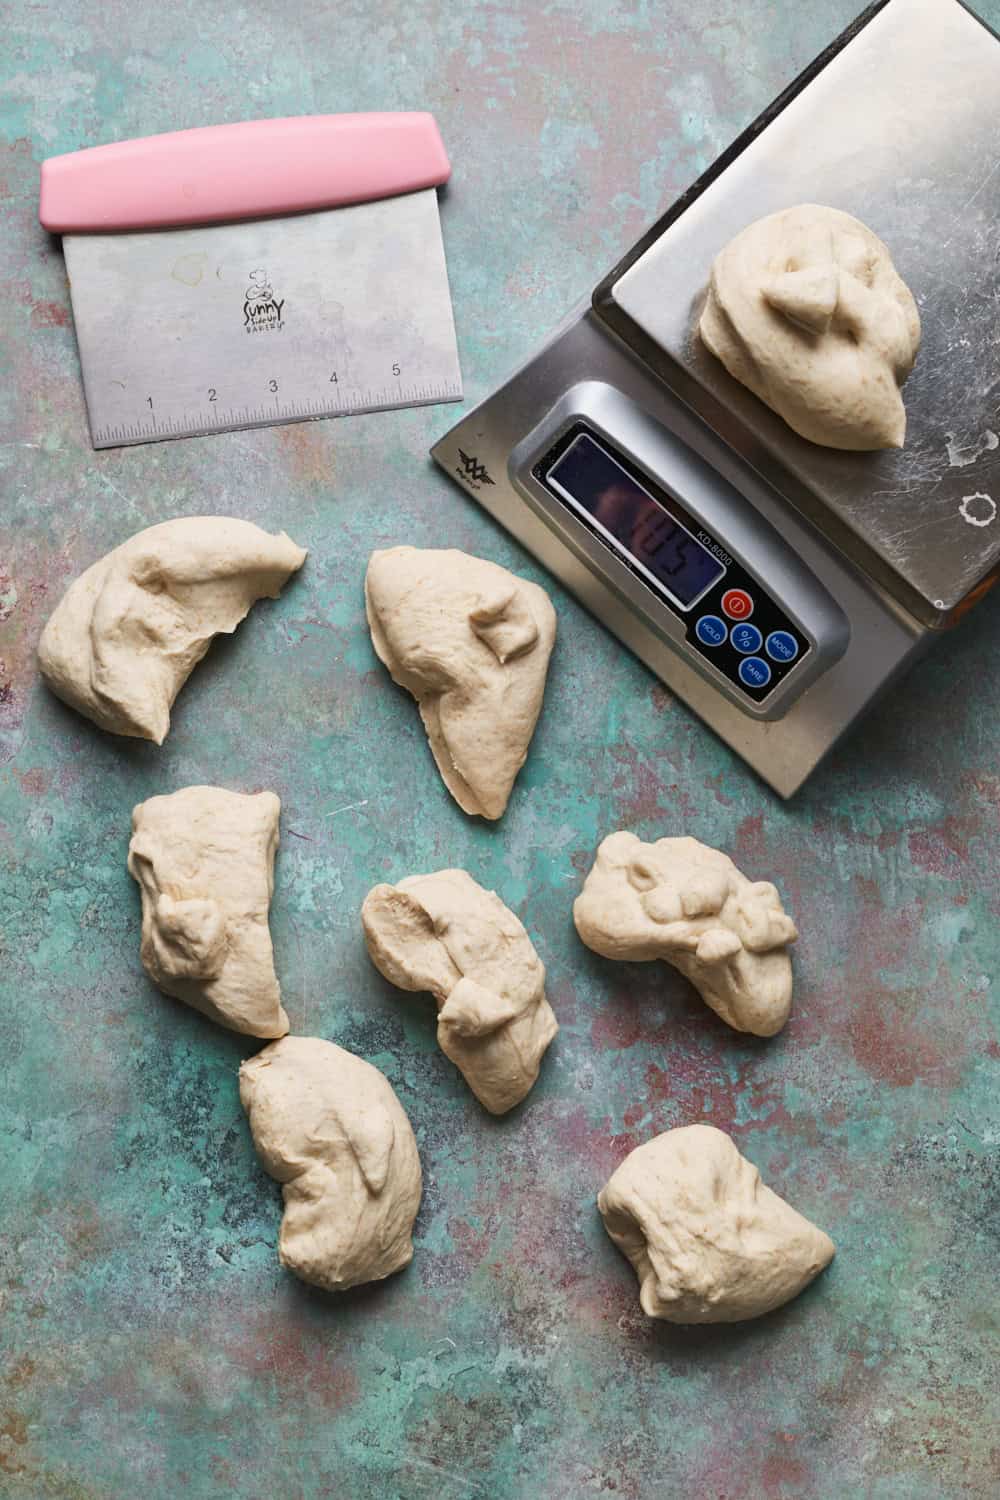
- Step 3: Punch down the dough ball and divide into 8 equal pieces (I weigh the whole dough and divide by 8 to then measure out each portion - you don't need to be that precise).
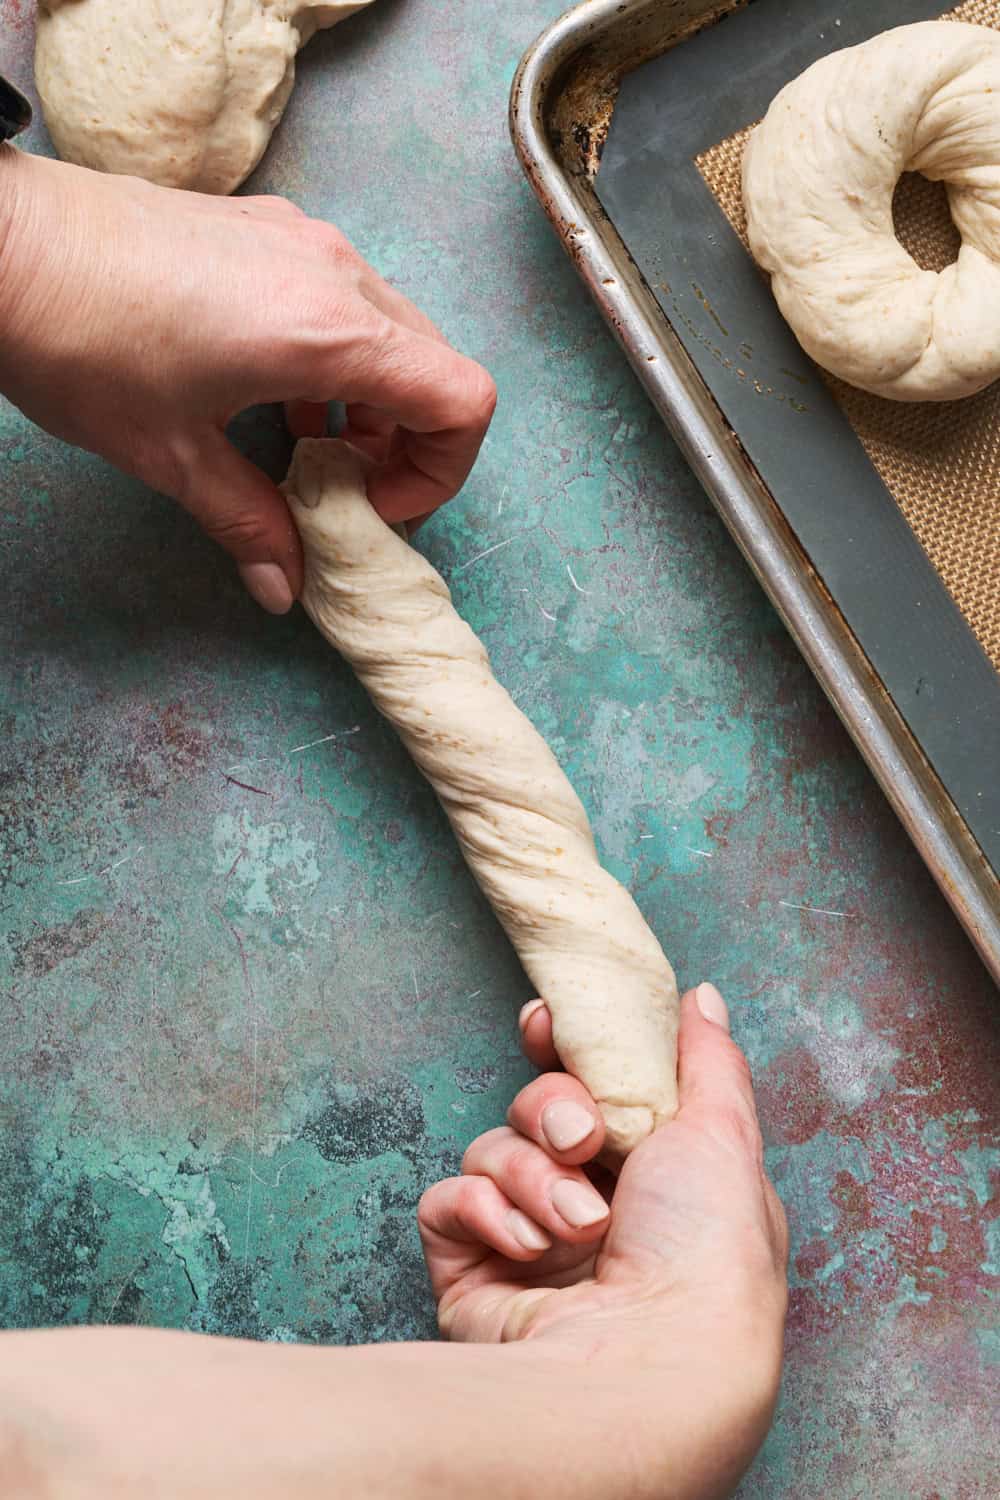
- Step 4: Take each portion and roll it into a 5 inch rope, then twist the rope (to create surface tension on the outside of the bagel).
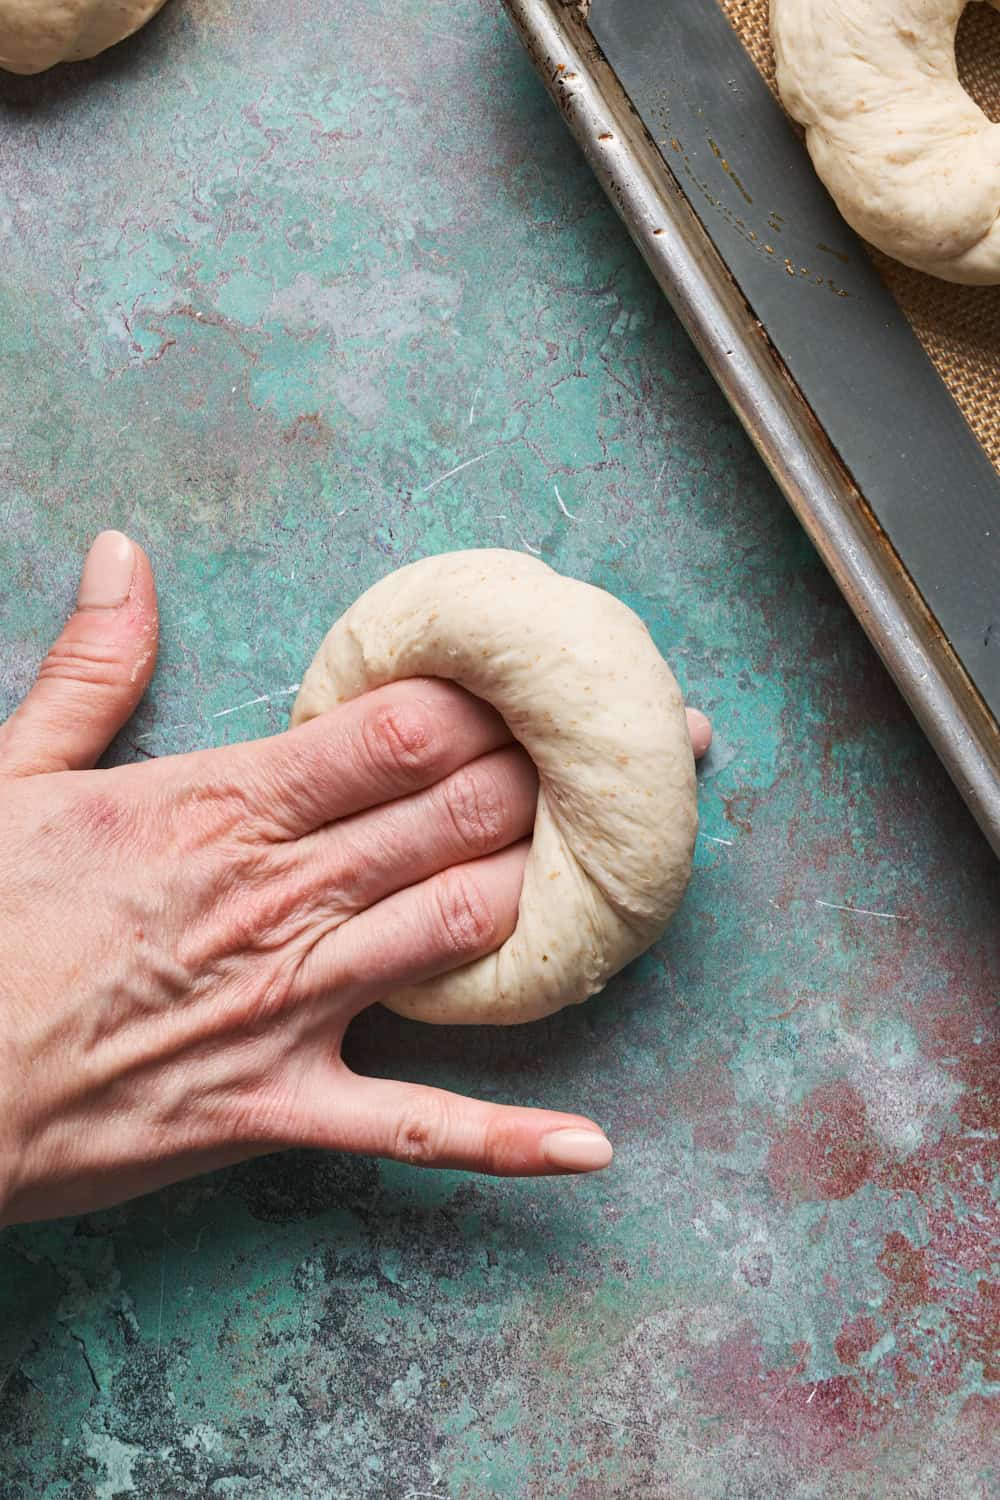
- Step 5: Secure the ends and roll to make it seamless.
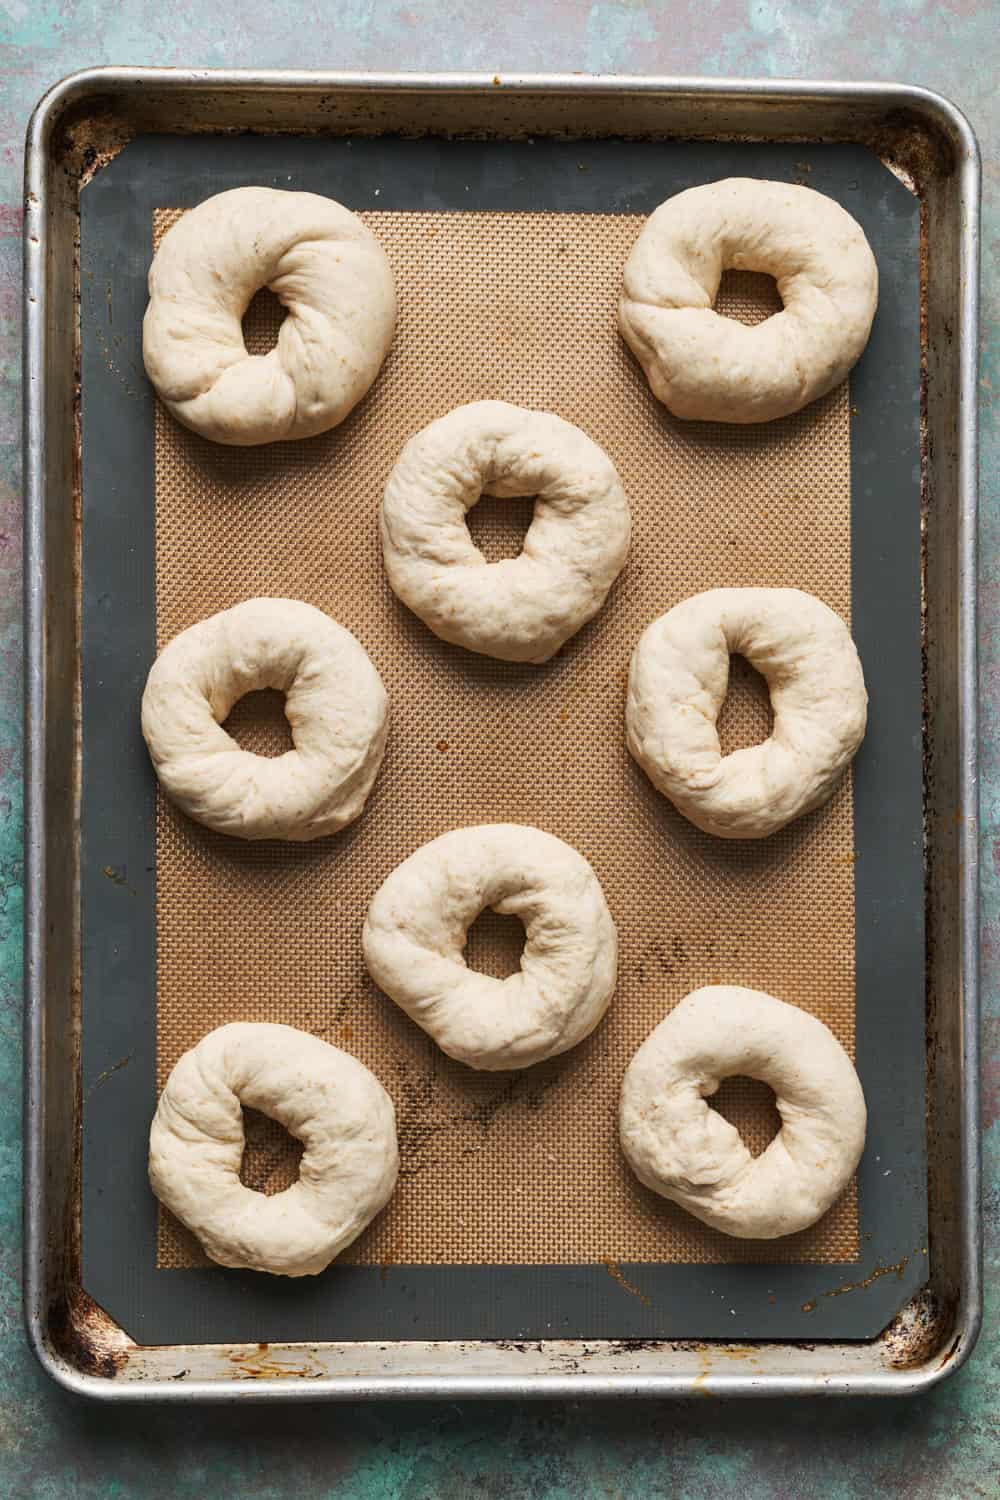
- Step 6: Place the formed bagels on a baking sheet to proof.

- Step 7: Once the bagels have puffed up, they're ready to boil.
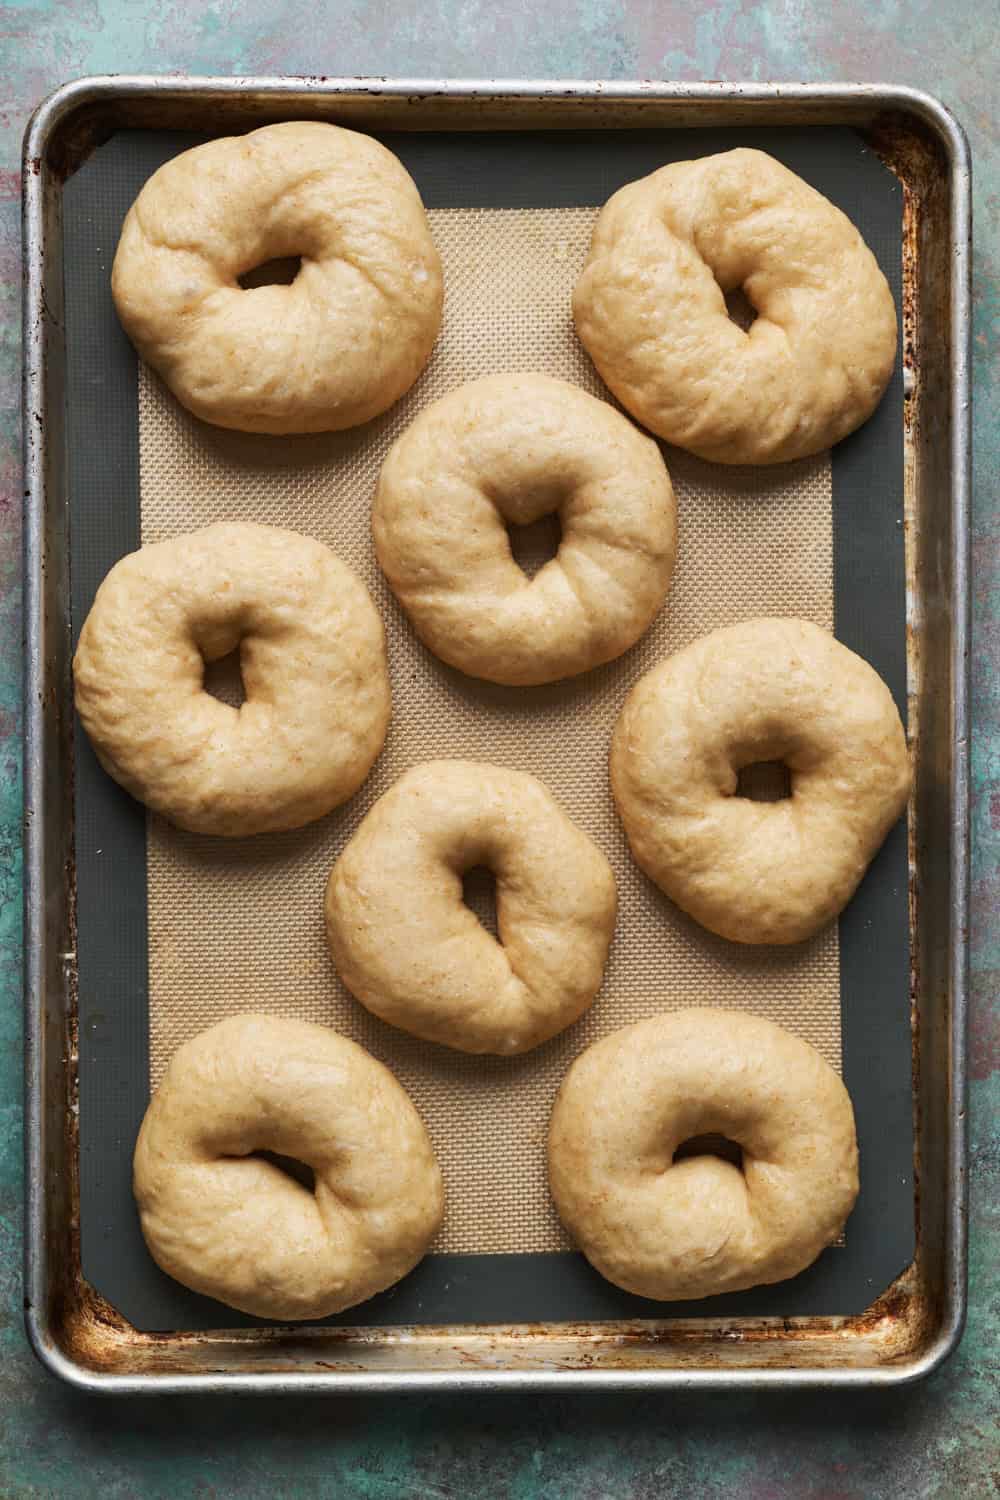
- Step 8: Boil the bagels in your water and molasses mixture, working in batches, boiling each bagel 20 - 30 seconds per side. Brush each with egg wash and any desired toppings.
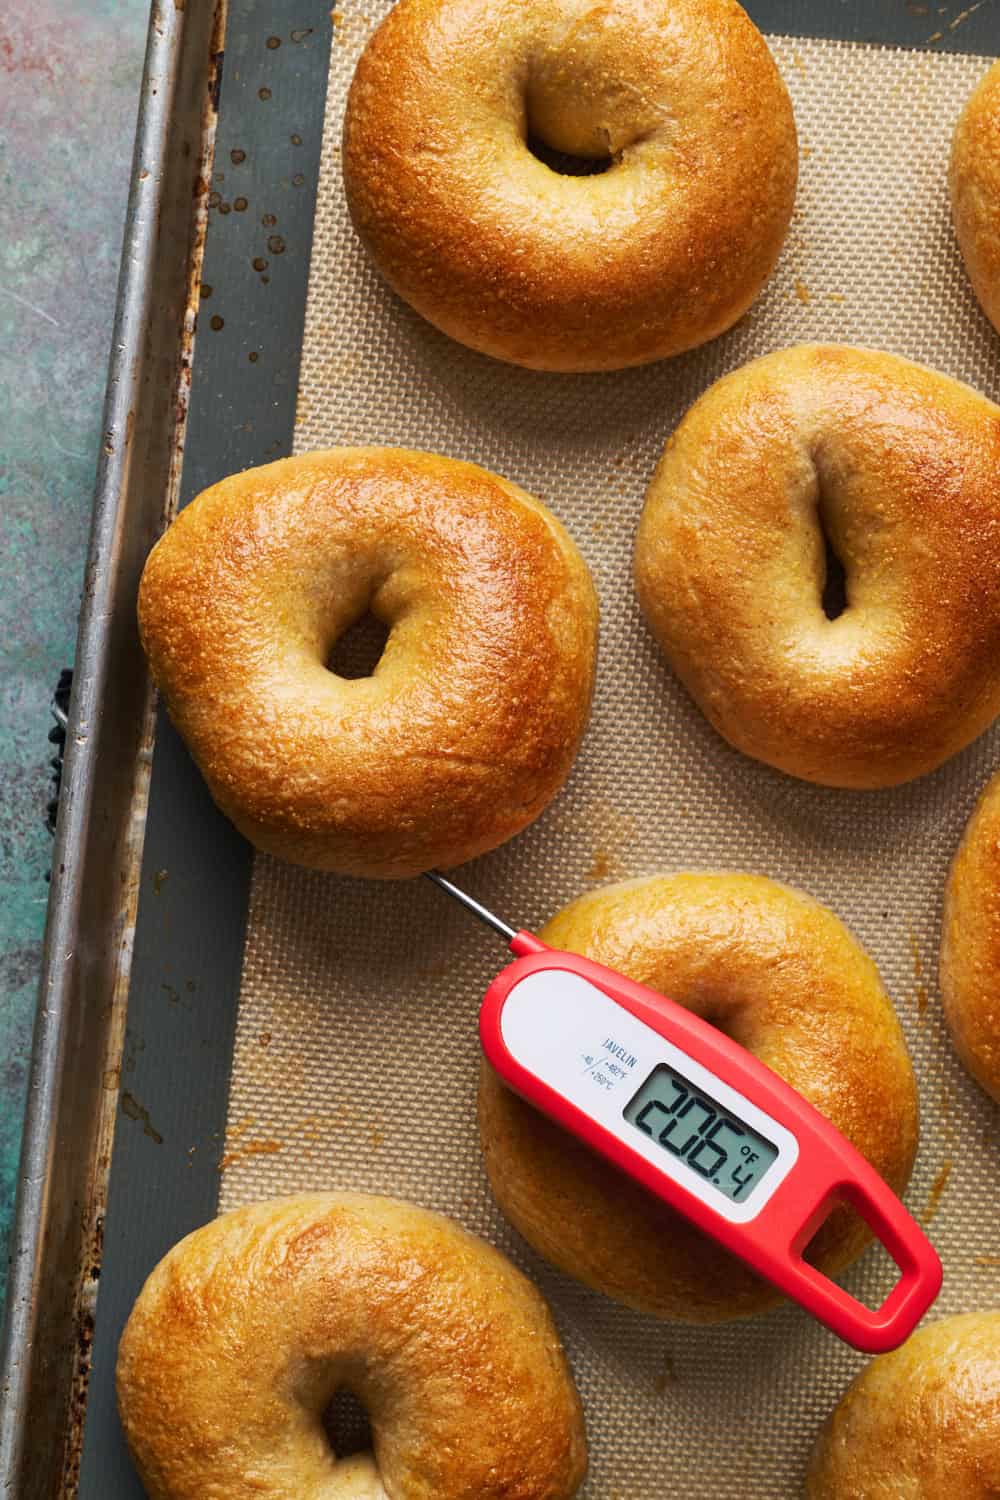
- Step 9: Bake the boiled bagels at 475F for 10 - 15 minutes until they're golden. If you have an instant read thermometer, they're done when the internal temperature is 200F to 210F.
Tips for Perfect Homemade Bagels
Don't Over-Boil Your Bagels
This was where so many recipes led me astray when I first started messing around with bagels. I saw folks boiling for a minute or more on each side. Which, if you love that super duper chewy, shoe-leather effect, go for it. But, I find 20 - 30 seconds each side to be total perfection. A hit of chewy exterior, a nice touch of color, that's all ya need.
High Heat Is Key
Want that lovely golden brown color on your bagels? The molasses in the boiling water helps. The sugars caramelize when baking.
But the other key is a hot hot oven. I tested at 400F and 425F and my bagels came out more blonde in color. 475F or 500F if your oven goes that high will give you a nice rise and signature golden color.
Make Ahead
I love to prep these bagels in the evening and bake them off the next morning. To do that, just follow the directions up to the point of shaping your bagels. Then instead of letting them puff up at room temperature, cover them with plastic wrap and stick them in the refrigerator overnight. The cold temperature will slow down the second rise process.
In the morning, just preheat your oven to 475F and get the water boiling. I boil the bagels directly from the refrigerator and then proceed with baking per the recipe. They're outta this world enjoyed fresh!
Freezing Bagels
They also freeze exceptionally well. Once they've cooled, I pre-slice them, stick them in a freezer bag and freeze them up to three months for optimal freshness. When you're ready to enjoy, pop them into the toaster to reheat and enjoy.
You can also freeze them unsliced and just let them come to room temp naturally in a bread box or plastic bag to help them retain their moisture.
I always have a stash of bagels, a sliced loaf of sourdough sandwich bread and cottage cheese blueberry muffins in the freezer to make weekday breakfasts and lunches easier.
Joanie's Balanced Bites for Blood Sugar
You probably already clocked that bagels are carbs. A delicious, chewy, deeply satisfying carb. If you're managing blood sugar, that's worth knowing upfront. But here's the good news: not all bagels are created equal, and these have a few things working in your favor.
What works for you here:
- Sourdough fermentation — The discard adds more than tangy flavor. Research suggests the acids produced during fermentation may help slow the digestion of starches, resulting in a gentler glucose response compared to conventional bread
- Homemade = controlled size — Store-bought bagels are often 4-5 oz monsters. These clock in around 107g (about 3.75 oz) each—still substantial, but not oversized
- 8g protein per bagel — More than most bread, which helps balance things out
How to make it work for your blood sugar:
The bagel itself is just the vehicle. What you put on it matters just as much. Load it up with protein, fiber and fat to blunt the glucose spike:
- Cream cheese + lox + capers (the classic for a reason)
- Egg and avocado
- Nut butter + a sprinkle of seeds
- Cottage cheese whipped with everything seasoning
Avoid pairing with high-sugar toppings like jam or sweetened cream cheese if you're trying to keep things steady.
Fun fact: Research shows glucose tolerance and insulin sensitivity are significantly higher in the morning, so breakfast really is the smartest time to enjoy your carbs!
Browse ➡️ Blood Sugar-Friendly Recipes

Description
These homemade bagels are a great way to use up sourdough discard and are the perfect balance of chewy and tender. They're just as good for days after they're made, too!
Ingredients
Bagel Dough:
- 1 ½ tsp (5g) active dry yeast
- 1 cup (240g) warm water, 100-110°F
- ½ cup (100g) sourdough discard
- 2 ½ tsp (10g) granulated sugar
- 4 cups (480g) unbleached all-purpose flour or bread flour
- 1 ½ tsp (8g) salt
- 1 Tbs (21g) honey
Toppings (optional):
- 1 egg for egg wash
- Everything but the bagel seasoning, sesame seeds, poppy seeds, cinnamon sugar
Boiling Solution:
- 2 quarts water
- 2 Tbs molasses
Instructions
- Add active dry yeast to the bowl of a stand mixer with the warm water and let it sit for 5 minutes until the yeast is foamy on top.
- Once the yeast is foamy, add sourdough discard, granulated sugar, flour, salt and honey to the stand mixer.
- Using the dough hook on your mixer, mix on medium low speed until a shaggy ball forms. Let it rest for 10 minutes so that the kneading will be easier. The dough will seem dry, but trust the process.
- Once it's rested it should be more workable. Knead the dough for 8 - 10 min on medium speed until smooth and elastic.
- Cover the bowl with a damp towel or plastic wrap for 1 hour until it's doubled in size. If you're in a warm place (above 75F) this might happen faster so keep an eye on your dough.
- Once the dough has doubled, pull it out of the bowl onto a lightly floured surface.
- Divide the dough into 8 balls, approximately 107g each.
- For each dough ball, roll it into a 5 inch rope, then twist to create tension on the surface of the dough and secure the other side to join the ends, and roll them together on the surface so they fully connect.
- Place each formed bagel on a parchment or silpat lined baking sheet and cover with plastic wrap for 30 - 45 minutes until the bagels have puffed up. You don't want to over-proof them as that will cause the bagels to flatten when they bake.
- Preheat your oven to 475F and heat 2 quarts water to a rolling boil with 2 Tbs molasses.
- Working one at a time, gently lift a bagel off the mat and using a slotted spoon, gently lower it into the boiling water and boil for 20 - 30 seconds, then flip and boil another 20 - 30 seconds.
- Shake off the excess water and place each boiled bagel on a fresh parchment or Silpat lined baking sheet.
- If you like, brush the bagels with egg wash for extra sheen. Also feel free to dip into cinnamon sugar or everything but the bagel seasoning.
- Bake the bagels at 475F for 10 - 15 minutes minutes until golden brown and an internal thermometer inserted into a bagel registers 205 - 210F.
- Remove the bagels from the oven and once they're cooled, enjoy!
- Keep bagels in an airtight bag or container up to five days or freeze up to 3 months.
Nutrition
- Serving Size: 1 bagel
- Calories: 255
- Sugar: 1.9 g
- Sodium: 479.1 mg
- Fat: 1 g
- Carbohydrates: 52.9 g
- Fiber: 2.6 g
- Protein: 8 g
- Cholesterol: 0 mg

Did you make this recipe? Let me know!