My 2-ingredient recipe for a Jello Brain is the right amount of creepy and easy to customize to your favorite flavor of the jiggly treat.
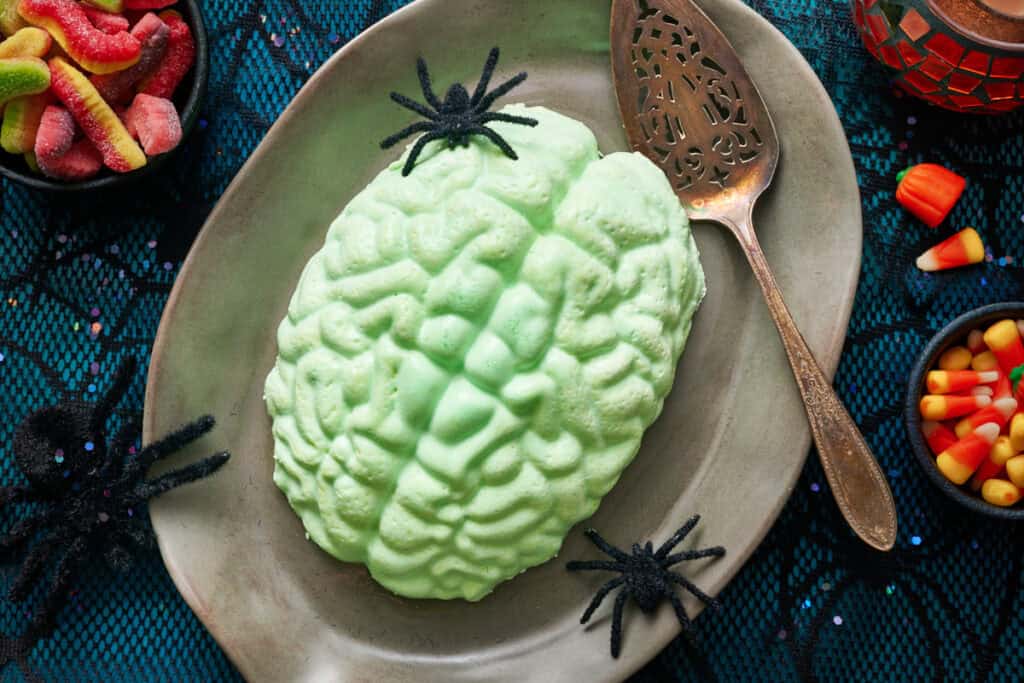
If you've been lured in like I was to buy this silicone brain Jell-O mold, this is now my tried-and true recipe.
Why Cool Whip Makes a Better Brain
Most Jello brain recipes call for evaporated milk to make the brain opaque and flesh-like. I tested that method and it works, too! But I prefer Cool Whip, and here’s why:
Fluffier texture. Evaporated milk gives you a standard jiggly Jello texture. Cool Whip creates something closer to a mousse. It's lighter and honestly more fun to eat (if anyone's brave enough 👻).
No curdling risk. Evaporated milk can separate or curdle if it's not fat-free, leaving you with a speckled, grainy brain. Cool Whip mixes in smoothly every time.
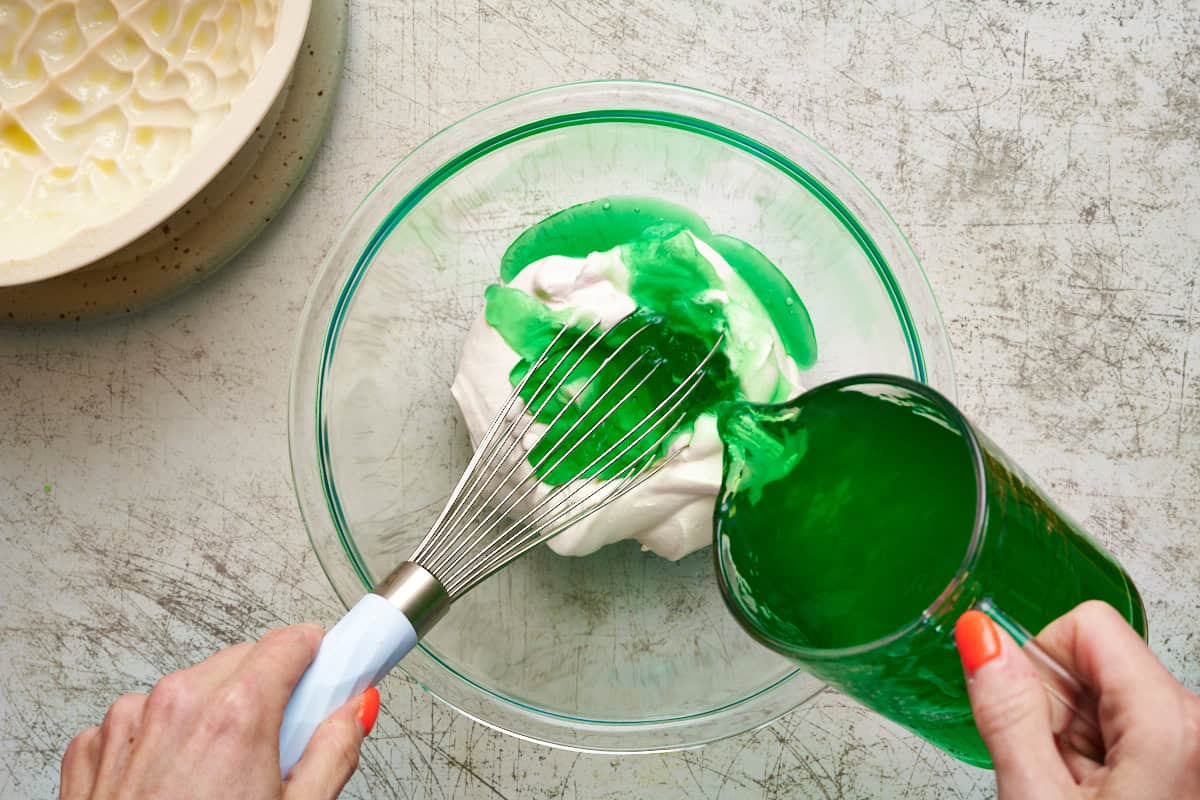
The key is letting the Cool Whip fully thaw before whisking it into the chilled (but still pourable) Jello. Add it slowly and whisk as you go. This keeps the texture smooth instead of streaky.
How to Make a Jello Brain
Time needed: 5 hours
Ready to get jiggly with it? Let's go!
- Prepare the Jell-O
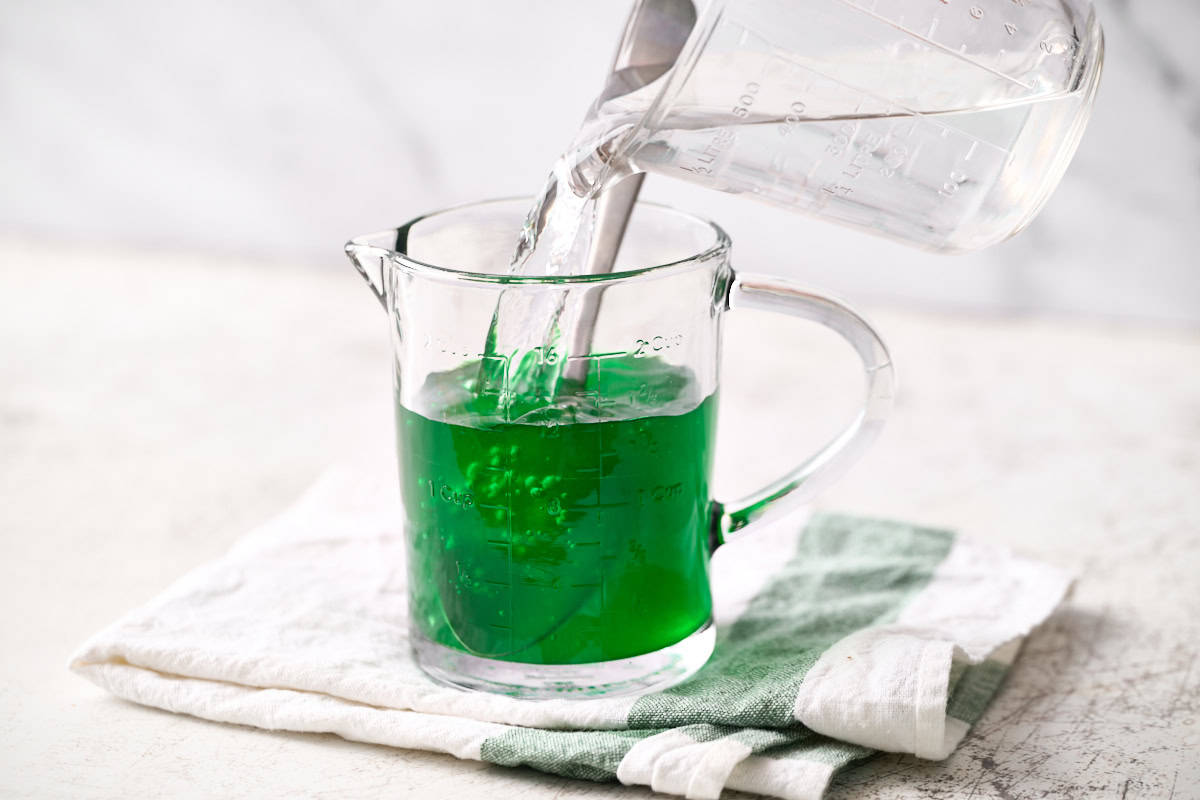
Add 3oz of Jell-O mix to 1 cup of boiling water and stir until it's dissolved. Then add 1 cup of cold water to it and refrigerate the Jell-O for 1 hour. You want it to cool and thicken slightly, but still be pourable for the next step.

- Combine the Jell-O and Cool Whip
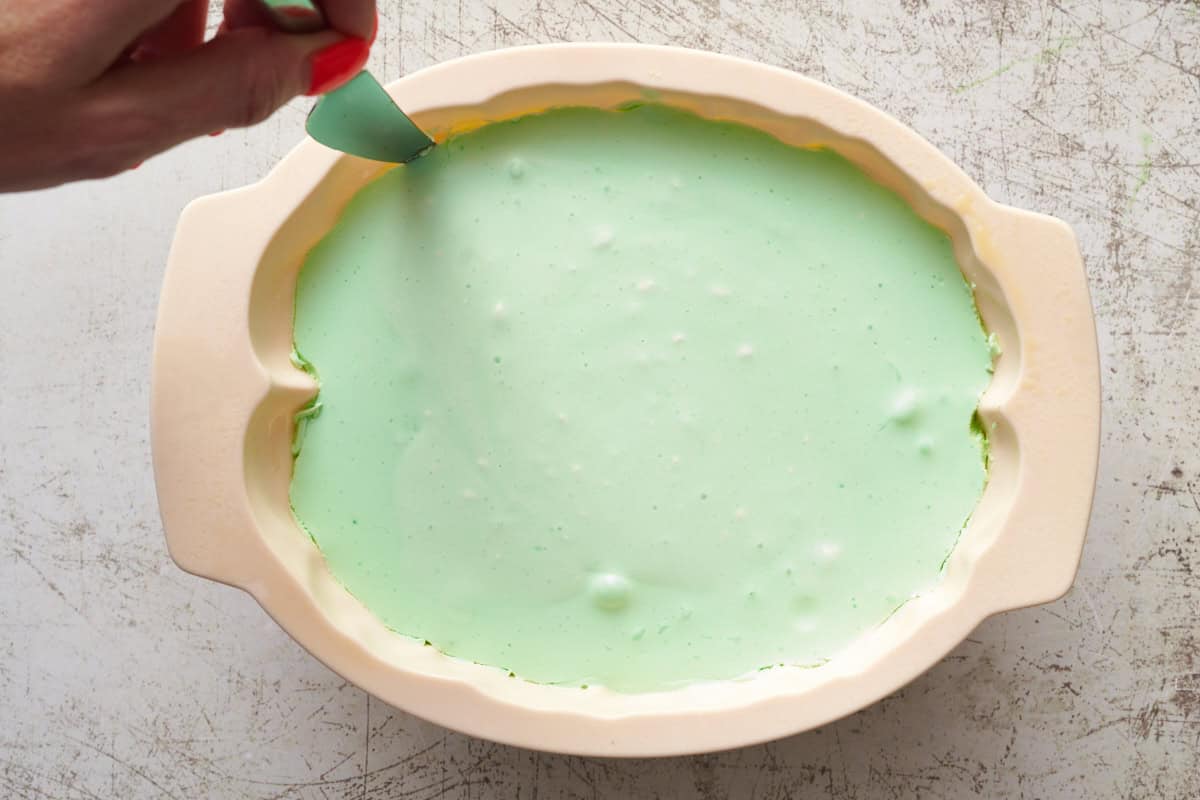
Use a whisk for this step. Put 2 cups of defrosted Cool Whip into a large bowl then pour the Jell-O in slowly and gradually, whisking continually as you add it to the whip. This will help to ensure a smooth texture, otherwise, the Cool Whip and Jello will separate and you'll end up with a kinda speckly final dessert. That will still work, but I prefer a nice, homogenous green mixture. If you want to make it an even more vibrant green color, add green food coloring.
- Into the Mold it Goes
First spray the plastic mold with non-stick cooking spray so that your brain comes out clean after it's set. Then pour the gelatin mix into the mold and pop it in the fridge at least 4 hours until the Jello is set.
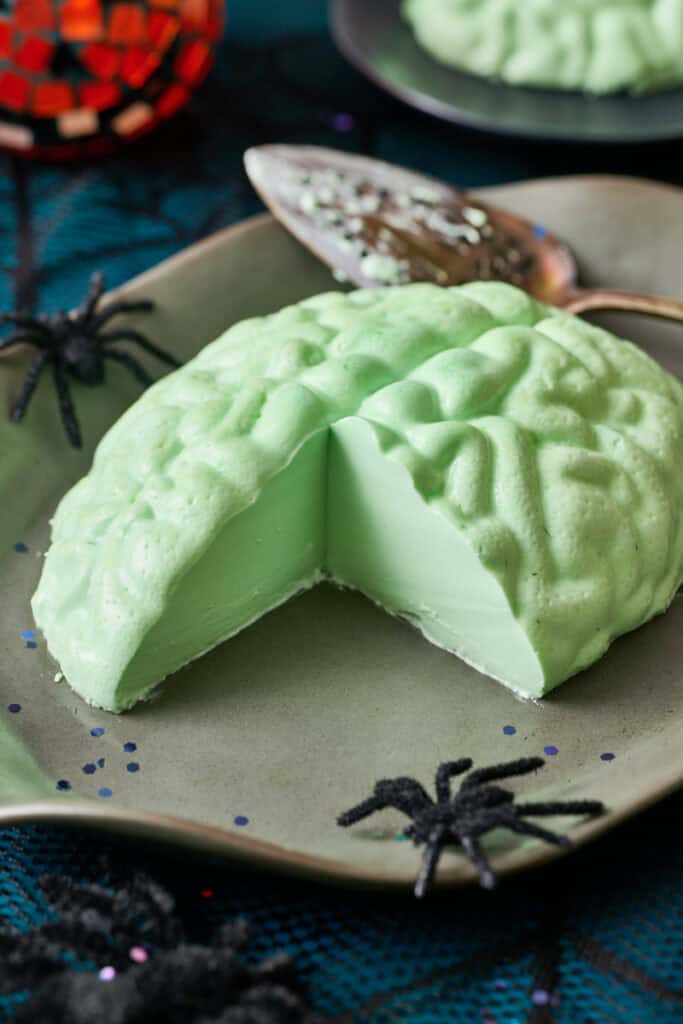
- Release the Brain
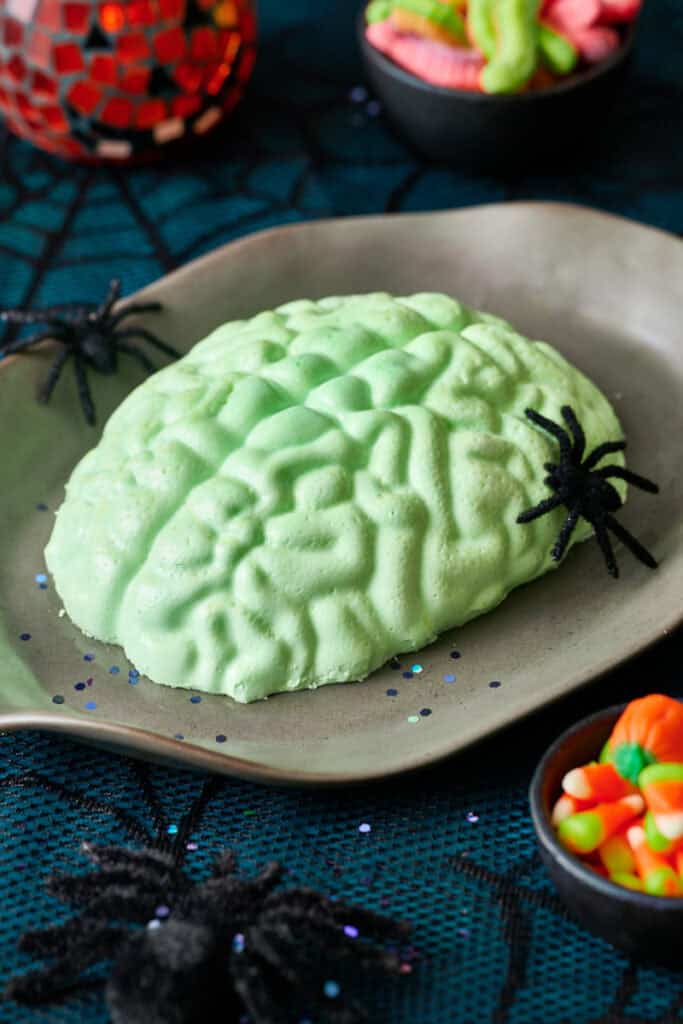
I run a knife around the edge of mold before then placing the serving plate on top of the mold, turning the whole thing upside down. At this point, the brain should release from the mold and you'll be ready to serve it to your party guests!

I can't wait to bring this to my sister's annual Halloween party. She always serves spaghetti bolognese. Do you have a Halloween tradition? I'd love to hear about it in the comments below!
Tips for Getting the Brain Out of the Mold
This is the moment of truth! I went through a lot of stuck brains before perfecting this technique. Here's how to nail it.
Start with cooking spray. Before you pour the Jello mixture into the mold, give the inside a light coat of nonstick cooking spray. Get into all the little folds and crevices. This one step makes everything easier later.
Make sure it's fully set. Give it at least 4 hours in the fridge, but overnight is even better. If it's not completely firm, it'll fall apart when you try to unmold it. Patience pays off here.
Run a knife around the edge. Before flipping, take a thin knife or offset spatula and gently run it around the outer rim of the mold to break the seal.
Try the warm water dip. Fill your sink or a large bowl with a few inches of warm (not hot) water. Dip the mold in just to the rim for about 10-15 seconds. This loosens the Jello without melting it. Don't leave it too long or you'll lose those creepy brain wrinkle details.
Have your plate ready. Place your serving plate on top of the mold, then flip the whole thing over in one confident motion. Give it a few firm shakes or gentle wiggles and you should feel the brain release and plop down onto the plate.
Still stuck? Use your fingers to gently pull the Jello away from the mold walls while it's inverted. A little patience and it'll slide right out.
Color and Flavor Variations
Lime green worked perfectly for the zombie brain my kids requested when I first developed this recipe, but you can take this in a lot of different directions depending on the vibe you're going for.
Peach = realistic flesh tone. If you want it to look disturbingly lifelike, peach Jello with Cool Whip gets you that fleshy pink-grey color.
Cherry or strawberry = bloody brain. Darker red reads as gory, especially with a raspberry drizzle on top. For the blood drizzle, just mix ¼ cup seedless raspberry jam with a splash of water, microwave for 20 seconds, and spoon it over so it drips down.
Blue = frozen brain. Berry blue Jello creates a cool, icy effect. This is great if you're doing a mad scientist lab theme.
Want actual grey? Start with peach or a light-colored Jello and add equal parts red, green, and blue food coloring (about 10-15 drops each). Adjust until you get the shade you want.
Go bold with the color. If your brain looks a little muted after mixing in the Cool Whip, a few drops of food coloring can punch it up. I've done this with lime green to get a more vibrant zombie effect.
Sugar Free. I've tested this with Zero Sugar Jell-O and sugar free whipped topping and it worked just the same. Only heads up is that the weight of 1 packet of sugar free Jello is .6 oz versus the full sugar version is 3 oz since artificial sweetener weighs less, but makes the same amount of Jello.
Joanie's Balanced Bites: What to Eat with a Jello Brain
What's a sugary, zero-nutritional-value recipe doing on a blood sugar-friendly website? Fair question!
Truth: We're not eating Jello brains every day. This is a once-a-year Halloween novelty. And when treats are intentional, they fit just fine into a balanced life.
If you're mindful of blood sugar, simply enjoy a slice after a balanced meal with plenty of protein, fat, and fiber. That combination helps blunt the glucose impact of the sugar.
For example, serve the brain as a creepy centerpiece alongside a bowl of Steak Chili (protein and fat) and a big salad with olive oil dressing (fiber and healthy fats). By the time you get to dessert, your body's already primed to handle it.
Browse ➡️ Blood Sugar-Friendly Recipes
More Halloween Treats

Description
You only need two ingredients (aside from water) for this Halloween Brain Jello mold. It's a sweet and spooky jiggly conversation piece.
Ingredients
- 1 cup boiling water
- 3 oz green Jello
- 1 cup cold water
- 2 cups (5oz) frozen whipped topping
- nonstick cooking spray
Instructions
- Add 3oz of Jell-O mix to 1 cup of boiling water and stir until it's dissolved.
- Then add 1 cup of cold water to the jello mixture and refrigerate for 1 hour. You want it to cool and thicken slightly, but still be pourable for the next step.
- Add 2 cups of defrosted Cool Whip into a large bowl then pour the chilled Jell-O in slowly and gradually, whisking continually as you add it to the whip. This will help to ensure a smooth texture, otherwise, the Cool Whip and Jello will separate and you'll end up with a kinda speckled final dessert.
- Spray the silicone brain mold with non-stick cooking spray so that your brain comes out clean after it's set.
- Then pour the gelatin mix into the mold and pop it in the fridge at least 4 hours until the Jello is set.
- Once the Jello is set, run a knife around the edge of mold before then placing a serving plate on top of the mold, turning the whole thing upside down. The brain should release and be ready to serve.
- If you're not ready to serve it right away, cover the brain in plastic wrap and keep chilled in the refrigerator up to two days.
Nutrition
- Serving Size:
- Calories: 45
- Sugar: 4.8 g
- Sodium: 15.1 mg
- Fat: 2.5 g
- Carbohydrates: 5 g
- Fiber: 0.2 g
- Protein: 0.7 g
- Cholesterol: 0.4 mg
Did you make this recipe? Let me know!