There's a moment in every sourdough journey when you pull a loaf from the oven, hear that crackle, and think "wait, I actually made this!" This is the recipe that created that moment for me.
After a year of tinkering, tracking, and more than a few "bake it anyway" experiments, I've landed on my daily-driver, ride-or-die sourdough recipe.
Not only is it my regular go-to on bake days, but it's the base for endless sourdough variations. Jalapeño cheddar, apple cinnamon, grated butter for a croissant loaf. Different flours, different liquids, all kinds of add-ins.
Master this one loaf and you'll be considered the pro baker by all your friends and family.
Sourdough Notes Before We Begin
Everything we’re about to talk about in this recipe assumes you have the basics of sourdough and starter maintenance under your belt. If not, check out my Beginners Guide to Sourdough to get your starter ready for baking. From there, other terms that we’ll dive into here that will be new if this is you first loaf:
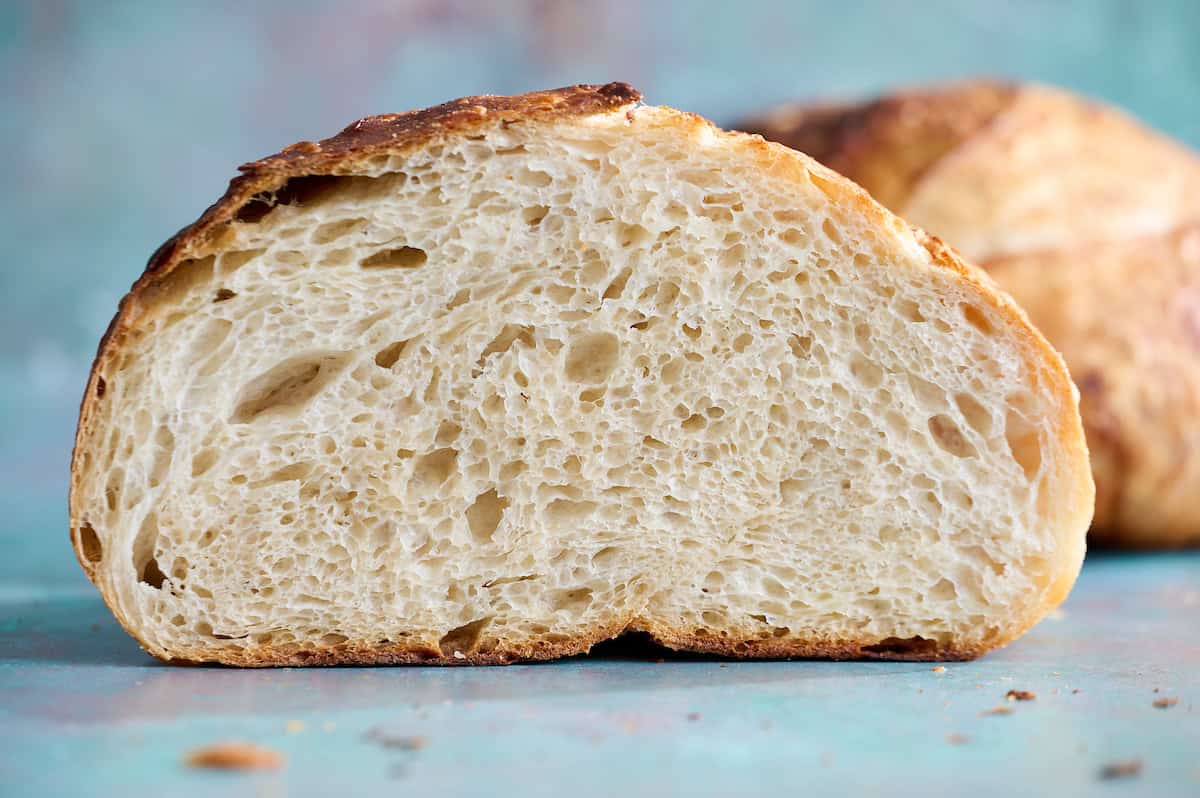
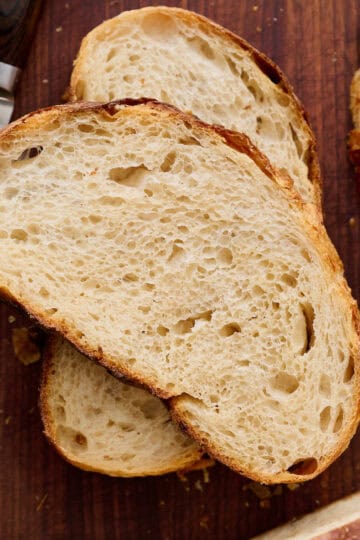
- The Crumb (The Interior) describes the interior texture of your loaf. Unlike the super-high-hydration loaves with huge, impractical caverns that seemingly dominate my social media feeds, I aim for a moderately open, semi-open crumb. This means the air pockets are evenly distributed , ranging from small to medium in size. This structure proves successful gluten development and allows the bread to have a light, tender texture while remaining sturdy enough to hold a spread or be used for sandwiches.
- Autolyse is the initial 30-minute rest period immediately after combining the ingredients into a shaggy dough. It allows the flour to fully hydrate and jump-starts the gluten development, making the dough easier to handle and reducing the overall mixing time.
- Bulk Fermentation is the heart of the flavor and lift. Just like fermenting beer or saurkraut, sourdough bread is fermented! We manage fermentation by watching for specific signs (The Dome, The Jiggle, The Poke Test) which I’ll teach you in Step 6 of the photo directions below. Trust the dough rather than rigid timing.
- Oven Spring describes the rapid expansion of the loaf in the first 15 minutes of baking, driven by the steam we create and the structure we built during folding and shaping. More oven spring means a higher, happier loaf.
- Baker’s Percentage is a fundamental concept in baking where the flour is always 100%, and every other ingredient is measured as a percentage of the flour's weight. This system allows for easy scaling of the recipe and clearly defines the hydration level of the dough. Higher hydration doughs at 80% or higher are much sticker and can be challenging to work with. For example, when I feed my starter, it’s equal parts water to flour, so 100% hydration because the amount of flour I add is the same as the amount of water. This loaf recipe is 70% hydration which you will see in the ingredients breakdown.

Essential Gear You'll Need
Since timing and consistency are everything in sourdough, these tools are non-negotiable for success:
- Digital Kitchen Scale: Accuracy is so helpful in bread baking. I measure all ingredients in grams to ensure the proper ratios and consistency.
- Large Mixing Bowl: For combining ingredients and the bulk fermentation phase. You can do everything by hand easily, no need for a mixer.
- Dutch Oven with Lid: Essential for baking. It traps steam, which mimics a professional baker's oven, maximizing oven spring and creating a crispy crust.
- Dough Scraper (Silicone): The silicone scraper helps gently remove the dough from the bowl.
- Lame or Straight Razor: For scoring the loaf before baking to control the oven spring and also great for creating fancy patterns.
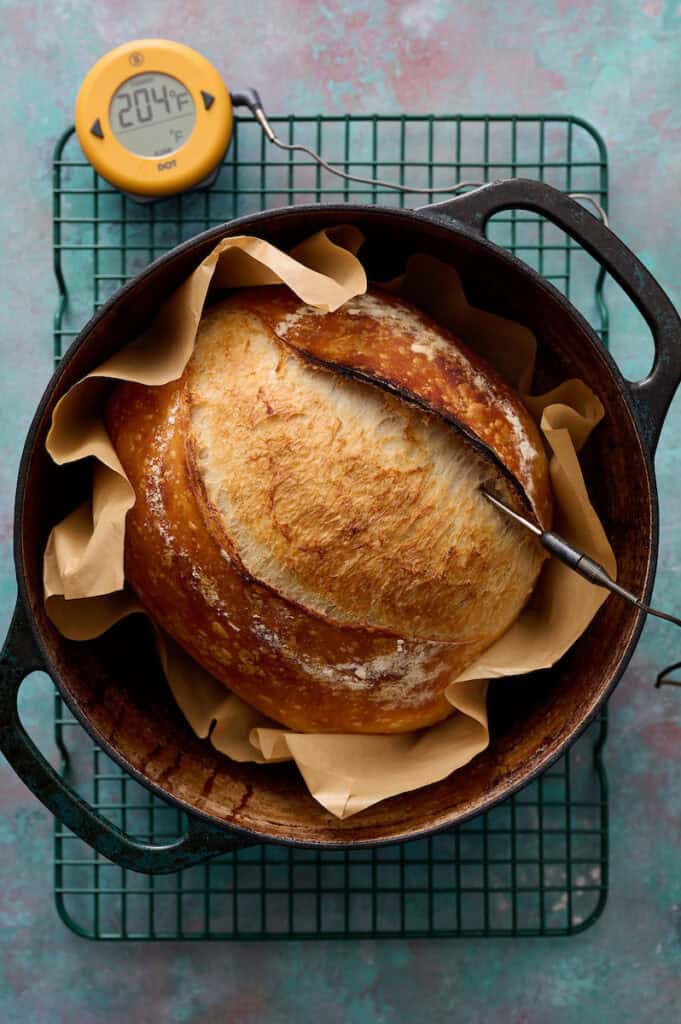
- Digital Instant-Read Thermometer: Essential for accurately confirming when your loaf has finished baking, ensuring the perfect interior texture. The one I use has a long stick (a probe) that you leave inside the bread after you take the lid off the Dutch Oven. The screen stays outside the oven, and you can tell it to ring an alarm when the bread is perfectly done, in this case 205F. This means you don't have to watch the clock, you just wait for the beep! I use this same thermometer for all baked goods and meats.
Shaping & Proofing Baskets: Batard vs. Boule
This recipe is structured to produce a batard (oblong/oval shape). While a boule (round shape) is popular, the batard offers a few key advantages:
- Even Slicing: The oblong shape makes for more uniform slices, ideal for sandwiches and toast.
- Easier Shaping: Many bakers find it slightly easier to achieve even surface tension when rolling the dough into a log (Steps 10-12 in the photo instructions below) as opposed to a perfect round.
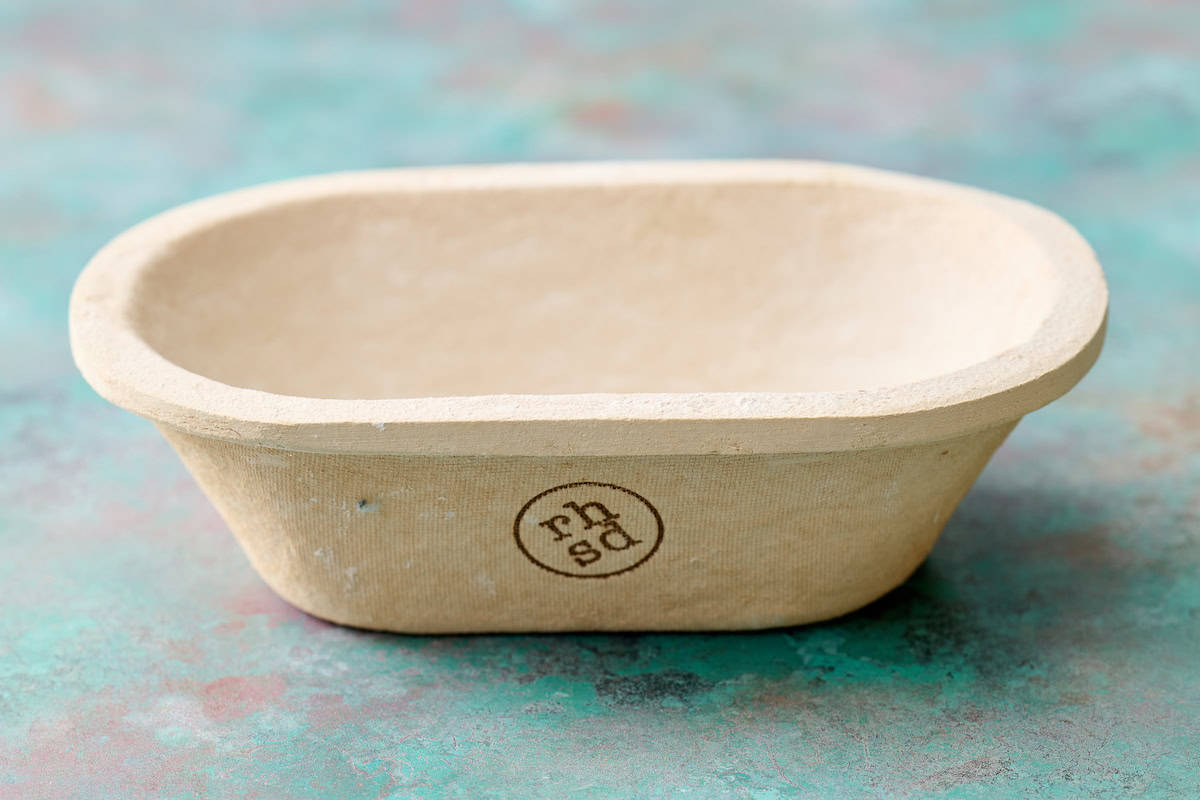
Choosing Your Proofing Basket (Banneton)
- The Best Basket: I use an oval-shaped proofing basket (banneton) to accommodate the batard shape.
- Wood Pulp Advantage: I specifically prefer wood pulp baskets over linen-lined ones. These baskets are naturally moisture-wicking, which helps pull excess moisture from the dough's surface during the cold proof. This is a subtle but powerful step toward achieving a more thin, crispy and beautiful crust in the final bake. With proper storage, these wood pulp baskets can be used for years.
Homemade Sourdough Bread: Step-by-Step Instructions
Now that you have your gear and ingredients, let's get into the process. Remember, trust the dough, not the clock! Though there is a sample schedule further below in the post though to set some rough expectations for timing.
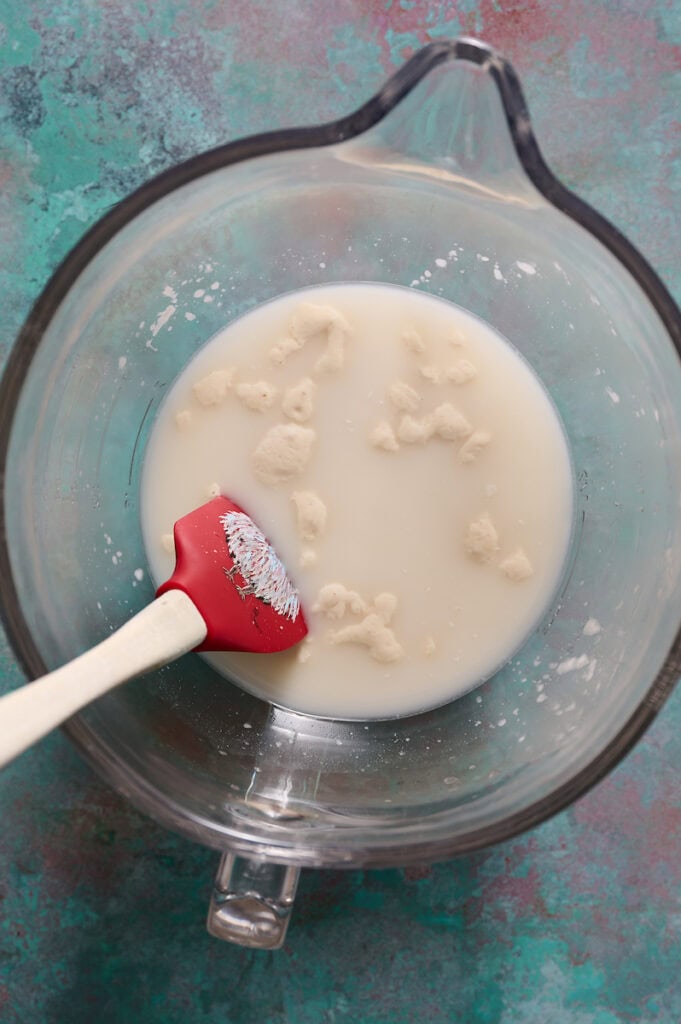
Step 1: Mix the starter and water
Combine 150g of peaked sourdough starter with 325g filtered room temperature water and mix until the water appears milky
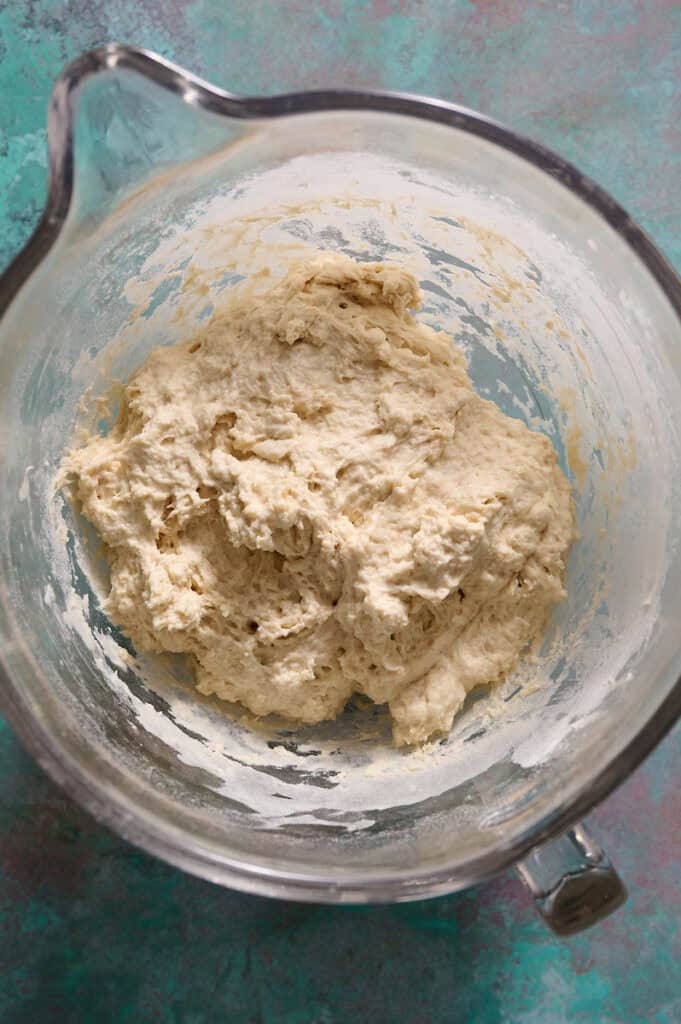
Step 2: Add the flour and salt
To the water and starter, add 500g of unbleached bread flour and 9g of fine sea salt and mix until you get a shaggy dough. You can use the dough hook on a stand mixer or do this by hand. Then cover the bowl and leave the dough at room temperature for 30 minutes before starting your stretch and folds.
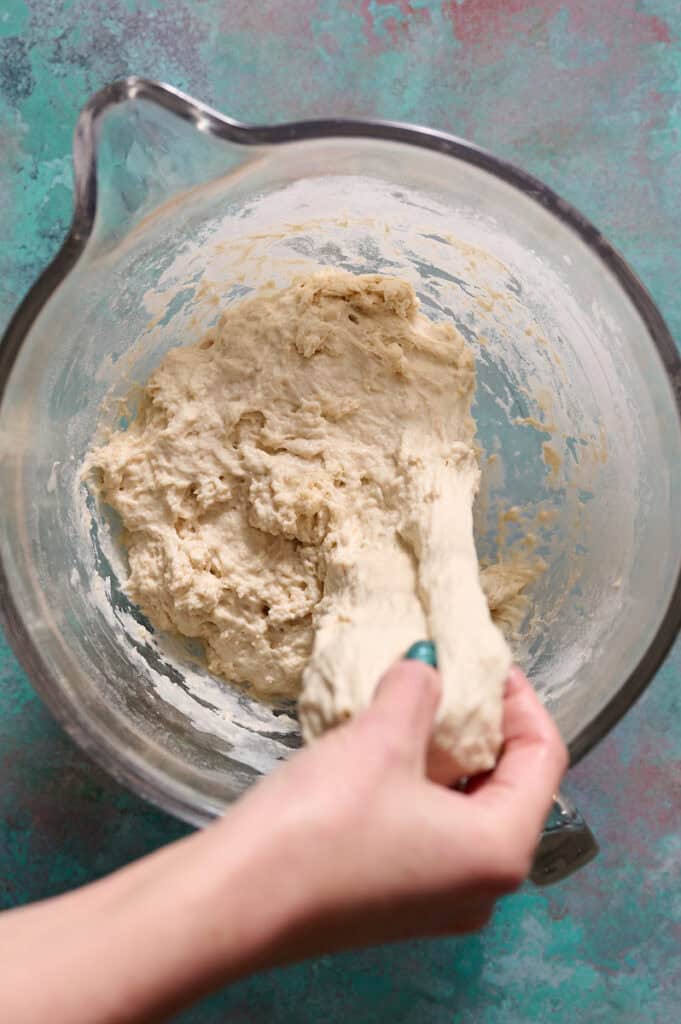
Step 3: Stretch and Folds
Once the initial 30 minutes has elapsed do 8 - 12 sets of stretch and folds. To do a stretch and fold, dampen your fingers with water, then scoop one of the sides with your fingers and thumb and pull up, away from the dough in the bowl, then pull it across to the opposite side of the bowl and push it down. You are stretching the dough out to help develop gluten which provides structure and folding to distribute the gluten bonds across the loaf.
Step 4: Repeat the Stretch and Folds
Do 8 - 12 sets of these, rotating 90 degrees with each stretch and fold. You will notice the dough getting tighter and harder to stretch with each stretch and fold. If it's not getting tighter, continue with a few more stretch and folds to build up the structure more.
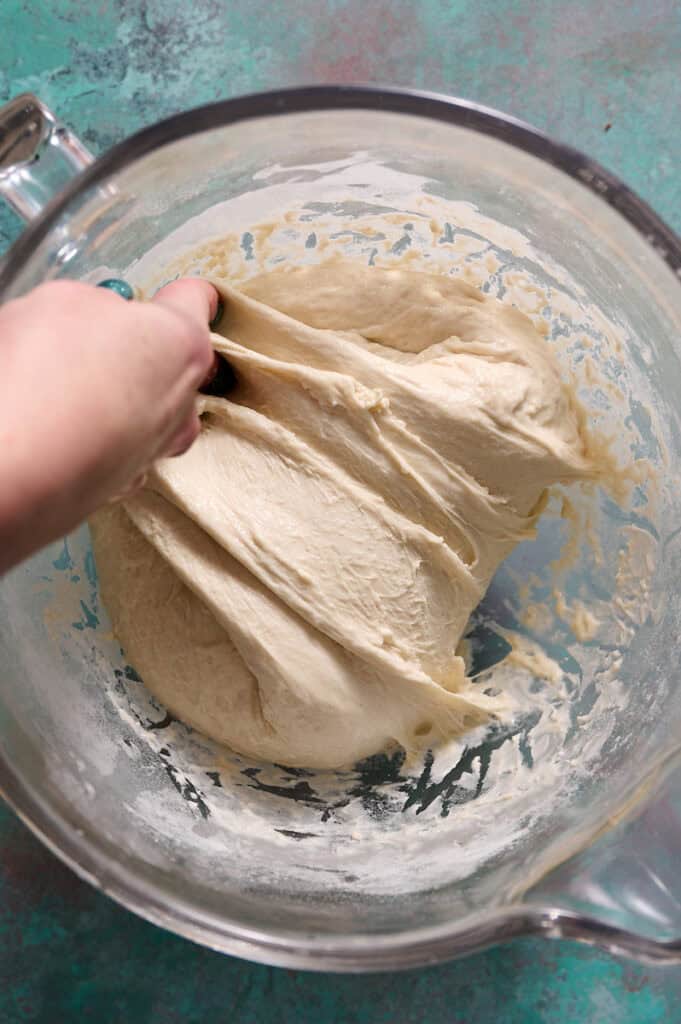
After you complete the first set of stretch and folds, set a timer for 1 hour then after an hour do another set of 6 - 8 stretch and folds.
Then set a timer for an hour again, then another round of 6 - 8 stretch and folds.
And one more hour timer and wrap up with one last (fourth) round of stretch and folds.
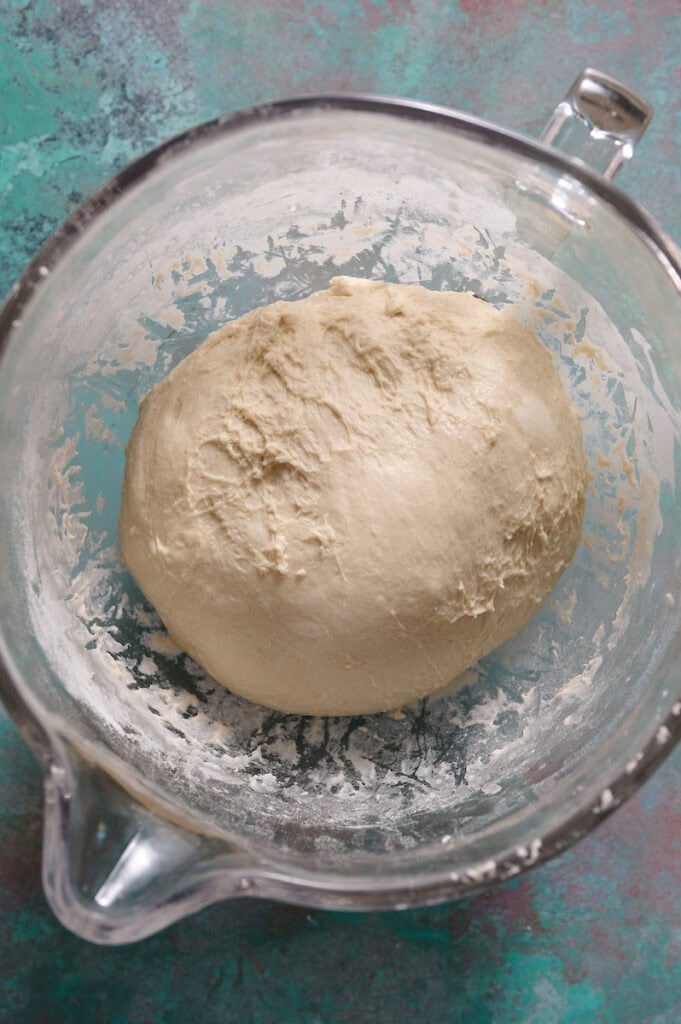
Step 5: Bulk Fermentation
Once you've completed stretch and folds, cover the bowl of dough and let it sit at room temperature to undergo bulk fermentation. This is the process of all the wild yeast eating up the starches and sugars in the flour and producing gasses to help leaven the bread. Simultaneously, they're also converting those sugars to acid, creating the signature sour flavor. Your dough will expand in size and you'll see all the little air bubbles along the side of the bowl developing.
This process can take anywhere from 3 hours to 12 hours depending on the temperature of your environment and behavior of your starter. A warmer room (75F+) will cause a faster rise where a colder room (less than 70F) will take more time.
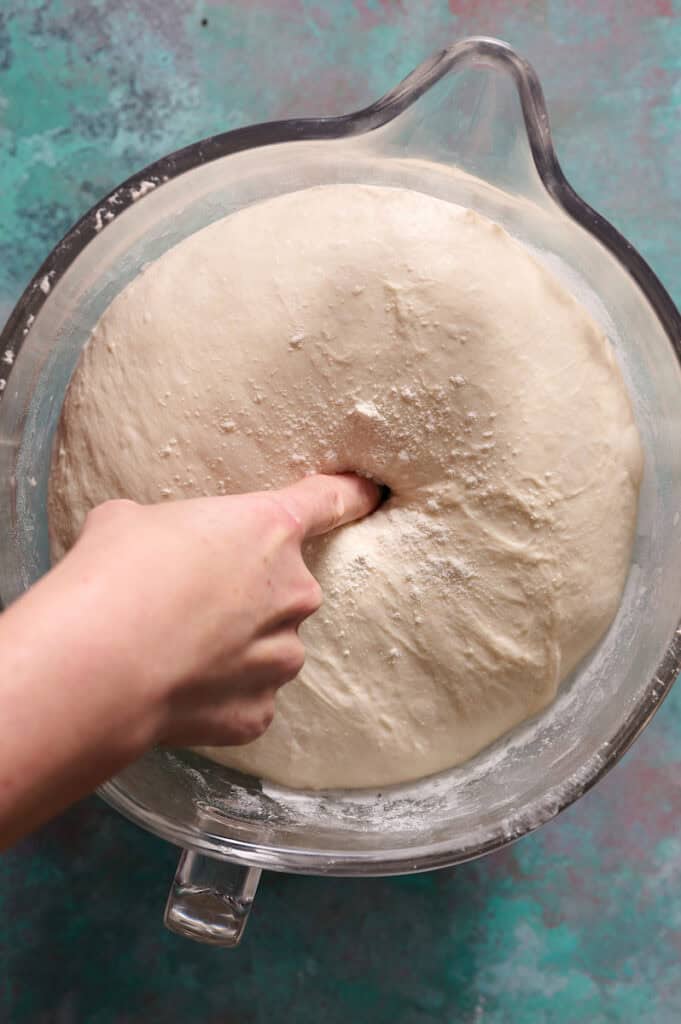
Step 6: Knowing when Bulk Fermentation Is Done
There are lots of different suggestions I've seen for confirming bulk fermentation is done. After years of sourdough experience, you'll know it when you see it. One way that has predictably worked well for me over the years is The Dome, The Jiggle and The Poke Test.
The dome means that the dough is domed on top. If it's flat and ripply, that likely means you'v overproofed and you can use the dough to make focaccia. But, properly proofed for a loaf is still smooth across the top, pulling away from the edges and has a dome to it, but also while being "jiggly" when you shake the bowl. If it's domed and but doesn't jiggle, let it keep fermenting. If it's domed and it jiggles, then confirm with the "poke test" pressing a floured index finger into the dough to the first knuckle, then take it out and if the dough quickly springs right back, it's still under proofed. If it slowly fills back in, then you're right on target and ready to move to the next step.
Properly proofing in the bulk fermentation step is one of the most important factors in a quality crumb in your final loaf and effective oven-spring when you're baking.
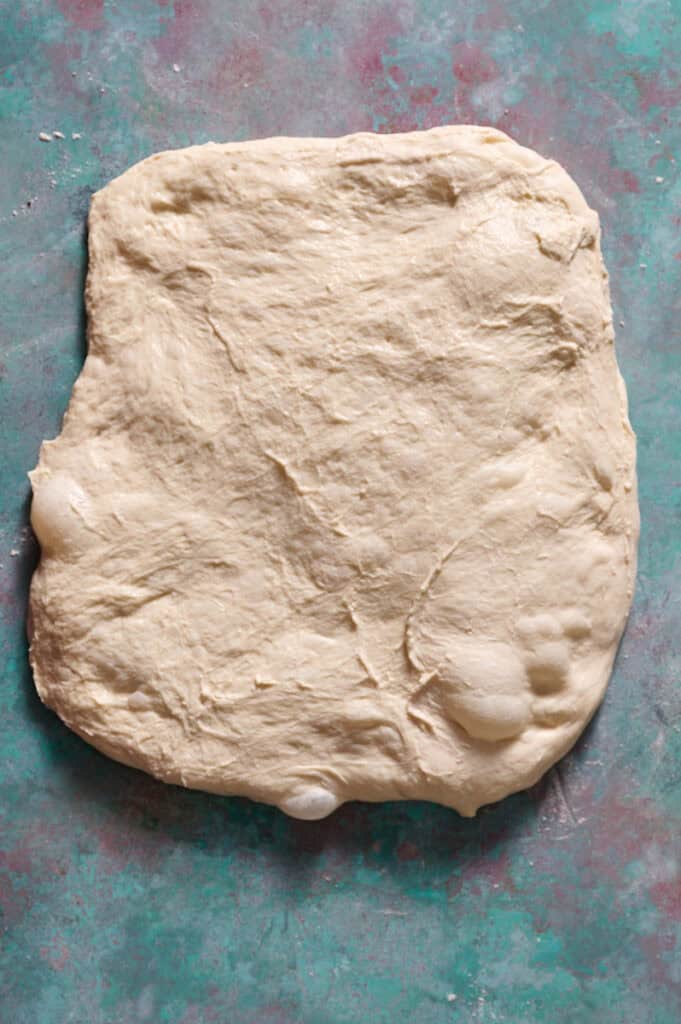
Step 7: Transfer the Dough to the Work Surface for Shaping
Carefully remove the dough from the bowl. I run a silicone dough scraper around the edges of the bowl to help free it and gently help it fall out onto a floured work surface. Too much ripping and pulling of the dough can dammage the gluten strands that have formed and weaken the structure of your final loaf. Gently stretch it into a quasi-rectangle shape.
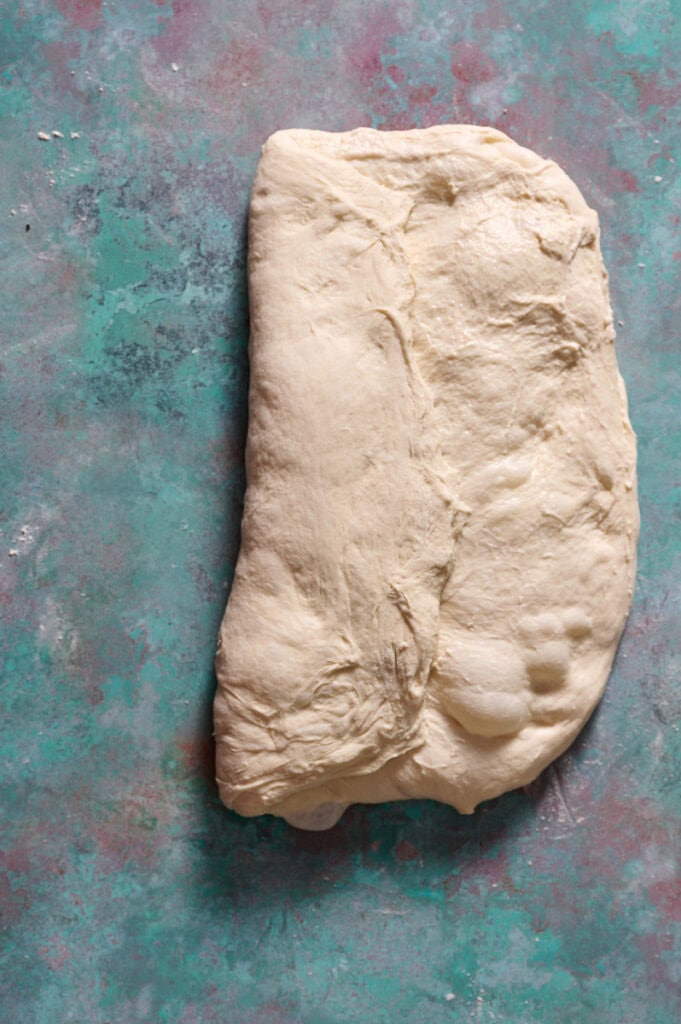
Step 8: Folding the Dough
Fold one side of the dough toward the center.
Step 9: Continue Folding the Dough
Fold the other side of the dough toward the center and fold the top down several inches to "close off" the top edge.
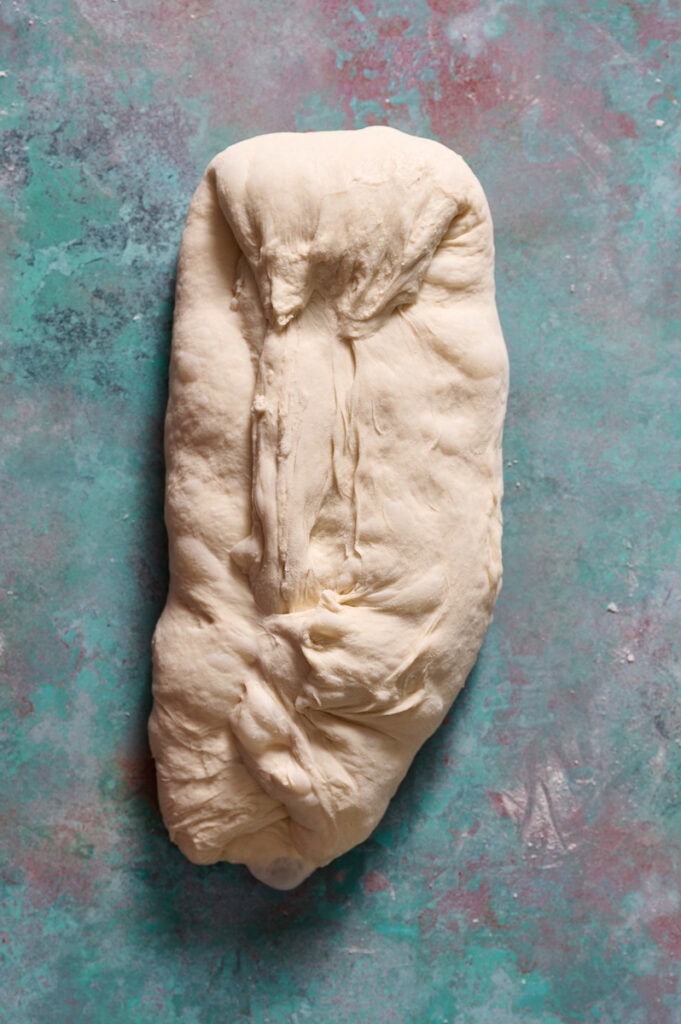
Step 10: Roll the Dough into a Log
Roll up the dough from the bottom toward the top into a log.
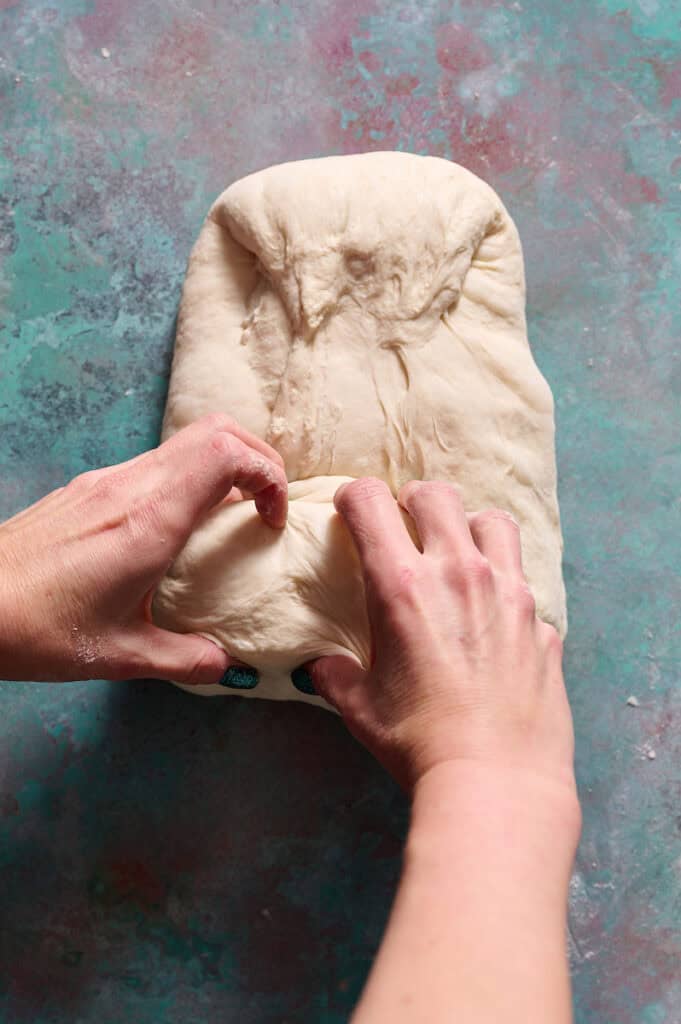
Step 11: Shape the Log into a Large Ball
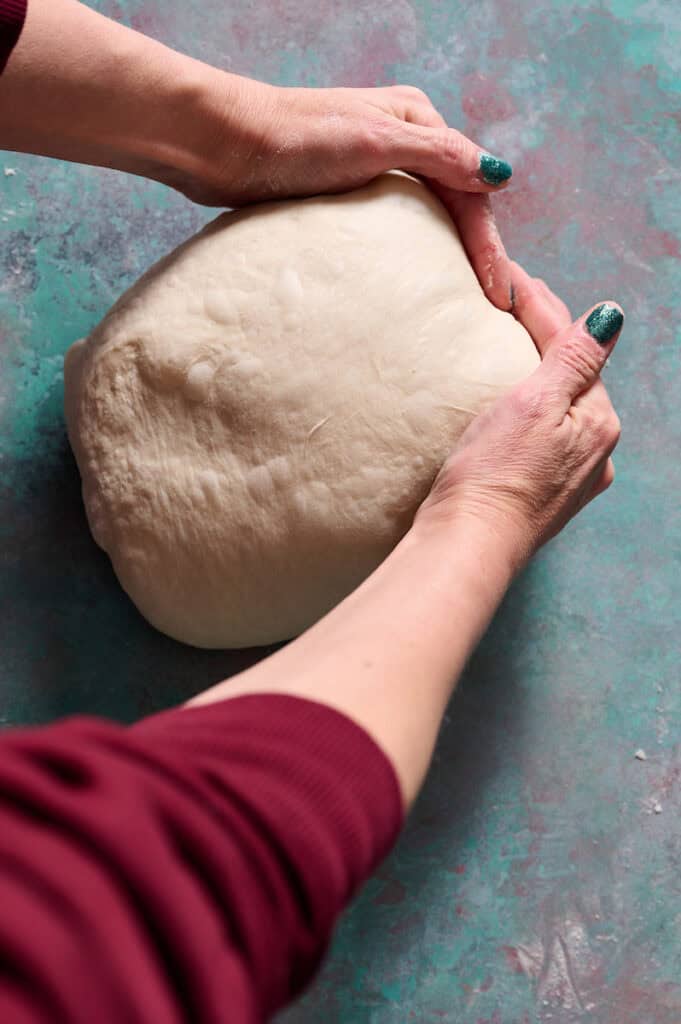
Take the log and cup your hands around the far edge and pull the loaf toward you, turning it in a slightly circular motion so as to create tension across the top of the loaf's surface and to round out the loaf into a more circular shape.
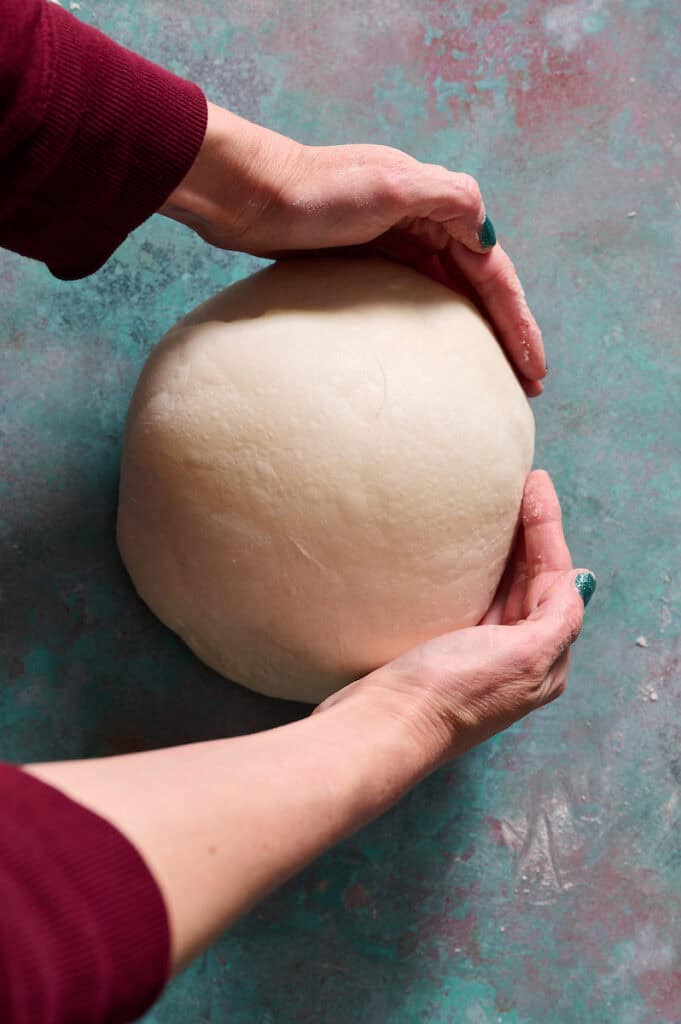
Step 12: Finish Shaping the Dough Ball
Gently continue the pulling and circular motions with the loaf until it's round and smooth on top. Careful not to pull too hard and cause the surface to break or tear. This is one of the hardest steps in the whole recipe.
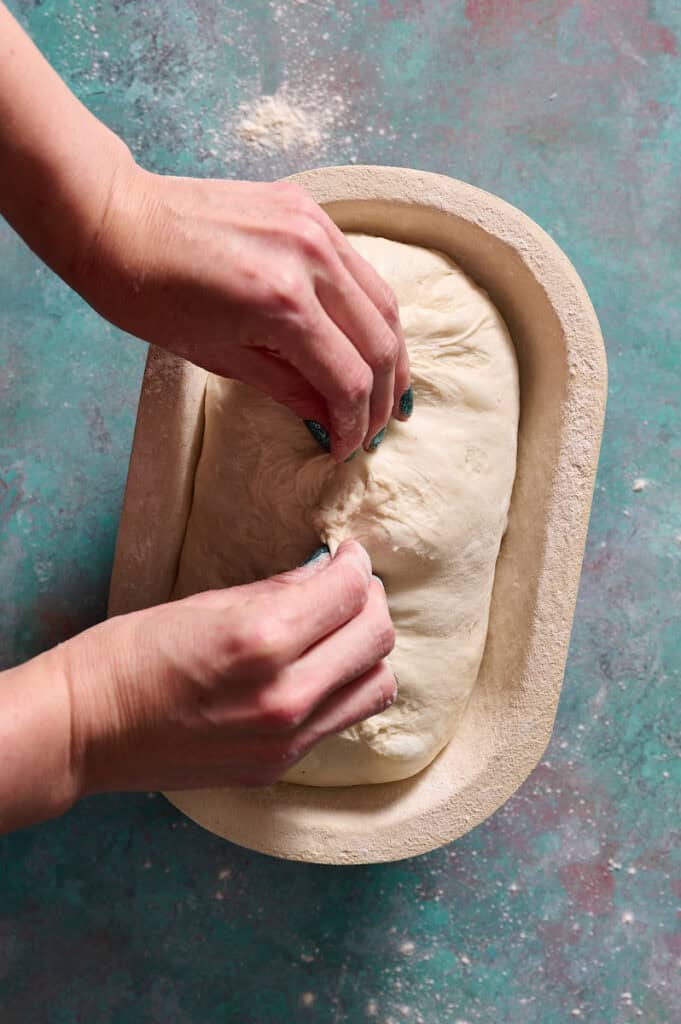
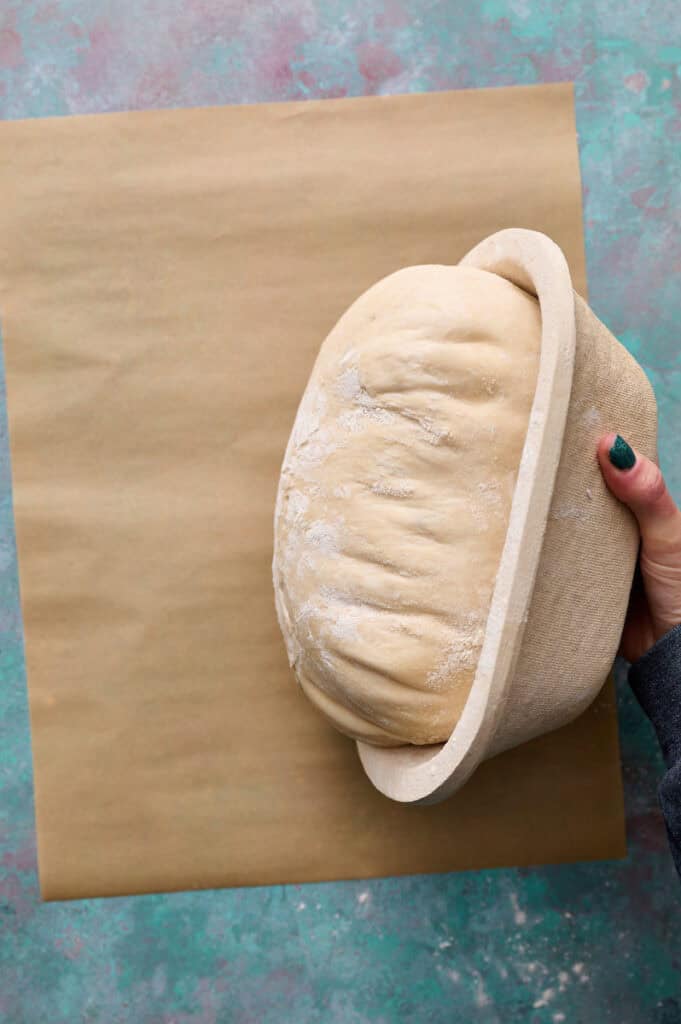
Step 13: Place the Dough in a Proofing Basket
Scoop the loaf up (a dough scraper can make this easier) and drop the loaf seam side up into your banneton / proofing basket. Then pinch the seam closed to help create a little extra surface tension.
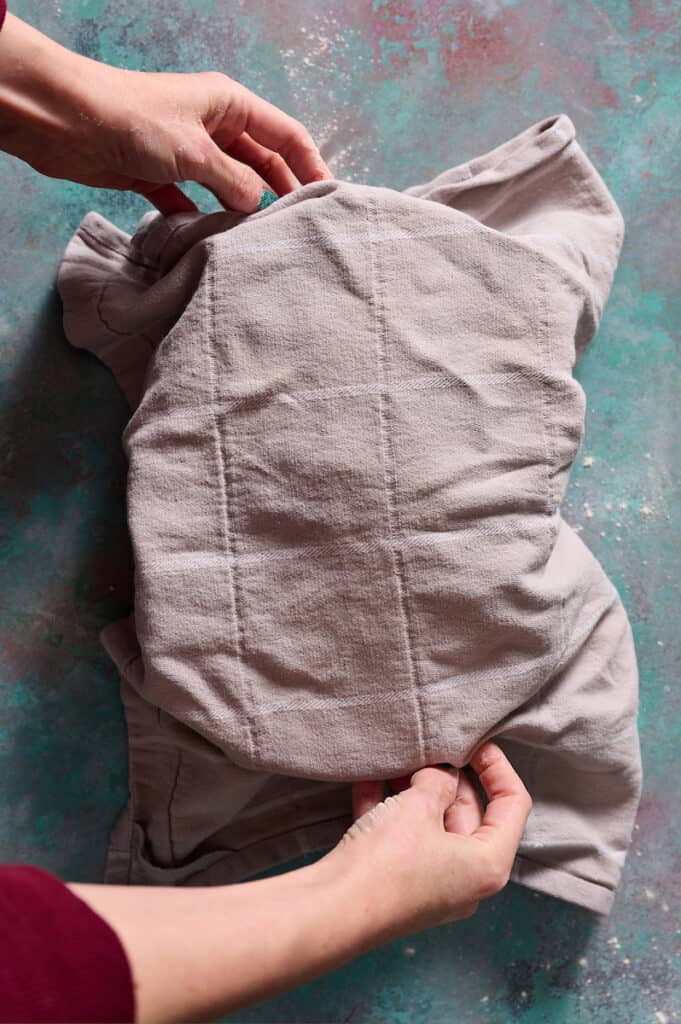
Step 14: Cover and Refrigerate
Cover the loaf with a clean kitchen towel, keeping it semi-loose so that the dough can expand.
Then place the covered dough into the refrigerator for 8 - 24 hours for cold proofing.
Cold proofing slows down fermentation, giving your dough deeper flavor and a stronger structure. It also makes the dough easier to handle and improves oven spring for a beautifully baked loaf. It needs at least 8 hours to take advantage of this process. But more than 24 hours cold proofing can start to impact the effectiveness and will results in an over-proofed loaf.
Step 15: Turn Out the Dough
Once you're ready to bake, place the dutch oven into the oven and preheat to 450F, keeping it at that temp for at least 30 minutes to get fully hot. We want the dutch oven screamin' hot when the loaf goes in to help encourage oven spring and a quality crust.
Then when it's time to bake, turn the loaf out onto a piece of parchment paper, seam side down.
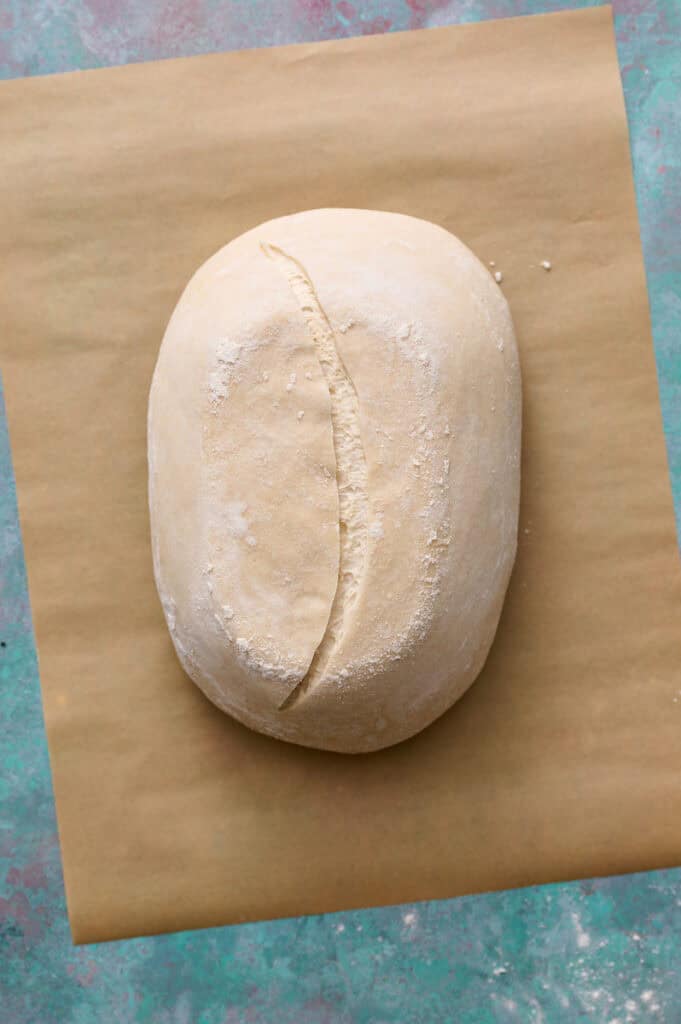
Step 16: Score the Loaf
Using a bread lame or straight razor, cut a score across the top of your loaf. I score at a slightly rounded line which mimics the curvature of the loaf.
Scoring gives the dough a controlled place to expand in the oven so it rises upward instead of bursting unpredictably. It also adds an attractive, signature pattern to the finished loaf.
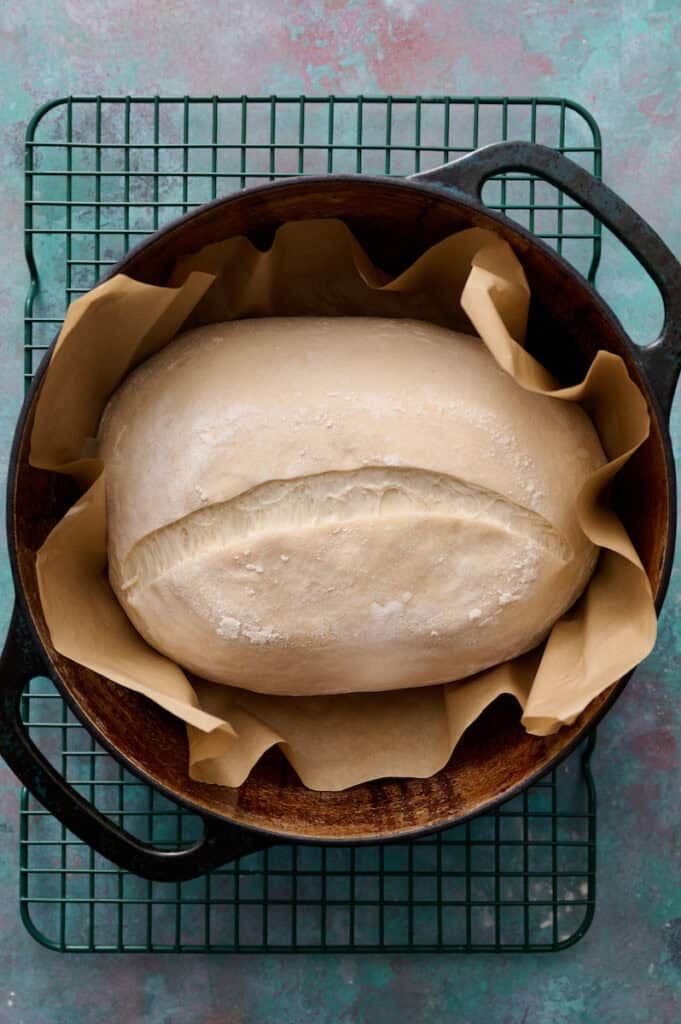
Step 17: Place the Loaf into the Dutch Oven
Carefully, using oven mitts, remove the hot dutch oven from the oven and pulling up with the sides of the parchment, place your loaf into the dutch oven. Also toss 2 or 3 ice cubes into the sides of the dutch oven to help create steam while the loaf bakes which helps form a lovely crust. Put the lid on the dutch oven and place the whole thing into the 450F oven for 15 minutes.
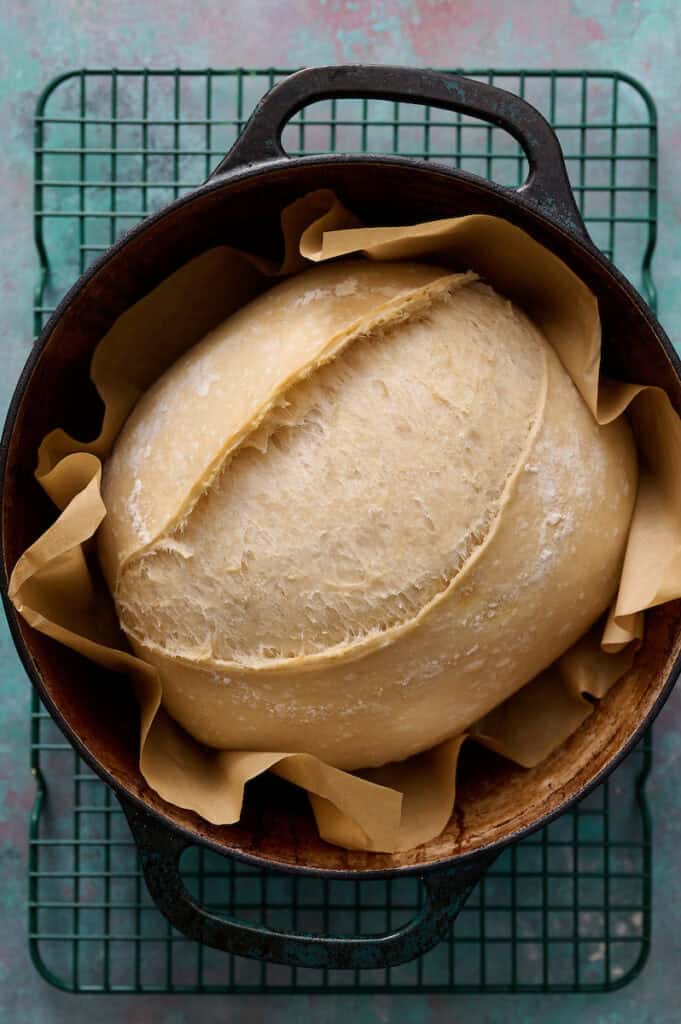
Step 18: Remove the Lid
Also known as the "moment of truth" when you see how well your loaf expanded during the initial baking process. Remove the lid, and either continue to bake the loaf for another 15 - 20 minutes or until the internal temperature reaches between 200F and 210F. Or, I like to at this step insert my instant read thermometer probe and set the alarm to sound when the bread reaches 205F. Relying on temperature, not time.
Step 19: Remove the Loaf and Cool
Once your loaf reaches the final temperature, remove the loaf from your dutch oven and place it on a cooling rack to finish cooling at room temperature. I wait at least an hour before slicing in so as to help keep all the moisture trapped inside instead of escaping as steam. This helps keep your bread moist when you slice it.
Sample Sourdough Schedule
Sourdough isn't labor-intensive; it's time-intensive. Most of the work is waiting! Use this schedule as a guide, but remember that temperature is the single biggest factor. If your kitchen is warmer than 75°F (24°C), your times will be shorter; if it's colder, they will be longer. Always rely on the tests I share in the instructions below over the clock.
Morning: Mix Day (8:00 AM): Start by mixing the peaked starter, water, flour, and salt. Allow the dough to rest for 30 minutes (the initial Autolyse period).
Mid-Morning: Building Structure (8:30 AM - 12:30 PM): This is the time for your Stretch & Folds (4 Sets total). The first set (8-12 Folds) happens after the 30-minute rest. The 2nd, 3rd, and 4th sets (6-8 Folds) happen every 60 minutes thereafter. This phase takes about 4 hours.
Afternoon/Evening: Flavor Development (12:30 PM - 8:00 PM): This is the Bulk Fermentation period, which can take anywhere from 3 to 8+ hours. Time varies greatly! Rely on the dome, jiggle, and poke test to determine doneness, not the clock.
Late Evening: Shaping (8:00 PM): Once bulk fermentation is complete, transfer, shape, and place the dough into your banneton. Be gentle to preserve all those beautiful bubbles.
Overnight: Cold Proof (8:15 PM - 8:00 AM): Place the dough in the refrigerator for Cold Proofing for 8–12 hours (up to 24). This develops deep flavor and firms up the dough for easier handling.
Next Day: Bake Preparation (8:00 AM): Place your Dutch Oven in the oven and preheat to 450F (230F) for a full 30 minutes. A hot oven helps promote oven spring.
Bake (8:30 AM - 9:05 AM): Score the loaf, then bake covered for 15 minutes, and then uncovered for another 15–20 minutes. The loaf is done when the internal temperature reaches between 200F and 210F.
Cool (9:05 AM Onward): Place the loaf on a cooling rack for at least 1–2 hours. Do not slice immediately! Waiting ensures the moisture is trapped, giving you that moist, shiny, crumb.
Endless Riffs: Variations on the Base
Once you've nailed the basic loaf, this dough becomes a canvas. The key with most add-ins (aka inclusions): incorporate them at the last set of stretch and folds so they're evenly distributed without disrupting gluten development.
Jalapeño Cheddar — Add one 4oz can of diced jalapeños (drained) and 100g shredded cheddar during your last set of stretch and folds before bulk fermentation. The folds distribute everything evenly without deflating the dough.
Croissant Loaf — Buttery, flaky layers without the lamination fuss. Use a cheese grater to grate 1 stick (½ cup) cold unsalted butter and stash it in the freezer until you're ready. Sprinkle the frozen grated butter into the dough during your last set of stretch and folds. It melts into pockets during baking, creating those rich, croissant-like layers.
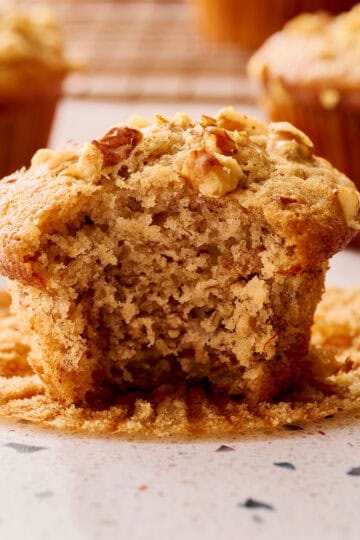
Apple Cinnamon Raisin — A fall favorite that makes the house smell incredible. Add 50g rolled oats to the initial dough during autolyse. During your last stretch and fold, mix in 100g diced Granny Smith apple and 100g raisins (or leave the raisins out if that's not your thing). Then during shaping, once you've spread the dough into a rectangle, sprinkle a mixture of 1½ teaspoon cinnamon and 50g brown sugar across the surface before rolling and shaping as usual.
Extra riff: Swap the water for apple cider! It deepens the apple flavor beautifully.
Top Tip
Experimentation is the name of the game. Things go wrong, bake it anyway because ya never know! And too, bread that isn't technically perfect is still totally delicious.
How to Store Homemade Bread
Proper storage is key to maintaining your loaf's crust and crumb.
Countertop Storage (Short-Term)
- Rule 1: No Fridge! Never refrigerate your sourdough bread. The cold temperature dries out the bread rapidly and ruins the texture.
- The Cut Side: To prevent drying, press the cut side of the loaf flat against a clean cutting board, or wrap it tightly with a beeswax wrap or plastic wrap.
- Whole Loaf: A whole, uncut loaf stays fresh for 1-2 days. Use a linen or paper bag for breathability.
- Longevity: Stored properly at room temperature, your loaf will taste great for 3–4 days.
Freezing (Long-Term)
- Cool First: Ensure the loaf is 100% cool before freezing.
- Slice & Wrap: Slicing the loaf first is recommended for convenience. Wrap the portions tightly in plastic wrap, followed by aluminum foil or a heavy-duty freezer bag.
- Thawing: Toast slices directly from frozen. A whole loaf can be thawed at room temperature.
- Longevity: Sourdough keeps well in the freezer for up to 3 months.
Joanie's Balanced Bites: What to Eat with Sourdough Bread
Our family is mindful of blood sugar and the fermentation process makes sourdough bread gentler on blood sugar than conventional bread, but we still apply the Power of the Plate philosophy: coat your carbs by pairing your slice with protein, fiber, or healthy fat.
My go-to pairings:
- Avocado slices and sprouts for epic toast
- An easy egg scramble with cheese and sauteed veggies
- Alongside my favorite low-carb Beef Stew
Browse ➡️ Blood Sugar-Friendly Recipes

Description
| This is the reliable process for my standard artisan sourdough loaf. Designed for manageable 70% true hydration, this method consistently delivers an outstanding, practical crumb that is perfect for slicing. |
Ingredients
- 150g peaked sourdough starter
- 325g filtered room temperature water
- 500g unbleached bread flour
- 9g fine sea salt
Instructions
- Mix Starter and Water (Hydration): Combine 150g of peaked sourdough starter with 325g filtered room temperature water and mix until the water appears milky.
- Add Flour and Salt: Add 500g of unbleached bread flour and 9g of fine sea salt and mix until you get a shaggy dough with no dry spots. Cover the bowl and leave the dough at room temperature for the 30-minute autolyse rest.
- Stretch and Folds (Initial Set): Once the 30 minutes has elapsed, dampen your fingers and perform 8 - 12 sets of stretch and folds, rotating the bowl 90 degrees with each fold.
- Repeat Stretch and Folds (Structure Building): Set a timer for 1 hour. After an hour, do another set of 6 - 8 stretch and folds. Repeat this process two more times (for a total of four rounds of stretch and folds, separated by 1 hour rests). As you do your stretch and folds, you should find the dough getting progressively stronger and has more resistance to stretching with each additional stretch. This is a good sign of strong gluten development.
- Bulk Fermentation: Cover the bowl and let the dough undergo bulk fermentation at room temperature. This can take anywhere from 3 to 12 hours depending on the temperature of your environment.
- Confirm Fermentation is Done: The dough is ready when it is domed, "jiggly," and passes the Poke Test (a floured finger indentation slowly fills back in (see details in step 6 photo above).
- Transfer: Carefully transfer the dough onto a lightly floured work surface. Gently stretch the dough into a quasi-rectangle shape.
- Folding and Rolling (Shaping): Fold the sides of the dough toward the center and the top edge down a few inches. Then, roll up the dough from the bottom toward the top into a log.
- Develop Tension: Cup your hands around the dough and pull it toward you, turning it in a slight circular motion to create tension and a smooth, round top surface.
- Place in Proofing Basket: Scoop the loaf up and drop the loaf seam side up into your banneton. Pinch the final seam closed.
- Cold Proof: Cover the loaf with a kitchen towel and place it into the refrigerator for 8 - 24 hours for cold proofing.
- Preheat Oven: Place the Dutch Oven into the oven and preheat to 450F (232C) for at least 30 minutes. The Dutch Oven must be screaming hot before adding the loaf.
- Turn Out and Score: Turn the loaf out onto a piece of parchment paper, seam side down. Use a lame or razor to cut a score across the top of your loaf.
- Bake Covered: Carefully place your loaf (using the parchment paper) into the hot Dutch Oven. Toss 2 or 3 ice cubes into the sides for steam. Using an oven mitt, put the lid on and bake at 450F for 15 minutes.
- Bake Uncovered: Remove the lid, reduce the oven heat to 400F (205C) and insert the probe of your digital instant-read thermometer into the center of the loaf. Continue to bake until the internal temperature reaches 200F to 210F (Tip: Set your thermometer alarm to 205F so you can walk away and wait for the signal!)
- Cool: Remove the loaf from the Dutch Oven and place it on a cooling rack to cool at room temperature for at least one hour before slicing.
Nutrition
- Serving Size: 1 slice
- Calories: 130
- Sugar: 0.1 g
- Sodium: 218.7 mg
- Fat: 0.6 g
- Carbohydrates: 26.1 g
- Fiber: 0.9 g
- Protein: 4.3 g
- Cholesterol: 0 mg


Elana Iaciofano says
Do you place the dough straight from the fridge into the oven? As in, you don’t allow it to come to room temp before baking?
Joanie Simon says
I've done it both ways and there hasn't been much difference for my bakes. Color and rise seem consistent regardless, so for the most part I just go straight from the fridge to the oven. Lemme know how it goes on your end!
Elana Iaciofano says
I've been making sourdough for years, and this was my most successful loaf using Joanie's recipe. I squealed with glee upon cutting it open! It was perfectly fluffy, squishy and crunchy in allllll the right places. Love the pro tip of adding ice cubes.
Maria says
Hi Joanie,
I used your recipe to make this bread last weekend. The result was amazing. It is the best loaf of sourdough bread I have made to date and I have been making sourdough bread for fifteen years. It is crusty, chewy and delicious with the perfect crumb. The bread is lovely when used fresh but it also makes great toast.
Your step by step recipe is detailed, but easy to follow and the photos very helpful. Beginner sourdough bread makers will find your recipe especially useful.
As requested by my family, your discard bagels and cinnamon rolls are next on my 'To Make' list .
I will be working my way through your very tempting sourdough recipes- thank you for sharing.
Cheers,
Maria
from Adelaide, South Australia.
Joanie Simon says
Maria, this is so amazing and to know that my recipe made it to Australia! Wowzers! Love it <3