Description
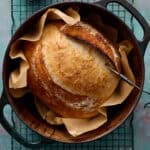
| This is the reliable process for my standard artisan sourdough loaf. Designed for manageable 70% true hydration, this method consistently delivers an outstanding, practical crumb that is perfect for slicing. |
Ingredients
- 150g peaked sourdough starter
- 325g filtered room temperature water
- 500g unbleached bread flour
- 9g fine sea salt
Instructions
- Mix Starter and Water (Hydration): Combine 150g of peaked sourdough starter with 325g filtered room temperature water and mix until the water appears milky.
- Add Flour and Salt: Add 500g of unbleached bread flour and 9g of fine sea salt and mix until you get a shaggy dough with no dry spots. Cover the bowl and leave the dough at room temperature for the 30-minute autolyse rest.
- Stretch and Folds (Initial Set): Once the 30 minutes has elapsed, dampen your fingers and perform 8 - 12 sets of stretch and folds, rotating the bowl 90 degrees with each fold.
- Repeat Stretch and Folds (Structure Building): Set a timer for 1 hour. After an hour, do another set of 6 - 8 stretch and folds. Repeat this process two more times (for a total of four rounds of stretch and folds, separated by 1 hour rests). As you do your stretch and folds, you should find the dough getting progressively stronger and has more resistance to stretching with each additional stretch. This is a good sign of strong gluten development.
- Bulk Fermentation: Cover the bowl and let the dough undergo bulk fermentation at room temperature. This can take anywhere from 3 to 12 hours depending on the temperature of your environment.
- Confirm Fermentation is Done: The dough is ready when it is domed, "jiggly," and passes the Poke Test (a floured finger indentation slowly fills back in (see details in step 6 photo above).
- Transfer: Carefully transfer the dough onto a lightly floured work surface. Gently stretch the dough into a quasi-rectangle shape.
- Folding and Rolling (Shaping): Fold the sides of the dough toward the center and the top edge down a few inches. Then, roll up the dough from the bottom toward the top into a log.
- Develop Tension: Cup your hands around the dough and pull it toward you, turning it in a slight circular motion to create tension and a smooth, round top surface.
- Place in Proofing Basket: Scoop the loaf up and drop the loaf seam side up into your banneton. Pinch the final seam closed.
- Cold Proof: Cover the loaf with a kitchen towel and place it into the refrigerator for 8 - 24 hours for cold proofing.
- Preheat Oven: Place the Dutch Oven into the oven and preheat to 450F (232C) for at least 30 minutes. The Dutch Oven must be screaming hot before adding the loaf.
- Turn Out and Score: Turn the loaf out onto a piece of parchment paper, seam side down. Use a lame or razor to cut a score across the top of your loaf.
- Bake Covered: Carefully place your loaf (using the parchment paper) into the hot Dutch Oven. Toss 2 or 3 ice cubes into the sides for steam. Using an oven mitt, put the lid on and bake at 450F for 15 minutes.
- Bake Uncovered: Remove the lid, reduce the oven heat to 400F (205C) and insert the probe of your digital instant-read thermometer into the center of the loaf. Continue to bake until the internal temperature reaches 200F to 210F (Tip: Set your thermometer alarm to 205F so you can walk away and wait for the signal!)
- Cool: Remove the loaf from the Dutch Oven and place it on a cooling rack to cool at room temperature for at least one hour before slicing.
Nutrition
- Serving Size: 1 slice
- Calories: 130
- Sugar: 0.1 g
- Sodium: 218.7 mg
- Fat: 0.6 g
- Carbohydrates: 26.1 g
- Fiber: 0.9 g
- Protein: 4.3 g
- Cholesterol: 0 mg